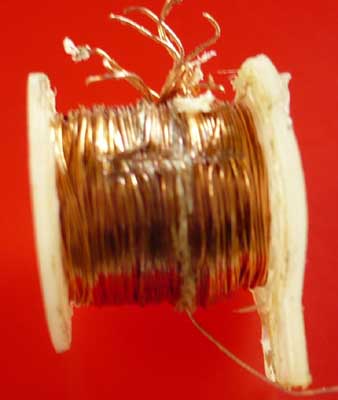
models 120/160, -A, -B, -Bb, -C, -D, and Century 21
Ich wollte eine spielende Single unterbrechen und habe dazu den
roten REJECT Knopf auf der Rückseite gedrückt, dass funktionierte auch.
Danach habe ich den Deckel aufgemacht und zuerst den obersten Knopf am
Münzprüfer, dann den unteren Knopf gedrückt. Danach kam auf einmal ein
merkwürdiges Geräusch.
Nun hat die Jukebox Prestige 120D keine
Anzeige mehr, es können keine Platten ausgewählt werden. Der Knopf, mit dem ich
vor und zurück steppen kann, macht auch nichts mehr. Der Schlitten der die
einzelnen Platten greift, hat noch Strom und fährt noch von links nach rechts.
Soweit ich davon einigermaßen Ahnung habe, sind die Sicherungen alle OK.
Antwort:
Wenn ich das richtig verstehe, leuchtet die "Wähle"
Anzeigelampe nicht und die Tasten rasten nicht ein.
Sofern beide Taster am
Münzprüfer nicht reagieren, ist höchstwahrscheinlich doch die Sicherung im 30V=
Kreis unterbrochen (von den zwei Sicherungen die ganz rechte; 2A träge).
Wichtig: die Sicherungen nicht nur mittels Sichtkontrolle, sondern auf
Durchgang prüfen.
Öffne bitte auch mal den Deckel des
Speicherwerks (grauer, quadratischer Kunststoffkasten an der inneren Rückwand).
Im unteren Bereich befindet sich der Subtraktionsmagnet, der einen
Kunststoffhebel mit Wischkontakt betätigt.
Schau bitte nach,
ob diese Magnetspule verbrannt aussieht oder verbrannt riecht. Evtl. könnte auch
der Hebel an der Verbindung zum Spulenkern gebrochen sein.
Die
Steckverbindung unterhalb des Speicherwerks vorsichtig abziehen, und den
Pertinaxstecker mit Spiritus o.ä. reinigen - nicht schmirgeln!
I wanted to interrupt a playing record
and pressed the red REJECT button on the back, which worked fine.
Then I opened the lid and first pressed the top button on the slug rejector,
then I pressed the the bottombutton. After that, all of a sudden a strange noise
occured.
Now the jukebox Prestige 120D shows an empty display, no records can be selected.
The button that lets me step back and forth doesn't do anything anymore either.
The carriage that gets the selected records still has power and still moves from
left to right.
As far as I can tell, the fuses are all OK.
Response:
If I understand correctly, the "select" indicator light is not lit and the
buttons do not engage.
If both buttons on the slug rejector do not respond, it is most likely that the
fuse in the 30V= circuit is blown (of the two fuses, the most right one; 2A
slow-blow).
Important: Check the fuses not only by visual
inspection, but also for continuity.
Please also open the lid of the credit
unit (gray, square plastic box on the inner rear wall).
In the lower area there is the subtraction solenoid, which operates a plastic
lever with a wiper contact.
Please check if this solenoid looks burnt or smells burnt. Eventually also the
lever at the connection to the coil core might be broken.
Carefully pull off the plug connection below the credit unit and clean the
Pertinax plug with
ethyl alcohol
or similar - do not sand!
models with Serenade technology
Hinweis: die Nockensteuerung dabei NIE im Uhrzeigersinn drehen, da sonst der Kontaktsatz beschädigt wird, die Nockenkontakte vorsichtig reinigen und die Kontakte am Stellmagneten (links unten am Magazin) reinigen.
Wenn die Nockensteuerung durch defekte Riemen vor der Ruheposition stehen bleibt, besteht Gefahr, dass Wahlspulen beschädigt werden.
Note: NEVER turm the cam control clockwise. The set of contact will get damaged. Clean the contacts of the cam carefully as well as the contacts at the operating magnet (left at bottom of carriage).
If the cam control stops of broken rubber belts theer is a risk that the selector coils get damaged.
models 120/160, -A, -B, -Bb, -C and -D, Century 21
Der Schlitten meiner Consul 120 findet manchmal die gewählte
Platte nicht, fährt zweimal hin und her und schaltet sich dann aus.
Antwort:
Einen Defekt in der
Steuerzentrale würde ich zunächst ausklammern.
Zuerst solltest Du das
Kreditwerk beobachten (kleiner grauer Kasten mit "NSM" Aufschrift). Bei jeder
getätigten Wahl muss der Subtraktionsmagnet kurzzeitig anziehen und über einen
Kunststoffhebel einen Wischkontakt schließen.
Sollte dies nicht immer
einwandfrei funktionieren, so ist der Fehler hier zu suchen!
In diesem
Fall musst Du
1. den Wischkontakt im Kreditwerk und
2. den
Anschlussstecker des Kreditwerks reinigen.
3. Außerdem unbedingt den
Nockenkontakt N2 unter der linken Abdeckung neben dem Plattenmagazin reinigen.
Zur
Reinigung am besten Relaisreinigungsstäbchen verwenden. Kein Schmirgelpapier o.ä.!!!
The carriage of my Consul 120 sometimes
does not find the selected record, it scans back and forth twice and then turns
off.
Response:
In first step I would exclude a defect in the control centre.
First you should observe the credit unit (small gray box with "NSM" inscription).
With each selection, the subtract solenoid must attract briefly and close a
wiper contact via a plastic lever.
If this does not always work properly, the fault has to be looked for here.
In this case you need to
1. clean the wiper contact in the credit unit and
2. clean the connector of the credit unit.
3. In addition it is absolutely needed to clean the cam contact N2 under the
left cover next to the record magazine.
For cleaning it is best to use relay cleaning sticks.
No sand paper or similar!!!
Modelle 120/160, -A, -B, -Bb, -C und -D, Century 21
models 120/160, -A, -B, -Bb, -C and -D, Century 21
Ich besitze
eine NSM Prestige 160 (Verstärker 70S, Steuerzentrale laut Stempel auf dem
Chassis Baujahr Juni 1972), die bis vor wenigen Tagen einwandfrei funktioniert
hat. Neuerdings stoppt der Schlitten nicht mehr an der Position der angewählten
Platte, sondern fährt nur zweimal hin und her und stoppt dann an der
Ruheposition rechts außen.
Ich habe alle Sicherungen überprüft (auch die
in der Steuerzentrale auf LP3), sie sind in Ordnung. Der Subtraktionszähler
zählt soweit ich das erkennen kann sauber herunter; dass eine Platte gespielt
werden sollte, wird also "bemerkt".
Antwort:
Bitte
überprüfen Sie zuerst, ob auf LP III alle angegebenen Spannungen vorhanden sind
(ca. 300V und 150V stabilisiert; Spannungen gg. Masse gemessen). Sollten diese
nicht vorhanden sein, oder erheblich abweichen, liegt ein Defekt der
Steuereinheit vor.
Sofern hier aber alles in Ordnung sein sollte,
überprüfen Sie zunächst, ob der Einschreib-/ Trigger-Kontakt im Kreditwerk (mit
der Subtraktionsspule mechanisch gekoppelt) einwandfrei arbeitet und reinigen
Sie die Steckkontakte des Kreditwerks.
Zwischenantwort:
Ich
habe die Spannungen auf LPIII gemessen und habe folgende Werte erhalten:
Messpunkt M1, Einschreiben, Abfrage: statt der angegebenen 300V ca. 210 V
Messpunkt M2: angegebene 135V werden erreicht.
Weiteres Vorgehen:
Die Ursache für die zu
niedrige Einschreib- bzw. Abfragespannung liegt höchstwahrscheinlich an defekten
Elkos der Spannungs- Verdopplerschaltung. Diese sind im Schaltbild und auf der
Platine LP III mit C7 und C8 gekennzeichnet; der Wert beträgt 16 µF, 450/500V.
Beim Austausch darauf achten, dass möglichst zwei identische (gleicher
Hersteller) und auch gute, neue Typen verwendet werden.
Passender Ersatz:
axialer Hochvoltelko 15µF/450V 
Gleichzeitig sollte außerdem
der Elko C4, 8 µF, 350V (Ersatz 10 µF 350V) getauscht werden.
Passender
Ersatz:
axialer Hochvoltelko 10µF/450V 
Unbedingt auf
richtige Polung achten!
I own a NSM Prestige 160 (amplifier
70S, control center according to the stamp on the chassis year of manufacture
June 1972), which worked perfectly until a few days ago. Recently, the carriage
no longer stops at the position of the selected record, but only moves back and
forth twice and then stops at the rest position on the far right.
I checked all fuses (also the one in the control center on LP3), they are ok.
The subtraction counter counts down right as far as I can tell; so the fact that
a record should be played is "noticed".
Response:
Please check first if all indicated voltages are present on LP III (approx. 300V
and 150V stabilized; voltages measured against ground). If these are not present,
or deviate considerably, there is a defect in the control unit.
However, if everything is in order here, first check whether the write-in /
trigger contact in the credit unit (mechanically coupled with the subtraction
coil) is working properly and clean the plug contacts of the credit unit.
Feedback:
I measured the voltages on LPIII and got the following values:
Measuring point M1, write-in, query: Instead of specified 300V approx. 210 V.
Measuring point M2: specified 135V are reached.
Further procedure:
The cause for the too low write-in or query voltage is most likely defective
electrolytic capacitors of the voltage doubler circuit. These are marked with C7
and C8 in the circuit diagram and on the LP III board; the value is 16 µF,
450/500V.
When replacing them, if possible make sure that two identical ones (same
manufacturer) and also good, new types are used.
Replacement:
High voltage capacitor 15µF/450V, axial 
At the same
time high voltage capacitors C4, 8 µF, 350V (replacement 10 µF 350V) should be
replaced.
Replacement:
High voltage capacitor 10µF/450V, axial 
Make sure the
polarity is correct!
Modelle 160/120C und 160/120D, Century 21
models 160/120C and 160/120D, Century 21
Anfangs lief die Prestige 120C so wie sie sollte. Jedoch nach
ca. 3 Wochen hat sich der Schlitten die Platten nach der Wahl nicht mehr
geholt, sondern nur 2x das Magazin durchgefahren und ist dann wieder in die
Ruheposition gefahren.
Nach ausgiebigem Studium der Beiträge zu diesem Thema und der Technischen
Unterlagen habe ich nun den Fehler lokalisieren können.
In meinem Fall hat das Abtast-Relais (AT) nach der Wahl nicht mehr angezogen.
Nach einer kurzen "Starthilfe" (einmal den Kontakt von Hand ausgelöst),
funktionierte die Box für ca. 1 Woche, dann ging das ganze wieder von vorne los.
Hatte zuerst das AT-Relais oder die Dioden D13, D14 in Verdacht, nach dem
Nachmessen aber festgestellt, dass diese einwandfrei funktionieren. So blieb nur
die Drossel Dr 3 (130µH) übrig, und die hatte dann auch den Unterbruch.
Nach dem Einbau der neuen Axialdrossel funktioniert das Abtasten des
Magnetspeicher wieder problemlos.
Initially, the Prestige 120C worked as
it should. However, after about 3 weeks, the carriage did not take the records
after the selection, but only scanned 2x and then moved back to the rest
position.
After extensive study of the articles on this matter and the technical
documentation, I have now been able to locate the fault.
In my case, the sensing relay (AT) did not pick up after the selection. After a
short "jump start" (triggering the contact once by hand), the jukebox worked for
about 1 week, then the whole issue started all over again.
I first suspected the AT relay or the diodes D13, D14, but after re-measuring I
found that they work fine. So only the choke Dr 3 (130µH) remained, and this had
then also the interruption.
After the installation of the new axial choke, the scanning of the magnetic
memory works again without problems.
models 160/120C and 160/120D, Century 21
Der Schlitten meiner Prestige 120C findet manchmal die gewählte
Platte nicht, fährt zweimal hin und her und schaltet sich dann aus. Kredit wird
angenommen und auch entsprechend abgebucht.
Antwort:
In der
Prestige 120C wird die Spannung nicht mehr durch eine Leistungs-Zenerdiode,
sondern mittels Zenerdiode und Transistor (T2) erzeugt.
Laut Schaltbild
ist eine ZY150 mit 1,3 Watt verbaut. Die Alternative ZD160 hat ebenfalls
1,3W.
Vorgehen:
1. C4 überprüfen. Zum Testen (Spannung messen) kann man ihn
auch komplett weglassen.
2. Ein defekter C31 (mit Schluss) kann auch das Problem verursachen.
3. Wenn C4 neu ist und die Polung
stimmt, sind die Zenerdiode und der Transistor die Hauptverdächtigen. Dann den
Transistor T2 entfernen. Sind dann ohne T2 immer nur noch 20 Volt über der
Zenerdiode, dann ist diese defekt.
4. R 32 muß 150k haben - überprüfen.
5. Sollte die Spannung ohne T2 korrekt sein, dann T2 tauschen.
The carriage of my Prestige 120C
doesn't recognize the selected song sometimes. scans twice and stops then.
Credit gets established and also subtracted.
Answer:
In Prestige 120C the voltage doesn't get produced by a power zener-diode but by
a zener-diode and a transistor (T2).
Regarding the schematic a ZY150 with 1.3 Watt is mounted. The alternative ZD160
also has 1.3 Watt.
Procedure:
1. Check C4. For testing (measuring voltage) it can be omitted completely.
2. A defective C31 (with short) can also cause this fault.
3. If C4 is a new one and the polarity is right, the zener-diode and the
transistor are the main trouble maker. remove T2 in that case. If without T2
still only 20 Volt are above the zener-diode, then this one is defective.
4. R32 must show 150k - check that.
5. If the voltage without T2 is correct, then replace T2.
models 120/160, -A, -B, -Bb, -C, -D, and Century 21
Ich habe ein Problem mit der NSM Prestige 120 C - folgendes
passiert oder besser, passiert nicht.
Ich kann Ziffer 1, dann 2 und auch A
oder B eingeben (Kredit vorhanden).
Dann läuft der Motor auf dem
Plattengestell an (Wählmotor), es wird Kredit abgezinst und der Schlitten fährt
nach links und wieder zurück und bleibt dann stehen. Also, er findet die Wahl
nicht.
Wie kann ich vorgehen um den Fehler zu finden? Gibt es eine
Möglichkeit zu testen, ob die Magnetkerne hinter dem Schlitten (also die Wahl)
aktiv sind - dann müsste es ja am Schlitten liegen. Obwohl dieser wurde
schon mit einem anderen Fahrwerk getestet, evtl. ist es ja ein Zufall, aber er
ging auch nicht.
Auf dem Netzteil sind ja auch Messpunkte, kann ich dort
etwas testen?
Die Sicherungen sind alle OK.
Antwort
A:
Dies "riecht" nach einem Einschreibproblem.
Auf der
Steuereinheit ist die Einschreib-/Ausleseeinheit. Dort befindet sich auch eine
Sicherung (innen auf der Platine). Bitte diese Sicherung prüfen, und wenn
defekt, durch eine neue ersetzen. In jedem Fall aber den genauen Wert nehmen! Meiner Erinnerung nach handelt es sich dabei um einen äußerst niedrigen
Stromwert (steht aber in den Schaltplänen, die ich jetzt nicht bei der Hand
habe). Die Sicherung bekommst Du nicht in jedem Kaufhaus, sondern nur in
Elektronikläden. Am besten ein paar mehr kaufen. Bitte auch nicht
testweise durch eine höhere Sicherung ersetzen! Wenn die neue wieder zerstört
wird oder die ursprüngliche sogar noch ok ist, kann es an dem
Einschreibkondensator liegen oder dem Treibertransistor, die defekt sind. Du
findest aber auf der Platine auch Messpunkte, um den Fehler einzugrenzen.
Hält die neue Sicherung, sollte Dich das nicht unbedingt nervös machen. Auch
Sicherungen altern, so dass auch gar kein Defekt vorliegen muss. Die alte
Sicherung ist einfach nur "müde" geworden.
Antwort B:
Um den beschriebenen Fehler genauer lokalisieren zu können, sollten zuerst
einige Spannungen in der Steuereinheit gemessen werden. Die zu messenden
Gleichspannungen sind unter die entsprechenden Messpunkte auf der Oberseite des
Chassis und auf LPIII gedruckt (300V= und 150V= stabilisiert).
Sollten diese Werte vorhanden sein, kann man in der Regel davon ausgehen, dass
die Steuereinheit in Ordnung ist!
Als nächstes sollte folgendes beobachtet
werden:
Beim Tätigen einer Wahl (also nach Eingabe der A oder B Taste) muss
die Subtraktionsspule im Kreditwerk (quadratischer, grauer Kasten; nach
aufklappen des Vorderdeckels längliche Spule unten rechts) kurzzeitig anziehen.
Dabei betätigt der Spulenanker über einen Plastikausleger eine
Kontaktschleifbahn oder einen Mikroschalter (je nach Modell), den sogenannten Einschreib-(Trigger) Kontakt.
I have a problem with the NSM Prestige
120 C - the following happens or better, does not happen.
I can enter digit 1, then 2 and also A or B (credit is established).
Then the motor on the carriage base (selection motor) turns, credit igets
subtracted and the carriage scans to the left and back again and then stops. So,
it does not find the selection.
How can I proceed to find the error? Is there a possibility to test if the
magnet cores behind the carriage (hence the selection) are active? If so the
fault should be in the carriage. Although I have already tested with another
carriage, maybe it is a coincidence, but that did not work either.
On the power supply there are also measuring points, can I test there something?
The fuses are unfortunately all OK.
Answer A:
This sounds like a problem with write-in.
On the control centre there is the write-in/read-out unit. There is also a fuse
located (inside on the circuit board). Please check this fuse, and if broken
replace it with a new one. In any case make sure to get the right value! In my
memory this is a fuse with a very low value (can be found in the schematics
which I haven't on my hand right now). The fuse is not available in every shop
but only in electronic stores. It's best to get a few more. Also never replace
the fuse with a higher value, not even for testing only! If the new fuse blows
or the old one still was ok, the fault might be the write-in capacitor or the
driver transistor which are faulty. On the circuit board there are measuring
points to narrow down the fault.
If the new fuse stays stable then don't get nervous. Fuses age as well, means
maybe there isn't a fault. The old fuse might be just worn.
Answer B:
To narrow down the describing fault more, some voltages in the control centere
should be measured. The DC voltages to be measured are printed below the
corresponding measuring points on the top of the chassis and on the LPIII (300V=
and 150V= stabilized).
If these values are present, it can be usually assume that the control centre is
OK!
Next it should be watched the following:
When a selection is made (i.e. after the A or B pushbutton has been pressed),
the subtraction coil in the credit unit (square, gray box; after opening the
front cover, a longish coil at the bottom right) must attract briefly. The coil
armature actuates via a plastic extension arm a contact slide or a microswitch (depending
on the model), the so-called write-in (trigger) contact.
models 120/160, -A, -B, -Bb, -C, -D, and Century 21
Sollte die Subtraktionsspule NICHT anziehen, liegt hier der
Fehler. Da in dem Fall der Einschreibekontakt nicht betätigt wird,
kann auch keine Wahl eingeschrieben werden.
Zur Behebung muß der Nockenkontakt N4 gereinigt und evtl. justiert werden!
Dieser befindet sich unter der linken Abdeckhaube am Plattenmagazin (linker
Kontakt über Steuernocke).
Sehr vorsichtig justieren und keinesfalls
Schmirgelpapier o.ä. (am besten Relais- Reinigungsstäbchen) verwenden !
Sobald der Kontakt längere Zeit geschlossen bleibt, brennt die Subtraktionsspule
ab! Also auf genügend Abstand der Kontaktblätter achten.
If the subtract coil does not attract,
then this is the fault. In that case the write-in contact isn't activated, hence
no selection can be written-in.
To remedy this the cam N4 needs to be cleaned and eventually re-adjusted! This
is located below the left cover at the record magazin (left contact above
control cam).
Re-adjust carefully und in no way use sand paper or similar (cleaningsticks for
relay contacts are best)!
If the contact is closed for a longer time then the subtract coil will burn. So
take care of enough distance of the contact blades.
Modelle 120/160, -A, -B, -Bb, -C, -D und Century 21
models 160/120C and 160/120D, Century 21
Leider sieht man nicht, ob Wahlen im
Speicher eingeschrieben sind. Aber man kann - genau so wie bei der Seeburg Tormat - Technik - mit einer 1,5V - Batterie (eine große Monozelle eignet sich
sehr gut, kleinere liefern möglicherweise zu wenig Strom) alle Magnetkerne in
den Zustand "gewählt" versetzen. Das funktioniert folgendermaßen:
Man zieht den Stecker der Impulsleitung (3-poliger DIN-Stecker) an der
Steuerzentrale ab. Die Impulsleitung ist an die Pins 1 und 3 angeschlossen. Die
Impulsleitung ist nur eine Drahtschleife durch alle Magnetkerne. Dem
entsprechend muss man einen Widerstandswert in der Größenordnung von 1 - 2 Ohm an
den Pins messen können. Falls der Widerstandswert wesentlich größer (> 5 Ohm)
ist, liegt ein Fehler (z. B. irgendwo ein schlechter Kontakt) vor. Dann schließt
man kurzzeitig (etwa 1 Sekunde) die besagte Monozelle an die Steckerstifte an
und zwar - wenn ich nicht irre - den Pluspol der Batterie an den Masseanschluß
(bei DIN Steckern normgemäß Pin 3). Damit sind alle Magnetkerne in den Zustand
"gewählt" gesetzt. Wenn man nun die Impulsleitung wieder ansteckt und den
Suchlauf startet, entweder durch eine beliebige Wahl oder durch Drücken des
Fahrknopfes, sollten der Reihe nach alle Platten gespielt werden. Wenn das nicht
funktioniert, ist der Vorgang noch einmal mit umgekehrter Batteriepolarität
(falls ich mich doch geirrt habe) zu wiederholen.
Sollte alles funktionieren, liegt der Fehler mit Sicherheit im Einschreibstromkreis (sog. Write-In):
Einschreibkontakt in der Krediteinheit, Tastaturkontakte, Steckverbindungen und
Verkabelung zum Magnetkernspeicher. Alle anderen Möglichkeiten (Thyristor,
Auslöserelais, Auslösemagnet, Schleppkabel, Auslese- Stromkreis und Kontakte
usw.) kann man ausschließen
Eine Fehlersuche mit dem DSO (ein analoges Oszilloskop ist völlig ungeeignet)
wäre grundsätzlich möglich, die Oszillogramme sind aber sehr schwierig zu
beurteilen, besonders wenn man es zum ersten Mal versucht.
Unfortunately, it is not possible to see whether selections are written-in into the memory unit. But one can - just like with the Seeburg Tormat technology - set all the magnetic cores to the "selected" state with a 1.5V battery (a large mono cell is best suitable, smaller ones may not supply enough current). This works as follows:
Disconnect the plug of the impulse line
(3-pole DIN plug) from the control centre. The impulse line is connected to pins
1 and 3. The impulse line is only a wire loop through all magnet cores.
Accordingly, you must be able to measure a resistance value of about 1 - 2 ohms
at the pins. If the resistance value is much higher (> 5 Ohm), there is a fault
(e.g. a bad contact somewhere).
Then connect the previously mentioned mono cell to the connector pins for a
short time (about 1 second) and - if I am not mistaken - connect the positive
pole of the battery to earth connection (pin 3 is standard for DIN connectors).
This sets all the magnetic cores to the "selected" state.
If you now reconnect the impulse line and start the searching process, either by
any selection or by pressing the scan switch, all records should be played in
turn.
If this does not work, repeat the procedure again with the battery polarity
reversed (in case I made a mistake after all).
If everything works, the fault is
almost certainly in the write-in circuit:
Write-in contact in the credit unit, keyboard contacts, plug connections and
wiring to the magnetic core memory. All other possibilities (thyristor, release
relay, release solenoid, trailing cable, read-out circuit and contacts, etc.)
can be ruled out.
Troubleshooting with the DSO (an analogue oscilloscope is completely unsuitable)
would be possible in principle, but the oscillograms are very difficult to
assess, especially if you are trying it for the first time.
|
Die Prestige 120 B läuft nach Geldeinwurf und Wählen nicht
automatisch an. |
The Prestige 120 B does not
start automatically after inserting coins and selecting. After inserting
money, the magnet releases the counter. Now I can select. After
selecting each record it is needed to press the lower button at the
money counter. Then, to make the carriage travelling again I have to
press the lower button at the counter. Only then the carriage moves. |
Modelle ES Technik
10. Carriage scans but does not find
any selection -
models with ES-technical equipment
Nach Geldeinwurf und Wählen fährt der Schlitten hin und her und findet keine Wahl. Wo ist das Problem zu suchen?
Eine
Möglichkeit ist, dass die Photoabtastung defekt ist. Er wird auch
"Positionsanzeiger" genannt. Das ist das kleine schwarze Rad, das von der
Rutschkupplung (einem weißen Zahnrad, das man sieht, wenn das Laufwerk ausgebaut
und umgedreht wird) angetrieben wird. Die Abtastung ist gern mal hinüber, vor
allem, wenn zu großzügig mit Öl umgegangen wurde, um die Box "abzuschmieren",
und nun Öl in der Photoabtastung ist. In dem Fall, kann durch Reinigung mit WL-Spray (oder einem anderen guten Elektronikreiniger, keinen
Bremsenreiniger, der ist zu scharf) das Öl ausgespült werden. Ggfs.
funktioniert die Box nach der Trocknung wieder. Sollte die Abtastung defekt
sein, kann sie repariert werden.
Andere Möglichkeiten sind Defekte in der
Ausläuferplatine am Laufwerk oder in der Steuerzentrale selbst.
One possibility is that the photo sensing is defective. It
is also called the "position indicator". This is the small black wheel that is
driven by the slipping clutch (a white gear that can be seen when the carriage
gets removed and turned around).
The sensing is often broken, especially if oil has been used too liberally to "lubricate"
the jukebox. Then there can be oil in the photo sensing unit. In this case, the
oil can be removed by cleaning with WL spray (or another good electronics
cleaner, no brake cleaner, which is too sharp). It might be that the
jukebox will work again after drying well. If the sensing is defective, it can
be repaired.
Other possibilities are defects in the circuit board at the carriage or in the
control unit itself.
Bei einer Consul 120A hängt der Schlitten komplett. Er versucht
immer nach links bzw. rechts zu wandern, kommt aber nur ein paar Millimeter.
Wenn man den Schlitten ein wenig anhebt (so dass der Teil mit den Kontakten und
dem einzelnen Laufrad nach unten geht), fährt er ein Plattenfach weiter. Wenn
man das dann öfter macht "befreit" er sich, läuft zur nächsten Auswahl, spielt
sie ab und hängt wieder fest. Ist die Justierung falsch?
Antwort:
Bitte beobachte, ob evtl. der Plattengreifer zu hoch
steht und am Magazin schleift; wahrscheinlicher ist aber, dass der
Betätigungshebel für den Popularitätszähler (graue Kunststoffstreifen hinter
jedem Plattenfach, die anzeigen, welche Platten am meisten gespielt wurden)
verharzt und das Laufwerk blockiert ist.
Dieser Hebel befindet sich am
Laufwerk direkt über der hinteren Rolle und darf bei Fahrbetrieb nicht über dem
Chassisrand stehen.
On my Consul 120A, the carriage sits
completely. It always tries to move to the left or right, but only moves a few
millimeters. If the carriage gets lifted a little bit (so that the part with the
contacts and the single idler goes down), it moves one record slot further. Then,
if this gets done more often, it releases itself, travels to the next selection,
plays it, and gets stuck again. Is the adjustment wrong?
Answer:
Please observe if perhaps the record gripper is too high and is sliding against
the magazine. But more likely, the actuating lever for the popularity counter (gray
plastic strips behind each record tray that indicate which records have been
played the most) is gummed up and is jamming the carriage.
This lever is located on the carriage just above the rear roller. When the
carriage is in operation this lever should not be above the edge of the chassis.
Modelle 120/160, -A, -B, -Bb, -C und -D, Century 21
models 120/160, -A, -B, -Bb, -C, and -D, Century 21
Antwort:
Dreht der Motor weiter? Wenn ja, dann ist die Rutschkupplung wahrscheinlich hin. Bleibt der Motor aber stehen, dann wird die Einheit im linken Laufwerkskasten verharzt sein. Eine gründliche Reinigung sollte Abhilfe bringen.
Response:
Does the motor keep turning? If so, then the slipping clutch is probably faulty. But if the motor stops, then the left unit on the carriage assembly will be gummed up. A thorough cleaning should remedy the situation.
models 120/160, -A, -B, -Bb, -C, and -D, Century 21
Der Laufwagen ist in Ruheposition. Nach
dem Wählen eines Titels fährt dieser los, bleibt aber immer an der Position L8
(ganz rechts) stehen, ohne die Platte zu spielen. L8 wurde nicht gewählt, das
passiert unabhängig von der Wahlkombination. Nach dem Drücken des Fahrknopfes
(links neben dem Plattengestell) fährt der Schlitten auf die gewünschte Platte
und spielt den Titel ab. Dann fährt der Schlitten zurück in die Ruheposition.
Bei der nächsten Auswahl wiederholt sich das Problem. Der Schlitten bleibt bei
L8 stehen.
Antwort:
Das hört sich nach einem mechanischen Fehler an.
Entweder blockiert etwas oder die Abläufe können z.B. aufgrund von Verharzung im
Zählwerk (links vom Laufwerk) oder Dejustierungen nicht vollständig ausgeführt
werden. Am besten die Abdeckung vom Zählwerk herunternehmen und den Ablauf genau
beobachten. Es kann sein, daß das Laufwerk immer dann stehen bleibt, wenn
die Nocke N3 nach unten gleitet. Ggfs. reinigen und / oder
nachjustieren.
The carriage is at rest position. After
selecting a title it starts to scan, but always stops at position L8 (the most
far right) without playing the record.
L8 wasn't selected, this happens independantly from the selection being made.
After pressing the scan switch (FA, left of the carriage base) the carriage
moves to the actually selected song and plays it. Then the carriage returns to
its rest position.
With the next selection this procedure begins again. The carriage stops at L8.
Answer:
This sounds like a mechanical fault. Either something blocks or the sequences
cannot completed because of e.g. gummed up / hardened grease in the counter (left
of carriage) or mis-adjustments.It is best to take off the cover of the counter
and to watch the process carefully. It might be that the carriage always stops
when cam N3 moves downwards.
A good cleaning and / or re-adjusting might help.
Modelle 1969 bis E-Technik
models 1969 up to E-Technology
|
von
Hans-Gerd Bargmann |
||
|
Die
Ursache ist auf der Platine LP1 zu suchen. |
The cause is to be
found on the LP1 circuit board. |
|
 |
1. 1. |
|
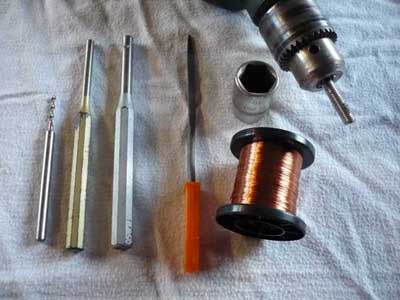 |
2. Werkzeug:
|
|
 |
3.
Material:
3.
Material:
|
|
|
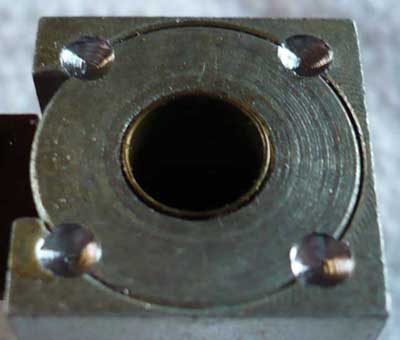
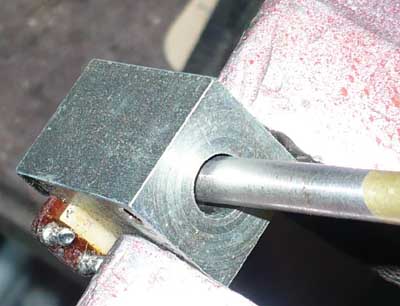
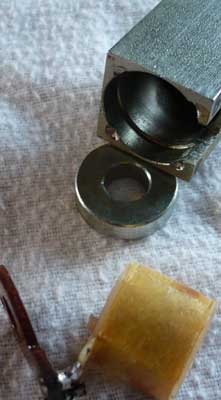
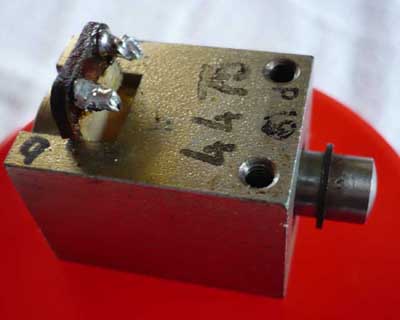
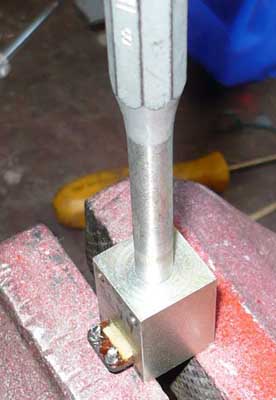
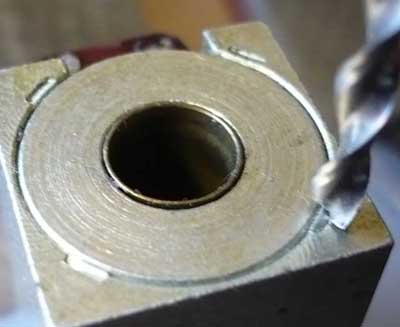
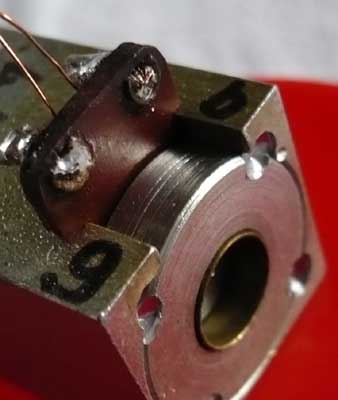
4. An der Anschlussseite ist ein verkörnter Stahlring. Die 4 Körnerstellen werden mit 3,2mm angebohrt. Danach kann man den Ring mit einem 6mm Splintentreiber, den man schräg durchs Gehäuse führt, leicht rausschlagen, die Anschlussplatte entfernen und die Spule rausziehen.
4.
|
|
 |
5.
5.
|
|
 |
6. 6. |
|
 |
7.
8.
7.
8.
|
|
 |
9. 9. |
|
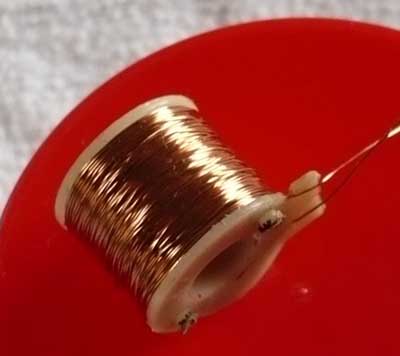 |
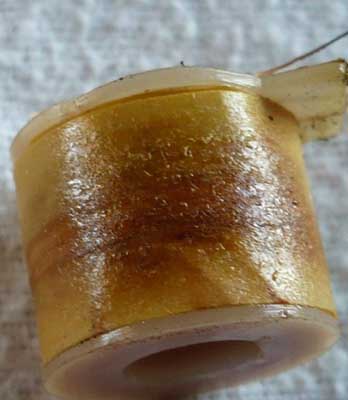
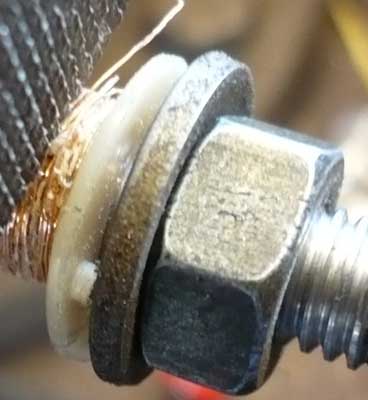
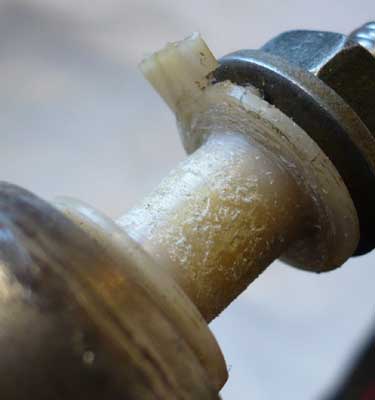
10. Wenn der Draht sauber und fest gewickelt wurde hat die Spule mit 2,2mm Draht zirka 12 Ohm Widerstand.
10. |
|
 |
11.
11.
|
|
 |
12.
12.
|
|
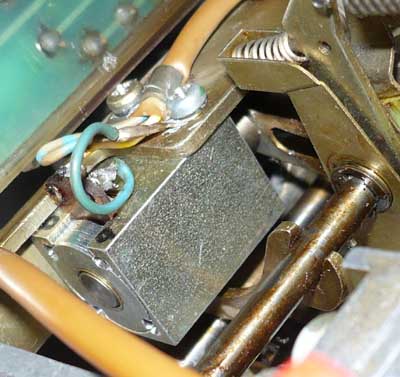 |
13. Jetzt kann die Spule wieder ins Laufwerk gebaut werden.
13. |
Die Angaben haben keinen
Anspruch auf Vollständigkeit oder Richtigkeit.
Bei den (importierten) Boxen können im Laufe der Jahre durchaus
Veränderungen vorgenommen worden sein. Copyright.
Ein Service von

Copyright by
Stamann Musikboxen
