|
Reinigung Tastatur Rock-Ola 1446 und
vergleichbare Modelle |
|
Cleaning keyboard of Rock-Ola 1446
and similar models |
|
Frage: Wie bekomme ich die
Tastaturkontakte der Rock-Ola 1446 sauber bzw. so sauber wie
möglich?
Antwort: Die
Tastaturblöcke mit ihren Schaltschieberchen kann man schon
so weit zerlegen, dass die Schaltschieberchen einzeln zu
reinigen sind.
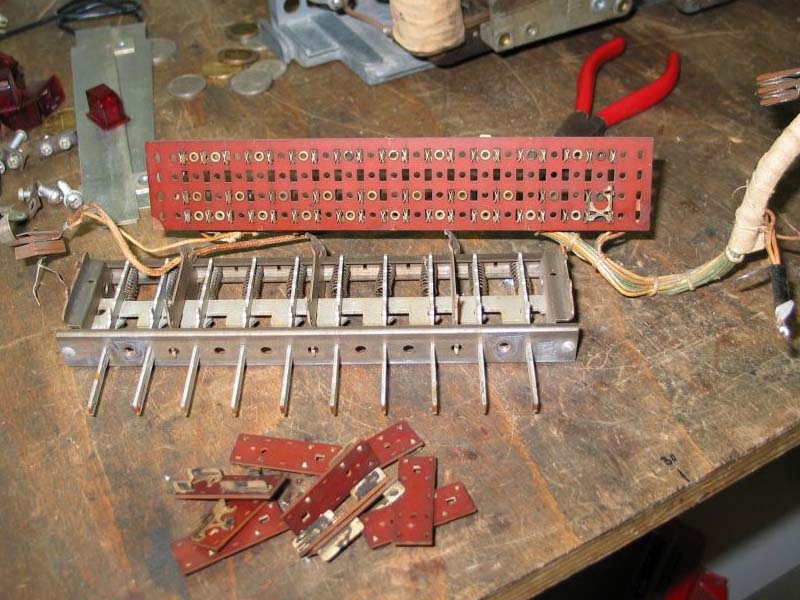
Das Foto unten zeigt eine geöffnete Tastatur.
Die Pertinaxplatine mit den Schaltschieberchen wird von der
Tastenmechanik mit kleinen Nasen gehalten.
Die jeweils beiden Nasen an der Schmalseite der Platine
schauen durch die Platine und sind ein wenig verdreht.
Diese muss man v o r s i c h t i g wieder gerade drehen.
Die umgebogenen Nasen an den beiden Längsseiten der Pertinaxplatine sind mit noch mehr Vorsicht zu behandeln.
Biegt man sie einfach gerade, brechen sie ab !!
Die Nasen an der "Vorderseite" der Platine mit einem flachen
Schraubendreher vorsichtig ein wenig anheben damit sie
nicht mehr auf den Platinenrand drücken Hinweis: auf keinen Fall
grob ans Werk gehen und wirklich nur einen Millimeter
hochbiegen.
Die Nasen am "hinteren" Rand der Platine ebenfalls mit der
Schraubendreherklinge etwas anheben und dann den ganzen
Bügel, an dessen Ende die etwas angehobene Nase sitzt mit
einer Flachzange in einem weichen Radius seitlich weg biegen,
damit die Platine freigegeben wird.
Die im weichen Radius seitlich weg gebogenen Haltebügel der
Platine sind auf dem Bild gut zu erkennen.
Wenn man so vorgeht, dann bleiben alle Haltenasen ganz und
die Platine wird nach dem Zusammenbau und dem Zurückdrehen
der Haltebügel wieder wie ab Werk gehalten.
Hinweis: Das Foto zeigt zwar eine Rock-Ola 1546
Wallboxtastatur, aber die Tastatur der 1446 ist fast
identisch aufgebaut.
|
|
Question:
How can I get the contacts of a Rock-ola 1446 keyboard clean
or at least as clean as possible?
Answer: The
blocks of the keyboard with their switching sliders can be
dismantled that much that the switching sliders can be
cleaned individually.
The photo below shows an opened keyboard.
The Pertinax circuit board with the switching sliders is
held in place by the pushbutton mechanism with small lugs.
The two lugs on the narrow side of the keyboard look through
the board and are slightly twisted.
These must be straightened again c a r e f u l l y.
The bent lugs on the two long sides of the Pertinax circuit
board must be handled with even more care. If you simply
straighten them, they will break off!
Lift the lugs on the "front" of the circuit board carefully
a little bit with a flat screwdriver so that they no longer
press on the edge of the board. Note: In any case do be
rough in any way and really only bend them up to one
millimeter only.
Lift the lugs on the "rear" edge of the circuit board
slightly with the screwdriver blade and then bend the entire
bracket, at the end of which the slightly raised lug is
located, sideways in a soft radius using flat-nose pliers so
that the circuit board is released.
The retaining brackets of the circuit board bent sideways in
a soft radius are clearly visible in the picture.
If you proceed in this way, all the retaining lugs will stay
intact and the circuit board will be held as it was from the
factury after the assembly and turning back the retaining
brackets.
Note:
Although the photo shows a Rock-Ola 1546 wallbox keyboard,
the keyboard of the 1446 is almost identical. |
|
|
|
|
|
Austausch einer Taste in Tempo, Regis und Empress |
|
Replacing one pushbutton in models Tempo, Regis,
and Empress |
-
Tür (Vorderteil) vorkippen
-
Tastaturstecker links
abziehen
-
Lampenstecker rechts am
Verstärker abziehen
-
Sicherungskette
aushängen
-
Dann die komplette Tür mit
den Emblemen nach unten auf zwei Böcke oder einen Tisch (Decke oder
ähnliches unterlegen) legen
-
Diffuserscheibe entnehmen (Glas)
-
die sechs Schrauben der
Tastatur sowie die Kabelschelle des Steckers lösen
-
Schrauben des schmalen
Blechstreifens entfernen, welcher die Tasten sichert (der Streifen
hat die Schraublöcher etwas versetzt, ich glaube die breitere Seite
ist unten)
-
In dem Zusammenhang
empfiehlt sich die Reinigung der Tasten und Kontakte
|
|
- Tilt the door (front part of the jukebox)
forward
- Disconnect the keyboard plug on the left
- Disconnect the lamp plug on the right side
of the amplifier
- Unhook the safety chain
- Then place the complete door with the
emblems facing down on two supports or a table (place a blanket or
similar underneath)
- Remove diffuser glass (real glass)
- Loosen the six screws of the keyboard and
the cable clamp of the plug as well
- Remove the screws from the narrow metal
strip that secures the pushbuttons (the strip has the screw holes
slightly offset, I think the wider side is at the bottom)
- In this context, we recommend to clean the
pushbuttons and contacts as well
|
|
|
|
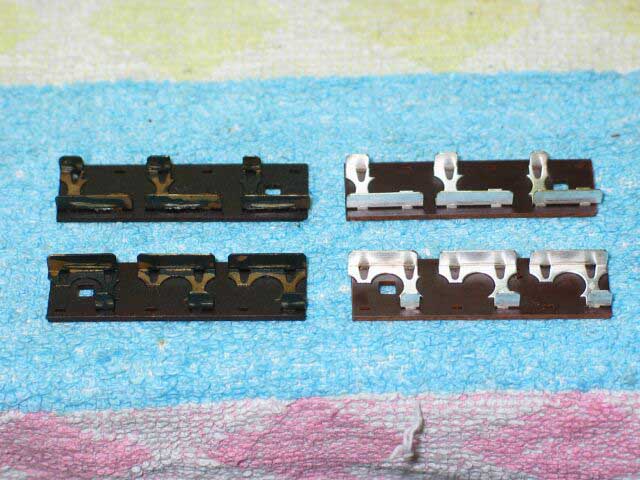
Reinigung der
Tastaturkontakte |
|
Cleaning of keyboard contacts |
|
 |
|
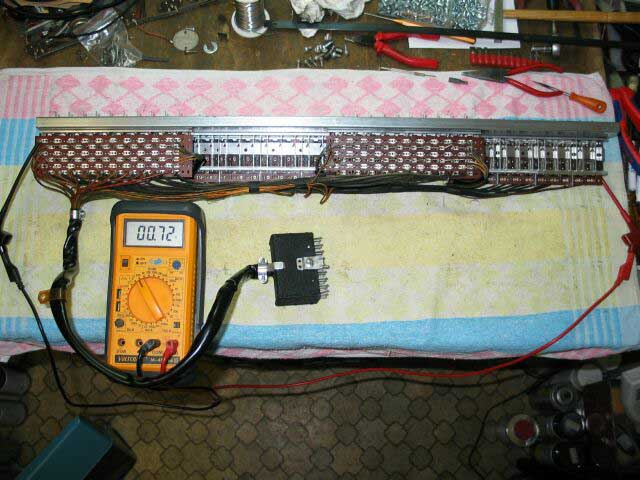
Widerstandsmessung der Ladeleitung zum Kreditwerkkondensator durch die
Tastatur vor der Reinigung: 104,33 Ohm
|
|
Resistance measurement of
the charging wire to the capacitor through the keyboard before
cleaning: 104.33 Ohm |
|
|
|
gereinigte Kontakte |
|
Contacts after cleaning |
|
|
Widerstandsmessung der Ladeleitung zum Kreditwerkkondensator durch die
Tastatur nach der Reinigung: 0,72 Ohm |
|
Resistance measurement of
the charging wire to the capacitor through the keyboard after
cleaning: 0.72 Ohm |
|
|
|
|
Latchbar solenoid =
Elektromagnet, Tastaturmagnet oder auch Tastenverriegelungsspule -
Modelle 1484, 1493, 1494, 404 ff. |
|
Latchbar solenoid
models 1484, 1493, 1494, 404 and
onwards |
|
Bei Princess (1493) und Wandbox 1494 brummt
der Elektromagnet im Tastenfeld, wenn noch Freispiele vorhanden sind.
Mehrmaliges Drücken der Löschtaste beruhigt die Angelegenheit manchmal
ein wenig. Wie kann das Problem behoben werden?
Antwort:
Dieses Problem ist nicht so einfach zu beheben. Im Prinzip kann man
darüber streiten, ob es überhaupt eins ist, denn diese Boxen haben
wahrscheinlich vom ersten Tag an gebrummt, wenn noch ungenutzte Kredite registriert
waren. Nur wird wohl kaum jemand Geld in die Box geworfen haben ohne so
viele Titel zu wählen, wie dafür zu bekommen waren.
Wenn keine Kredite mehr registriert sind, dann brummt es auch nicht.
Aber zu den Lösungsmöglichkeiten:
1. Einige Leute berichten davon, dass sie es geschafft haben das Brummen
durch neue Spulen oder Gummiunterlagen einzudämmen.
2. Man kann an die Tastenfelder für Zahlen und Buchstaben zusätzliche
Schalter anbringen, die dafür sorgen, dass die Spule erst anzieht, wenn
die erste Taste gedrückt wird. Dazu braucht man dann noch eine simple
Schaltung mit einem Relais. Diese Lösung habe ich selber schon bei einer
432 ausprobiert. Es brummt dann eben nur noch, wenn jemand zwar eine
Zahl, aber keinen Buchstaben (oder umgekehrt) ausgewählt hat.
3. Man kann die Box "auf Freispiel stellen" indem man den Münzeinwurf
deaktiviert, und wie oben beschrieben einen Schalter an den Tastenblock
für die Zahlen anbaut. Diesen Schalter kann man an Stelle des
Münzschalters, der einen Credit registriert anschließen. Auf diese Weise
wird immer ein Credit registriert, wenn eine Zahlentaste gedrückt wird.
Der Magnet zieht dann solange an, bis der Titel eingeschrieben ist und
fällt dann wieder ab.
Hinweis:
Diese Lösung habe ich selber nicht ausprobiert. Sie kommt aus einem
Seeburg Restaurationsbuch. |
|
In Princess (1493) and Wallmount
jukebox 1494, the latchbar solenoid in the keyboard buzzes if there are
still selections available. Pressing the cancel button several times
sometimes calms this down a little bit. How can the problem be solved?
Answer:
This problem is not that easy to resolve. In principle, it is debatable
whether it is one at all, because these jukeboxes have probably been
buzzing from day one when not used credits were still registered. But
hardly anyone would have inserted money into the jukebox without
selecting as many titles possible as one could get.
If there are no more credits registered, then it doesn't hum either.
But here are possible solutions:
1. Some people report that they have managed to reduce the hum with new
coils or rubber pads.
2. You can attach additional switches to the keypads for numbers and
letters, which ensure that the coil gets only activated when the first
pushbutton is pressed. This requires also a simple circuit with a relay.
I have already tried this solution by myself on a 432. It then only
buzzes if someone has selected a number but not a letter button (or vice
versa) yet.
3. You can set up the jukebox to "free play" by deactivating the coin
slot and adding a switch to the keypad for the numbers as described
above. This switch can be connected in place of the coin switch, which
registers a credit. In this way, a credit is always registered when a
number button is pressed. The latch bar solenoid then attracts until the
title is registered and then fall off again.
Note: I have not tried this solution by
myself. It is taken from a Seeburg restoration book. |
|
<<<
zur
Archiv Startseite
Die Angaben haben keinen
Anspruch auf Vollständigkeit oder Richtigkeit.
Bei den (importierten) Boxen können im Laufe der Jahre durchaus
Veränderungen vorgenommen worden sein. Copyright.
|
|
Ein Service von

Copyright by
Stamann Musikboxen |