|
Rock-Ola 1432 und 1434 |
|
Rock-Ola 1432
and 1434 |
|
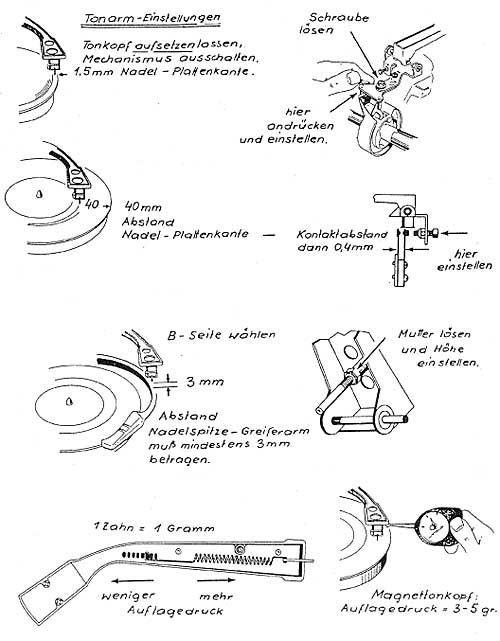
Man muss als erstes die
Mechanik soweit bewegen, bis die Platte ca. 10 mm aus dem Plattenmagazin
angehoben wird (zu erkennen auch an der Kulisse unten im "Karussell). An
diesem Punkt wird die Mechanik angehalten - Box ausschalten.
Jetzt wird unten an der Drehachse des Tonarms die Schraube soweit
gedreht, bis die Nadel über den Einlaufrillen der Platte steht. Dabei
darf die Blattfeder, die auf die Tonarmdrehachse wirkt, an diesem Punkt
gerade eben keine Kraft mehr ausüben - diese Feder ist ebenfalls mit
einer Schraube einstellbar. Drückt die Feder jetzt noch auf die
Drehachse, dann wird der Tonarm beim Abspielen über die Platte
gestoßen.
Als nächstes wird die Nadel mit Hilfe der Inbusschraube, die sich oben
im Tonarm befindet, bis ca. 1 mm über die Plattenrillen bewegt.
Das war dann auch schon alles, wobei die beschriebene Prozedur ggf.
mehrfach wiederholt werden muss bis man genau den Punkt gefunden hat,
bei dem die A- und B-Seite gleichgut "getroffen" wird.
Wichtig ist auch
eine gleichmäßige Einstellung der beiden Tonköpfe im Tonarm. Ebenfalls
bietet es sich bei dieser Arbeit an, mit den beiden weiteren Schrauben
am Tonarm die Nadel-Auflagekraft einzustellen. |
|
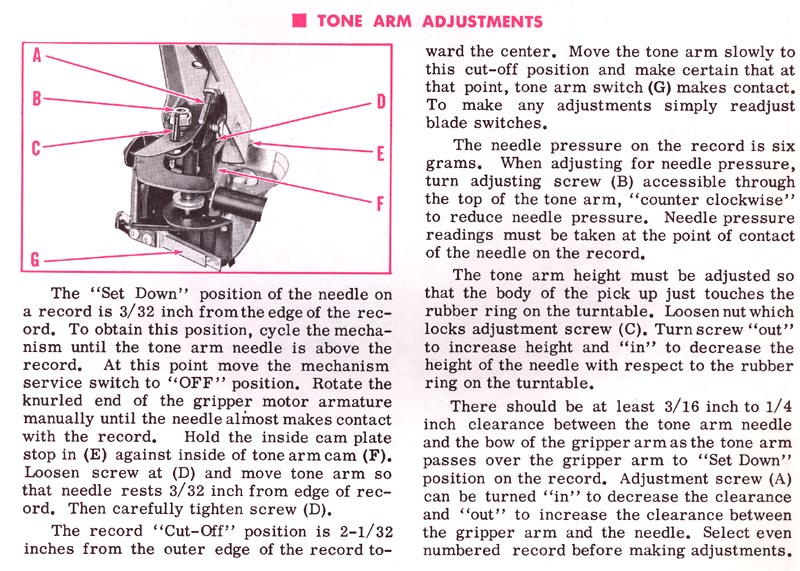
First you have to move the
mechanism that far that the record is lifted approx. 10 mm out of the
record magazine (can also be seen on the scenery at the bottom of the "carousel").
At this point the mechanism stops. Now switch off the jukebox.
Now turn the screw at the bottom of the tonearm pivot shaft until the
needle is above the record grooves. At this point the flat spring acting
on the tonearm pivot shaft must not apply any force - this spring is
also adjustable with a screw.
If the spring now still presses on the pivot shaft, then the tone arm
will be pushed over the record when playing.
Next, with the allen screw located at the top of the tone arm, the
needle gets moved up to about 1 mm above the record grooves.
That's all, although the described procedure may have to be repeated
several times until you find exactly the point where the A and B sides
are match equally well.
It is also important to
adjust the two tone heads in the tone arm evenly. It is also a good idea
to use the two additional screws on the tone arm to adjust the needle
contact force. |
|
|
|
Modelle Rock-Ola 1438 – 430 |
|
Models Rock-Ola 1438 – 430 |
|
Rock-Ola 1438, 1442, 1446, 1448, 1452, 1454, 1455D, 1455S, 1458, 1462,
1464, 1465,
1468, 1475, 1478, 1485, 1484, 1488, 1493, 1494, 1495, 1495, 404, 408,
414, 418, 429, 430 |
|
►►►
Auch 424, 425, 426, 429
wenn der braune Tonarm mit Zierdiamant eingebaut ist.
◄◄◄ |
|
►►►
Also 424, 425, 426, 429 if the brown
tonearm with decoration diamond is mounted.
◄◄◄ |
|
|
|
|
Modelle 424, 425, 426, 429, 431
bis 498 und 1000 (Nostalgia) –
Tonarm Accutrac |
|
Die beschriebene Prozedur muß ggf. mehrfach wiederholt werden, bis man
genau den Punkt gefunden hat, bei dem die A- und B-Seite gleichgut
"getroffen" wird.
|
|
|
|
Models 424, 425, 426, 431 up to 498 and 1000
(Nostalgia) - Tonearm
Accutrac |
|
|
|
|
|
Aufsetz-
und Abschaltpunkt Rock-Ola |
|
Set-down and cut-off Rock-Ola |
|
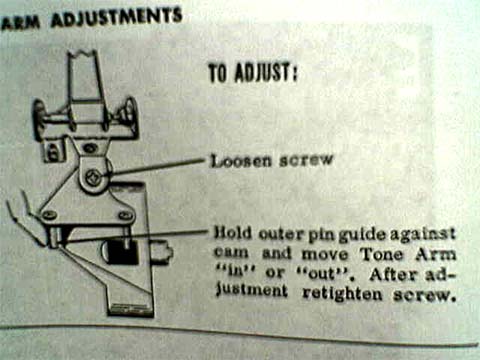
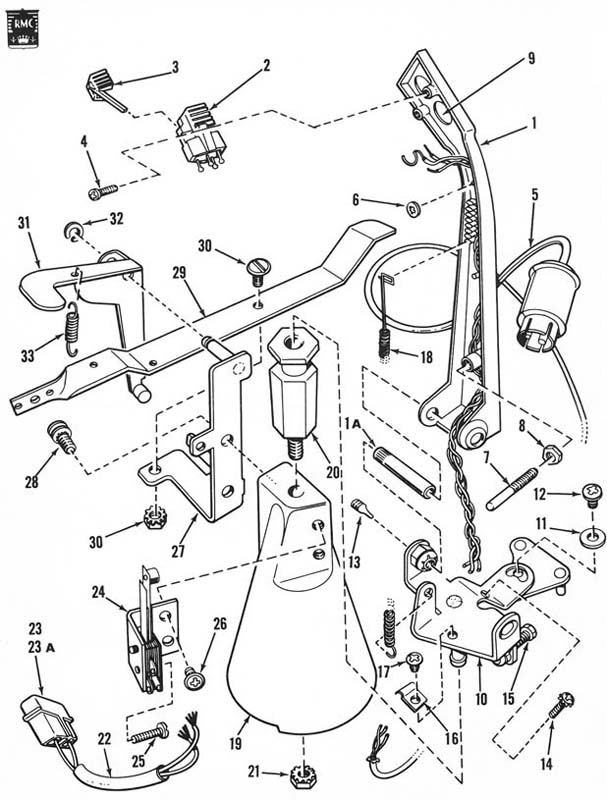
Wie justiere ich den Aufsetz- und Abschaltpunkt?
Hinten am Tonarm ist ein Metalldreieck mit 2 Stiften, das mit einer
Schraube am Tonarm befestigt ist. Eine Platte auflegen lassen, den
Mechanismus anhalten (Operate/Scan Schalter auf Off). Die Schraube am
Dreieck lockern, den äußeren Stift an das Führungsrad (Drive Shaft
Assembly) drücken und den Tonarm entsprechend positionieren. Die
Schraube wieder festschrauben.
Der Abschaltpunkt wird mit der Schraube hinten am Tonarm eingestellt
(drückt auf einen Schalter).
|
|
How do I adjust the set-down and cut-off?
At the back of the tonearm there is a
metal triangle with 2 pins, which is mounted at the tonearm with
a screw. Put a record on the turntable, stop the mechanism (operate/scan
switch to Off). Loosen the screw on the triangle, press the
outer pin against the guide wheel (drive shaft assembly) and
position the tonearm accordingly. Tighten the screw again.
Adjust the cut-off point with the screw at the back of the
tonearm (it presses a switch). |
|
|
 |
|
|
|
Aufsetz-
und Abschaltpunkt Rock-Ola |
|
Set-down and cut-off Rock-Ola |
|
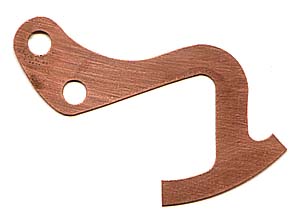
Der Tonarm setzt
in unregelmäßigen Abständen hin und wieder zu weit auf. Aufsetz- und Abschaltpunkte
wurden nach Handbuch
justiert.
Vermutlich ist das Tonarmfederblech gebrochen. Dieses ist ein dünnes
Federblech, welches den Tonarm führt.
Es sitzt auf der Welle am Plattenbock, die den Tonarm bewegt, am
hinteren Teil. Oftmals erkennt man nur noch die Überreste des
Tonarmfederblechs. |
|
The tonearm occasionally sets down too
far, at irregular intervals. The set- down and cut-off were each
adjusted according to the manual.
Probably the tonearm cam keeper spring is
broken. This is a thin spring plate that guides the tonearm.
It sits on the shaft at the record stand that moves the tonearm,
at the rear. Often you can only see a left over piece of the
tonearm spring plate. |
|
|
|
|
|
|
Ausbau Tonarm Rock-Ola 429
|
|
Removal tonarm in Rock-Ola 429
|
|
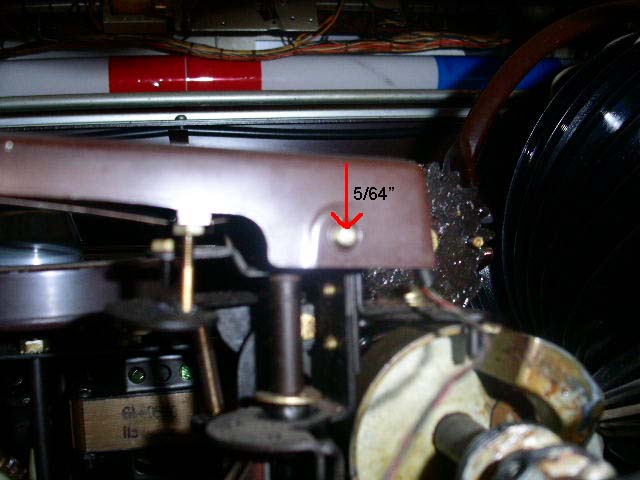
Die Inbusschraube am Drehpunkt des Tonarms
muss etwas gelöst werden: Dann lässt sich der Tonarm (nur die Hülle) mit
dem Kabel abnehmen. Das Tonarmkabel selber ist i.d.R. noch an einigen
Stellen angeklebt bzw. gesichert.
Beim Montieren darauf achten, dass die Schraube nicht zu fest angezogen
wird. Der Tonarm muss sich spielfrei auf und ab bewegen lassen.
Es wird ein 5/64" Inbusschlüssel benötigt, ggfs. passt auch einer
mit 2 mm. |
|
The Allen screw at the
pivot point of the tonearm must be loosened slightly: Then the
tonearm (only the cover shell) with the cable can be removed.
The tonearm cable itself is usually still glued or secured in
some places.
When mounting the tonearm, make sure that the screw is not
tightened too much. The tonearm must be able to move up and down
without play.
A 5/64" allen wrench is needed - a 2 mm wrench might also fit. |
|
|
 |
|
|
|
Tonarm Accu-Trac
|
|
Tone arm Accu-Trac
|
|
 |
|
<<<
zur
Archiv Startseite
Die Angaben haben keinen
Anspruch auf Vollständigkeit oder Richtigkeit.
Bei den (importierten) Boxen können im Laufe der Jahre durchaus
Veränderungen vorgenommen worden sein. Copyright.
|
|
Ein Service von

Copyright by
Stamann Musikboxen |