|
Allgemeines zur Transportsicherung -
Mechanismusfedern |
|
General for securing for transportation -
mechanism springs |
|
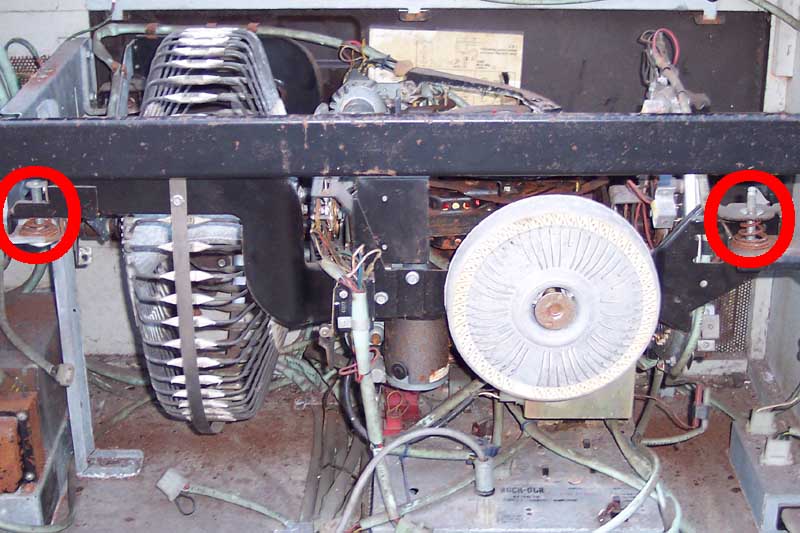
Der Mechanismus bei
Rock-Ola ist auf vier konischen Federn gelagert. Durch diese geht
jeweils eine dicke Schraube, die beim Transport angezogen wird.
Folgende Federn wurden wurden verwendet:
-
Modelle bis Tempo 1
(1468, 1475): vier gleiche schwarze
-
Modelle ab Tempo 2
(1478, 1485): zwei schwarze und zwei rote. Die roten Federn waren
stärker ausgelegt und tragen somit den hinteren, schweren Teil der
Mechanik.
-
Wandboxen, Princess:
vier Federn, rot markiert an der linken Seite
|
|
The Rock-Ola mechanism is
mounted on four conical springs. A thick screw passes through each of
these and is tightened during transportation.
The following springs were used:
-
Models up to Tempo 1 (1468,
1475): Four identical black ones
-
Models from Tempo 2 (1478,
1485): Two black and two red. The red springs were stronger and
therefore carry the rear, heavy part of the mechanism.
-
Wall mount jukeboxes,
Princess: fFur springs, marked red on left side
|
|
|
|
Allgemeine Hinweise zum Transport einer Rock-Ola |
|
General advise for transporting
a Rock Ola |
-
Stehender Transport: wird die Musikbox stehend
transportiert, müssen die Lenkrollen entweder entfernt werden oder man
entlastet sie, z. B. durch Unterschieben von Holzstaffeln. Zudem muss man die Box gut festzurren, ohne Beschädigungen durch zuviel Druck
zu riskieren.
-
Liegender Transport: man sollte einen
Karton unterlegen, um eine Beschädigung des Laderaumbodens zu vermeiden.
Keinesfalls sollte man dicken Schaumstoff, dicke Decken oder gar
Matratzen unterlegen, weil die Musikbox darauf nicht stabil liegt, sondern
bei jeder Bewegung des Fahrzeugs schwingt und die Gefahr einer
Beschädigung steigt.
-
Transportsicherung: der Mechanismus steht auf
vier großen Federn. Unmittelbar neben diesen Federn gibt es je eine
große Schraube, die normalerweise nicht angeschraubt sein sollte. Nur für den Transport
sind diese Schrauben anzuschrauben, so dass die Federn gespannt werden und
der Mechanismus möglicht nicht mehr schwingen kann. Nachdem Transport
sind diese Schrauben wieder zu entfernen.
Bsp.: Mechanismus der
70er Jahre |
|
-
Upright transportation:
If
the jukebox is transported upright, the castors must either
be removed or the load must be taken off them, e.g. by
pushing wooden stacks underneath. The jukebox must also be
lashed down properly without risking damage due to excessive
pressure.
-
Horizontal transportation: A cardboard box should be placed
underneath to prevent damage to the cargo floor. Under
no circumstances thick foam, thick blankets
or even mattresses should be placed underneath. The jukebox will not be stable
on these, but will shake with every movement of the car and risk of damage increases.
-
Transport securing: The mechanism rests on four large
springs. There is a large screw right next to each of
these springs, which should usually not be screwed on. Only
for transportstaion these screws
must be tightened so that the springs are
tensioned and the mechanism can no longer shake. Remove
these screws again after transportation.
Example: 1970s Rock-Ola mechanism |
|
|
-
Maschinenabdeckung: ggfs. ist es ratsam, die
Maschinenabdeckung abzunehmen, da der Kunststoff im Laufe der Jahre
spröde und porös geworden sein kann. Dadurch können bei Erschütterungen
schnell kleine Stücke abbrechen. -
Tonarm: dieser sollte mit einem Stück Draht
befestigt werden, damit er sich nicht unkontrolliert hin- und herbewegen
kann.
-
Plattenteller: diesen am besten
herunternehmen, da man sonst zerbrochene Scheiben o.ä. riskiert. Er wird
nur gesteckt und könnte sich (vor allem beim liegenden Transport) aus
der Buchse lösen.
-
Verstärker, Netzteil, Kreditgerät, ggfs. Trafo:
diese sollten fest angeschraubt werden (wenn vorgesehen) oder
herausgenommen werden. Bei Röhrenverstärkern empfiehlt es sich, die
Röhren herauszunehmen und separat zu transportieren (Karton). Nach dem
Transport sollte man kontrollieren, ob alle Steckverbindungen und ggfs.
die Leuchtstoff- sowie Verstärkerröhren wieder fest sitzen.
-
Schallplatten: entweder herausnehmen oder aber
mit Tesakrepp (das lässt sich hinterher bequem entfernen) befestigen.
Dabei geht man so vor: man kann an einer Stelle beginnen und dann
mittels des Scan-Schalters das Magazin drehen lassen und dabei das
Tesakrepp über die Platten laufen lassen. Wenn das Tesakrepp einmal drum
herum liegt, können die Platten nicht mehr herausfallen. Nach dem
Aufstellen der Box natürlich diese noch einmal kontrollieren.
-
Netzkabel: entweder nach innen in die
Musikbox
ziehen oder aber so befestigen, dass es beim Einladen nicht quetscht o.ä.
-
Lose Teile: zur Sicherheit die
Musikbox auf lose
Teile überprüfen und diese entweder befestigen oder aber herausnehmen.
-
Gehäuse: je nachdem wie die
Musikbox transportiert werden soll, kann man Gehäuse, Glasscheiben, Vorderfront oder andere hervortretende Teile zur Sicherheit mit
Schaumstoff, Decken, Luftpolsterfolie o.ä. umwickeln. Achtung: kein
Paketband verwenden. Man bekommt es von Holz sehr schlecht ab und es
kann Rückstände hinterlassen oder Beschädigungen verursachen.
-
Spedition: sollte die Musikbox durch einen
Möbeltransporteur befördert werden oder eine weite Reise antreten, wäre
der Transport in einer Gitterbox zu empfehlen. Wenn man jemanden für den
Transport beauftragt, vorher Fotos machen und mit dem Auftragnehmer
zusammen das Gerät auf vorhanden Schäden prüfen. Dies hilft nachher bei
Diskussionen, ob der Schaden beim Transport entstanden ist. Falls ein
Transportschaden entstanden ist, sollte die Rechnung gekürzt oder die
Bezahlung herausgezögert werden. Ist erst einmal alles bezahlst, könnte
der Druck, sich um den Schaden zu kümmern, beim Auftragnehmer eher
gering sein.
Generell gut transportieren lässt sich eine Box mit
einer Sackkarre (sollte mind. 150 kg Tragkraft haben), damit bewältigt
man auch besser Stufen.
Es besteht natürlich auch die Möglichkeit, die Tür auszuhängen und ggfs.
die Mechanik herauszunehmen. Das reduziert das Gewicht deutlich - vor
allem, wenn man keine Sackkarre zur Verfügung hat. |
|
-
Mechanism cover: It may be
advisable to remove the mechanism cover, as the plastic may
have become brittle and porous over the years. As a result,
small pieces can quickly break off when the machine is
shaken -
Tonearm: This should be secured
with a piece of wire so that it cannot move back and forth
uncontrollably.
-
Turntable: It is best to take this
off, otherwise you take the risk of broken glasses or
similar. It is only plugged in and could come loose from the
socket (especially when transporting horizontally).
-
Amplifier, power supply unit, credit
unit, transformer if applicable: These should be screwed
on tightly (if provided) or removed. In the case of valve
amplifiers, it is advisable to remove the valves and
transport them separately (cardboard box). After transport,
you should check that all plug connections and, if necessary,
the fluorescent tubes and valves fit tightly.
-
Records: Either remove them or
secure them with masking tape (which can be easily removed
afterwards). Proceed as follows: Start at one point and then
use the scan switch to rotate the magazine while running the
masking tape over the records. Once the masking tape is
around the records, they can no longer fall out. After
setting up the jukebox, check it again of course.
-
Mains cable: Either pull it inside
the jukebox or secure it so that it is not crushed or
similar when loading.
-
Loose parts: To be on the safe
side, check the jukebox for loose parts and either secure
them or remove them.
-
Housing: Depending on how the
jukebox is to be transported, you can wrap the housing, the
glass windows, the front panel or other protruding parts
with foam, blankets, bubble wrap or similar for safety. Caution: Do not use parcel tape. This is very difficult
to remove from wood and it might leave residues or cause
damage.
-
Shipping: If the jukebox is to be
transported by a furniture transporter or is travelling a
long distance, we recommend transporting it in a pallet cage.
If you hire someone to transport the jukebox, take photos
beforehand and check the jukebox for any damage together
with the contractor. This will help in discussions
afterwards as to whether the damage occurred during
transport. If damage has occurred during transport, the
invoice should be reduced or payment delayed. Once
everything has been paid, the contractor may be under less
pressure to deal with the damage.
Generally a jukebox can be transported well
with a hand truck (should have a load capacity of at least 150
kg), which also makes it easier to climb steps.
It is of course also possible to unhinge the door and remove the
mechanism if necessary. This reduces the weight considerably -
especially if you don't have a hand truck available. |
|
|
|
|
Was sollte man beim Transport einer Rock-Ola 1448,
1452, 1454 beachten? |
|
What should be taken care of
when transporting a Rock-Ola 1448, 1452, 1454? |
-
Die o.g. allgemeinen Hinweise
außer Punkt 6 gelten auch für diese Modelle.
-
Den Plattenteller braucht man nicht abzunehmen,
er ist angeschraubt. Fehlt die Schraube, sollte er in jedem Fall
heruntergenommen werden.
-
Rund um den Plattenteller befindet sich eine
Abdeckung aus Kunststoff. Diese hat einen Abstand von 1 - 2 cm zu
der Umrandung aus Wellblech. Durch das Festziehen der
Transportschrauben verringert sich dieser Abstand. Wenn die
Kunststoffabdeckung dabei auf die Blechumrandung aufliegt, ist es
besser sie abzuschrauben. Der Kunststoff ist im Lauf der Zeit
ziemlich spröde geworden und bricht leicht.
-
Die Schallplatten sollte man herausnehmen. Es
könnte sonst durch die Fanghebel zu einer Beschädigung kommen.
-
Wenn der Verstärker gut angeschraubt ist, braucht
man die Röhren nicht herauszunehmen.
-
Zwischen Frontscheibe und Rahmen braucht man
nichts zu legen. Die Frontscheibe sollte beim Transport versperrt
sein. Den Schlüssel nicht stecken lassen. Er könnte beim Transport
verbiegen oder abbrechen.
|
|
-
The general instructions
above, with the exception of point 6, also apply to these models.
-
The turntable does not need
to be removed as it is screwed on. If the screw is missing, it
should always be removed.
-
There is a plastic cover
around the turntable. This has a gap of 1 - 2 cm to the corrugated
metal surround. Tightening the transport screws reduces this
distance. If the plastic cover rests on the sheet metal surround, it
is better to unscrew it. The plastic has become quite brittle over
time and breaks easily.
-
The records should be
removed. Otherwise they could be damaged by the catch levers.
-
If the amplifier is screwed
on properly, you do not need to remove the tubes.
-
Nothing needs to be placed
between the front screen and the frame. The dome glass should be
locked during transport. Do not leave the key inserted. It could
bend or break off during transport.
|
|
|
|
Hilfreiche Hinweise für den Transport einer Rock-Ola
453, 454, 459, 460 |
|
Helpful advice for transportation of Rock-Ola
453, 454, 459, 460 |
|
Frage: Ich habe überlegt, die Front mit den
Lautsprechern zum Transport abzubauen. Man kann diese ja nach vorne
klappen. Kann man sie auch komplett aushängen, oder ist sie unten mit
Scharnieren verschraubt?
Antwort:
Als erstes: die o.g. allgemeinen Hinweise
gelten auch für diese Modelle.
Darüber hinaus: am besten stellt man sich vor die Musikbox, so dass die Beine etwa 15 cm von der Fronttür entfernt
stehen. Dann die Tür entriegeln und bis auf die Oberschenkel vorziehen.
Nun die Kette links aushängen, Tür links und rechts packen, leicht
anheben (ca. 5 cm) und dann nach vorne wegnehmen.
Am besten hat man eine zweite Person dabei, die beide
Steckerverbindungen abzieht. Die Kabel sind recht kurz, also nicht
zuviel Schwung beim wegnehmen der Tür anwenden. Es hört sich
komplizierter an als es letztlich ist.
Ich persönlich würde auch die Maschine ausbauen sowie Verstärker und
Netzteil. Gefühlt wird so eine Musikbox mit jeder Stufe schwerer. Der
Verstärker und das Netzteil müssen nicht unbedingt raus, aber jedes Kilo
hilft - vor allen wenn man beim Jukebox-Transport Anfänger ist.
Unbedingt Handschuhe mitnehmen.
Ist die Tür ausgebaut, befindet sich dahinter eine Eisenstrebe zur
Gehäuse Stabilisierung. Dort kann man gut anfassen, wenn die Musikbox
seitlich getragen werden muss. Aber die schneidet ein - daher
die Handschuhe.
Ist die Treppe breit genug, dass die Musikbox quer hochgeht, kann man sehr
schön unten anpacken. Dort gibt es links und rechts unter der Box ein
Eisen, wo man sehr gut greifen kann.
Wer sich für eine Zerlegung
entscheidet, nehme einen 1/4 Zoll (Standard Größe für Bit Einsätze)
Steckschlüssel sowie einen 8 mm Steckschlüssel mit - zusätzlich zum
Standard Werkzeug.
|
|
Question: I was thinking
about removing the front with the speakers for transport. You can swing
it out. Is it possible to remove it completely, or is it hinged at the
bottom?
Answer:
Firstly, the given general instructions above also apply to these models.
In addition: It is best to stand in front of jukethe box so that your
legs are positioned about 15 cm away from the front door. Then unlock
the door and pull it forwards up to your thighs. Then unhook the chain
on the left, grab the door on the left and right, lift it slightly (approx.
5 cm) and then remove it forwards.
It is best to have a second person with you to disconnect both plug
connections. The cables are quite short, so don't use too much force
when removing the door. It sounds more complicated than it actually is.
Personally, I would also remove the mechanism, amplifier and power
supply. It feels like a jukebox gets heavier with every stair step. The
amplifier and power supply don't necessarily have to come out, but every
kilo helps - especially if you're a beginner at transporting jukeboxes.
Be sure to take gloves with you.
When the door is removed, there is an iron strut behind it to stabilise
the cabinet. It's easy to get hold of if the jukebox has to be carried
sideways. But it cuts in quite well - hence the gloves.
If the staircase is wide enough for the jukebox to go up crosswise, you
can grab the bottom very easily. There is an iron on the left and right
under the jukebox where you can get a good grip.
If you decide to dismantle the jukebox, take a 1/4 inch (standard size
for bit inserts) socket spanner and an 8 mm socket spanner with you - in
addition to the standard tools.
|
|
|
|
Kann der Lautsprecheraufsatz der 469
für den Transport umgeklappt werden? |
|
Can the upper speaker
compartment of model 469 be folded down for transport? |
|
Der Lautsprecheraufsatz für die Modelle 463, 464,
469, 470 ist relativ leicht zu entfernen, wenn man innen Schrauben löst
und die Stecker absteckt und herausfädelt. Der Aufwand ist zu groß für
kleine Transporte, aber wenn die Musikbox per Palette auf die Reise geht,
sollte man das unbedingt machen, um Beschädigungen zu vermeiden. |
|
The upper speaker compartment
for models 463, 464, 469, 470 is relatively easy to remove by loosening
the screws on the inside, unplugging the plugs and and pulling them out.
The effort is too great for small shipments, but if the jukebox is
travelling on a pallet, you should definitely do this to avoid damage.
|
|
Die Angaben haben keinen
Anspruch auf Vollständigkeit oder Richtigkeit.
Bei den (importierten) Boxen können im Laufe der Jahre durchaus
Veränderungen vorgenommen worden sein. Copyright.
<<< zurück
zur Archiv-Übersicht
|
|
Ein Service von

Copyright by
Stamann Musikboxen |