|
Als erstes sollte sichergestellt werden, dass
Verstärker und Lautsprecher an sich und die Verbindungen untereinander
in Ordnung sind (Steckverbindungen, Leitungen, fester und richtiger Sitz
der Röhren). Ein Verstärker sollte - vor allem nach vielen Jahren - ggfs.
überholt werden. Röhrensockel und -pins sowie Steckverbindungen sollten
sauber sein, ggfs. reinigen; Leitungen dürfen nicht gequetscht,
verklemmt oder beschädigt sein.
Zum Cobra Tonsystem ist folgendes zu
sagen:
Wurlitzer verwendete das Cobra-System zwischen 1948 (W1100) und 1958
(W2200), in den Mono-Jukeboxen auch noch länger (bis W2400).
Die Verbindung vom
Cobra-System zum Verstärker erfolgt über die besondere
Cobra-Leitung. Sie besteht aus zwei Teilen, ein dünner Teil zum
Tonarm und ein etwas stärkerer Teil zum Verstärker.
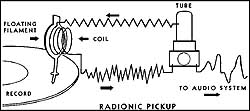
Die Cobra-Systeme arbeiten nach einem anderen Prinzip als heutige
handelsübliche Systeme.
Cobra-Systeme erzeugen selbst keine Spannung im System, wie es
Kristall-, Keramik- oder Magnetsysteme tun. Es wird durch einen
Oszillator (erste Röhre im Verstärker nach dem Eingang) ein
hochfrequentes Signal erzeugt, welches dann durch das Cobra-System nur
moduliert wird.
Diese Modulation wird dann im Verstärker vom Trägersignal wieder
entkoppelt und weiterverstärkt.
Man kann also nicht über das
Anschließen an eine reg. Hi-Fi-Anlage oder Plattenspieler das Tonsystem
und den Verstärker überprüfen, um Defekte dort auszuschließen.
Vorgehen:
-
zum
Überprüfen des Cobra-Systems:
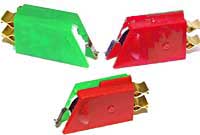
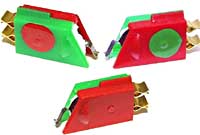
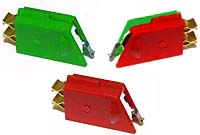
auf dem Nadeleinschub befinden sich zwei Kontaktfederpaare.
Diese sind manchmal auch bei neuen Nadeleinschüben etwas verbogen
und er läßt sich nicht ganz einschieben oder hat schlechten Kontakt.
-
zum
Überprüfen der Cobra-Leitungen:
- diese dürfen nicht gequetscht oder mechanisch beschädigt werden
- Cobra aus dem Tonarm nehmen, mit dem Ohmmeter den Innenwiderstand
an den Kontaktfedern messen
- Cobra einbauen und den Widerstand am Input-Stecker zwischen dem
Steckerstift und der Abschirmung messen
Es muß sich der gleiche Wert messen lassen. Der Wert darf sich
auch nicht verändern, wenn die Leitung bewegt oder am Cobra-System
gewackelt wird
-
weitere
Fehlerquelle Kontaktfehler einer defekte Röhre:
alle Steckverbindungen und alle Röhren (vorsicht bei den Endröhren -
diese werden sehr heiß) am Verstärker bewegen, während eine Platte
spielt. Wenn beim Bewegen eines Steckers bzw. Röhre der Fehler
auftritt, ist das vermutlich die Fehlerquelle. Zum Beheben des
Fehlers genügt es meist, den Stecker bzw. die Röhre so lange
weiterzubewegen (bei laufendem Gerät) bis dabei kein Geräusch mehr
entsteht oder bei abgeschaltetem Gerät mehrmals aus- und einzustecken.
In hartnäckigen Fällen kann es nötig sein, die Stifte mit
einer feinen Messingdrahtbürste zu reinigen.
Wenn das alles nicht zum Erfolg führt, dürfte eine Röhre dabei sein,
zu sterben. Röhren, die einen solchen Fehler verursachen, sind
fast immer klopfempfindlich. Es ist am besten, auf jede einzelne
Röhre mehrmals mit dem Kunststoffheft eines mittelgroßen
Schraubenziehers zu klopfen. Damit die Röhre dabei nicht aus der
Fassung geklopft wird, mit einem Finger dagegenhalten. Das gilt
hauptsächlich für die "kleinen" Vorstufenröhren.
Die drei großen
Röhren (2 x 6L6 und 5U4) sind selten klopfempfindlich, aber sie
verursachen bei einem Defekt meistens ein anderes Fehlerbild. Die
Eingangsröhre 6J5 verursacht beim Abklopfen ein Geräusch, ähnlich
wie wenn man gegen ein Mikrofon klopft. Das ist kein Fehler, die
Fassung der Röhre ist aus diesem Grund in Gummi gelagert.
-
alternativ zum Klopftest
kann man auch nacheinander jede Röhre einzeln austauschen.
Wichtiger Hinweis zum Herausziehen und Ersetzen
von Röhren:
das Herausziehen von Röhren im laufenden Betrieb ist
sicher kein Problem. Einsetzen sollte man sie aber nur, wenn man absolut
sicher ist, dass sie richtig, das heißt nicht verdreht angesetzt werden.
Das geht bei Oktalröhren (z.B. 6L6) leicht, weil sie einen Zapfen mit
Führung haben. Bei Noval-Röhren (z.B. 12AX7) solltest man es nur
machen, wenn man genau auf die Stifte und die Fassung sehen kann.
Andernfalls ist es dringend zu empfehlen, den Verstärker vorher
abzuschalten.
|
|
The first
thing to do is to make sure that the amplifier and loudspeakers
themselves and the connections between them are in order (plug
connections, cables, firm and correct fit of the tubes). An amplifier
should - especially after many years - possibly be overhauled. Tube
sockets and pins as well as plug connections should be clean, clean if
necessary; cables must not be crushed, jammed or damaged.
The following should be said about the Cobra sound cartridge:
Wurlitzer used the Cobra cartridge between 1948 (W1100) and 1958
(W2200), in the mono jukeboxes even longer (until W2400).
The connection from the Cobra cartridge to the amplifier is made by the
special so called Cobra Cable. It consists of two parts, a thin part to
the tone arm and a slightly thicker part to the amplifier.
Cobra cartridges work in a different way than today's commercially
available cartridges.
Cobra cartridges do not themselves generate voltage in the cartridge
like crystal, ceramic or magnetic ones do. A high frequency signal is
generated by an oscillator (first tube in the amplifier after the input),
which is then only modulated by the Cobra cartridge.
This modulation is then decoupled from the carrier signal again in the
amplifier and amplified further.
It is therefore not
possible to check the sound system and the amplifier by connecting it to
a regular hi-fi system or record player in order to rule out defects
there.
Procedure:
-
For
checking the Cobra cartridge:
There are two pairs of contact springs on the needle insert. These
are sometimes slightly bent, even on new needle inserts, and the
insert cannot be pushed in all the way or has poor contact.
For
checking the Cobra leads:
- These must not be crushed or mechanically damaged.
- Remove the Cobra from the tone arm, measure the internal
resistance at the contact springs with the ohmmeter
- Install the Cobra and measure the resistance at the input
connector between the connector pin and the shield.
It must be possible to measure the same value. The value must be
identical even when the wire is moved or the Cobra cartrdige gets shaken.
Another
source of error contact error of a defective tube:
Move all connectors and all valves / tubes on the amplifier while a record is playing (be careful with the
output valves -
they get very hot).
If the error occurs while moving a connector or tube / valve, this is probably
the source of the fault.
To fix this kind of fault, it is usually sufficient
to move the plug or the tube / valve while the jukebox is playing as
long as no noise
can be heard anymore; or to unplug and plug them several times with the
jukebox being
turned off.
In stubborn cases, it might be necessary to clean the
pins with a fine brass wire brush.
If all this fails, a valve / tube is probably about to die. Valves /
tubes that cause
this kind of failure are almost always sensitive to knocking. It
is best to tap each valve / tube several times with the plastic handle of a
medium-size screwdriver. To prevent the tube from being knocked out of
the socket while doing so, hold a finger against it. This applies
mainly to the "small" preamplifier valves / tubes.
The three large valves / tubes (2 x 6L6 and 5U4) are rarely sensitive to
knocking, but they usually cause a different error pattern when
defective.
The input tube 6J5 makes a noise when tapped, similar to tapping
against a microphone. This is not a defect, the socket of the tube
is mounted in rubber for this reason.
Alternatively to the knock test, you can also replace each valve
/ tube
one by one.
Important note
on removing and replacing tubes:
Removing tubes during operation is certainly no problem. However, they
should only be inserted if you are absolutely sure that they are
inserted correctly, i.e. not twisted. This is easy with octal tubes (e.g.
6L6), because they have a pin with a nose. With Noval tubes (e.g. 12AX7)
you should only do it if you can see exactly on the pins and the socket.
Otherwise it is strongly recommended to switch off the amplifier before.
|
|
Im Vorfeld ist zu bedenken, daß der originale
Tonarm nicht verwendet werden kann. Ein Tonarm eines späteres
Stereo-Modells ist notwendig. Er sieht äußerlich identisch aus, hat
jedoch innen mehr Platz zur Verfügung. Als Tonabnehmer kann z.B. das Pfanstiehl P132D verwendet werden. Zudem muß die spezielle sog. "Cobra-Leitung"
entfernt und durch ein flexibles Tonarmkabel ersetzt werden. Zur
Anpassung des Verstärkers gibt es zwei Möglichkeiten:
-
Entfernen der Teile
PEC-1, C6, R9 und R10 im Verstärker (530/532), ablöten des
Eingangskabel und anschließen bei Junction R4 und R5.
-
Harold Hagen: Anstatt die 12AU7 (Cobra-Oszillator) zu
umgehen und direkt zur 6AN8 zu gehen, verwende die 12AU7 als
Spannungsverstärkerstufe. Nach dem Schaltplan des 530 / 532 entferne C1,
C2 und C3 (siehe 12AU7 im Schaltplan). Alles andere bleibt gleich. Der
Kathodenwiderstand wird so eingestellt, dass am AVC ca. 15-20 Volt
anliegen (gemessen über den 2 µF bzw. MFD-Kondensator).
Beginne mit einem ca. 2K Widerstand, der zwischen Pin 8 und Masse
eingefügt wird. Der Eingang (vom Keramik-Tonsystem P132D) geht an einen
1-Meg-Widerstand und dann an Pin 7 (wenn es an Höhen fehlt, ca. 50-100
pF bzw. MMFD hinzufügen) über den 1-Meg-Eingangswiderstand. Wenn es zu
viel Bass hat, schließe den Eingang an Masse (versuche es mit einem
1-Megawiderstand). Lasse R1 grundsätzlich in der Schaltung.
Pin 6 (Anode), Pin 7 (Gitter) und Pin 8 (Kathode) werden als
Spannungsverstärker verwendet.
Ich habe letztlich R1 in der Schaltung gelassen (1 meg). Außerdem habe
ich einen 100pF-Scheibenkondensator parallel zum
1-Megawatt-Eingangswiderstand hinzugefügt (ich benutzte die Leiterbahn,
an die C3 gebunden war). Ich begann mit einem 50k-Potentiometer, um den
Kathodenwiderstand so einzustellen, dass ich den besten Klang erhielt
(letztlich bei etwa 29k). Dann habe ich Widerstände mit dem endgültigen
Wert installiert, beginnend bei 2k (klang schrecklich). Es ist auch
wichtig, nicht den originalen Cinch-Eingang auf der Rückseite des
Magazins zu verwenden (da er geerdet ist). Verlege ein neues
Eingangskabel für den späteren "Stereo"-Tonarm. Verbinde den linken und
rechten Ausgang (am P-132D) miteinander sowie Ihre Erdungen miteinander.
Ich muss zugeben, dass ich so, anstatt die 6AN8-Röhre zu verwenden,
einen wirklich schönen Klang mit viel Wurlitzer-Bass erhalte.
|
|
In advance it must be considered that the original
tone arm cannot be used. A tone arm of a later stereo model is needed.
It looks identical on the outside, but has more space available on the
inside. The Pfanstiehl P132D e.g. can be used as pickup. In addition,
the special so-called "Cobra Wire" must be removed and replaced by a
flexible tonearm wire. For the adjustment of the amplifier there are two
possibilities:
-
Remove parts PEC-1, C-6, R-9 and R-10 in the amplifier (530 or 532),
unsolder the input wire and connect to junction R-4 und R-5.
-
Harold Hagen:
Instead of bypassing the 12AU7 tube (cobra oscillator) and going
directly to the 6AN8 tube, use the 12AU7 as a voltage amplifier stage.
Following the schematic of 530 / 532, remove C1, C2, and C3 (looking at
12AU7 on schematic). Everything else stays the same. The cathode
resistor is adjusted to give about 15-20 volts on the AVC (measured
across the 2 µF resp. MFD capacitor).
Start with ca. 2K resistor which is added between pin 8 and ground. Your
input (from ceramic cartridge P132D) goes to a 1 meg resistor then to
pin 7 (if it lmisses treble add a ca. 50 - 100 pF resp.
MMFD) across the 1 meg
input resistor). If it has too much bass, shunt the input to ground (try
1 meg resistor).
Basically leave R1 in the circuit.
What you are doing is using pin 6 (anode), pin 7 (grid) and pin 8 (cathode)
as your voltage amplifier.
I ended up leaving R1 in the circuit (1 meg). I also added a 100pF disc
capacitor in parallel across the 1 meg input resistor (I used the trace
that C3 was tied to.) I started with a 50k pot to adjust the cathode
resistor to get the best sound (I ended up with about 29k). Then I
installed resistors of final value, starting at 2k (sounded terrible).
It is also important not to use the original RCA input on the back of
the carousel (because it is grounded).
Run a new input cable for your later
model "stereo" tonearm. Also tie your left and right outputs (on P-132D)
together. Also tie your grounds together.
I have to admit that doing it this way, rather than using the 6AN8 tube,
results in a really nice sound with lots of Wurlitzer bass.
|