|
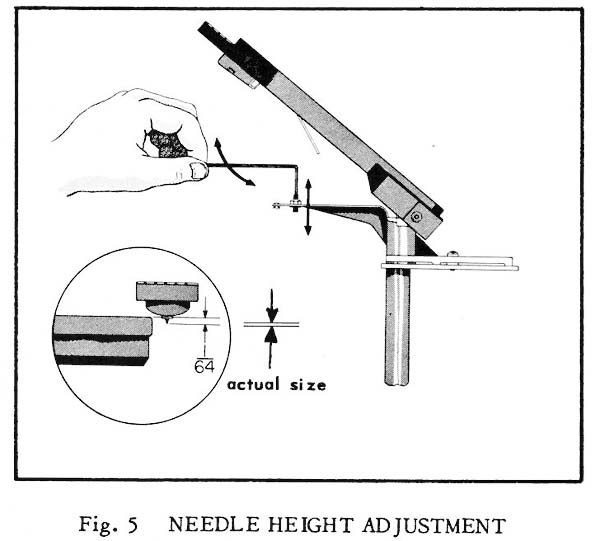
Tonarmhöhe: AMI F - Continental
2 |
|
Tone arm hight: AMI F - Continental
2 |
| Einstellung: 1/64"
unterhalb der Oberseite des Plattentellers |
Adjustment: 1/64" below surface of turntable. |
 |
|
|
|
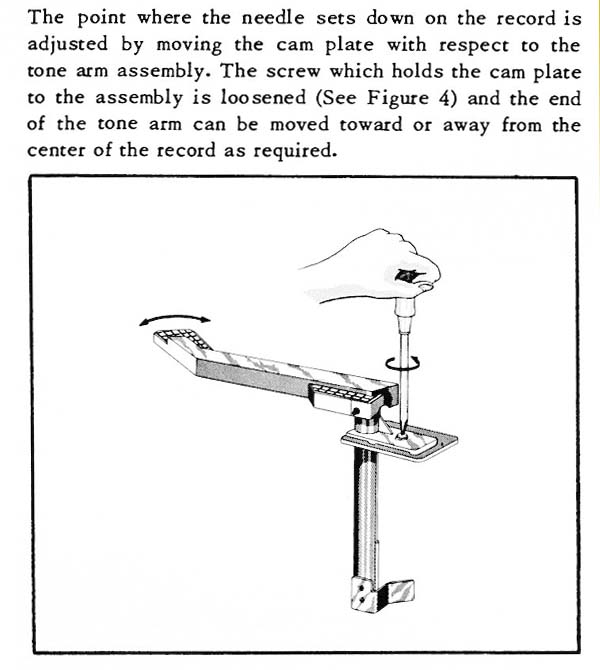
Tonarm Aufsetzpunkt –
Justierung AMI F -
Continental 2 |
|
Tone arm set down – adjustment in
AMI F -
Continental 2 |
|
Die Halterung, auf der der Tonarm montiert ist, hat
auch eine Blechplatte mit zwei nach unten stehenden Zapfen. Letztere werden von der Nocke geführt. Die Platte ist mit einer
Schraube hinter dem Tonarm befestigt. Wird diese Schraube gelockert,
kann der Aufsetzpunkt des Tonarms eingestellt werden.
Vorgehen: eine Platte auflegen lassen und den Serviceschalter auf OFF
stellen. Dann den Tonarm von der Platte heben, damit die Nadel nicht
beschädigt wird und die Schraube lockern. Damit die Nadel nicht auf die
Platte zurückfallen kann, kannst auch ein Stück Karton unter die
Schraube, die mitten auf dem Tonarm sitzt, gelegt werden. Dadurch
braucht man eine Hand weniger. Dann drückt man die Führungsplatte mit
den zwei Zapfen leicht gegen die linke Flanke der Nocke. Danach kann der
Tonarm so eingestellt werden, dass die Nadel etwa 3 mm vom Plattenrand
über der Einlaufrille steht. Die Schraube wieder anziehen.
Da die Platten unterschiedlich geschnitten sind und auch einen
unterschiedlichen Durchmesser haben, kann es vorkommen, dass man die
Prozedur wiederholen muss. Es gibt (oder gab) auch Testschallplatten, die
eine korrekte Einstellung erleichtern. |
|
The bracket on
which the tonearm is mounted also has a metal plate with two
downward-pointing pins. These pins are guided by the cam. The
metal plate is secured behind the tonearm with a screw. If this
screw is loosened, the contact point of the tonearm can be
adjusted.
Procedure: Let a record being placed on the turntable and set
the service switch to OFF. Then lift the tonearm off the record
so that the stylus does not get damaged and loosen the screw. To
prevent the stylus from falling back onto the record, you can
also place a piece of cardboard under the screw in the centre of
the tonearm. This means you will need one hand less. Then press
the guide plate with the two pins slightly against the left side
of the cam. Now the tone arm can be adjusted so that the stylus
is about 3 mm from the edge of the record above the start groove.
Tighten the screw afterwards.
As the records are cut differently and also have different
diameters, it may be necessary to repeat the procedure. There
are (or had been) also test records which helped for easier
correct adjustment.
|
 |
|
|
|
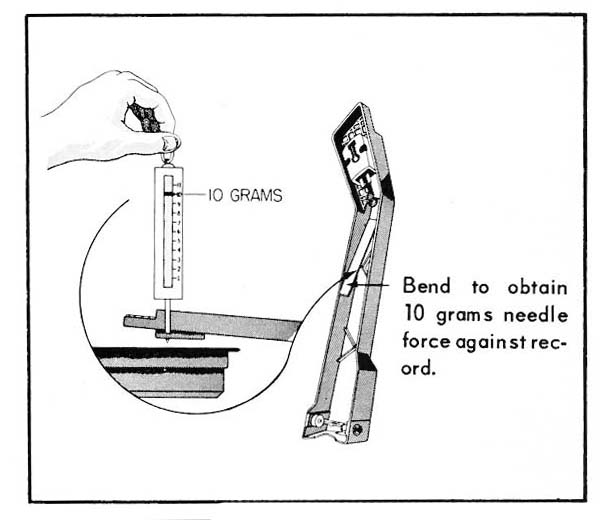
Auflagegewicht: AMI F - Continental 2 |
|
Tone arm weight: AMI F - Continental 2 |
|
Hinweis: Die Manuals der AMI F und G geben ein
Auflagegewicht von 10 bzw. 8 - 12 Gramm an. Das sollte nach Möglichkeit
reduziert werden, um sowohl die Singles als auch die Tonnadel zu
schonen.
Bei Mono-Tonsystemen sollten nicht mehr als 7 Gramm erreicht werden, bei
Stereo-Tonabnehmer ggfs. nur bis 6 Gramm. |
|
Note:
Service Manual for AMI F states up to 10 grams needle pressure.
This should be reduced as much as possible to reduce wear
of records and tip of stylus.
For Mono cartridges it should not be more than 7 grams, for
stereo cartridges up to ca. 6 grams. |
 |
|
|
|
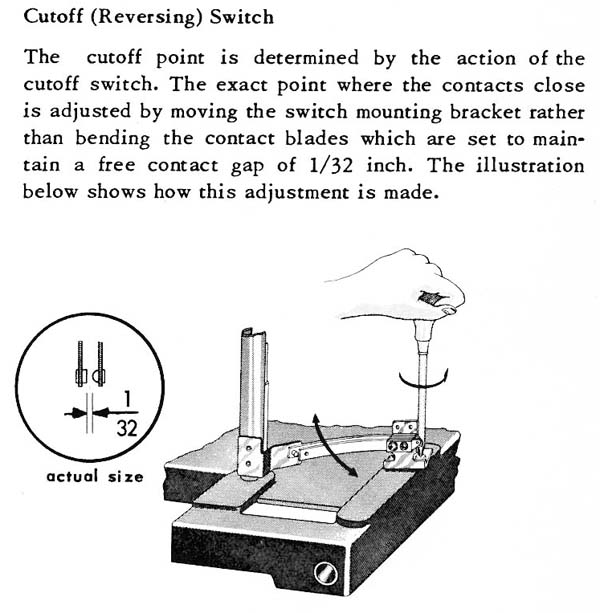
Tonarm Endabschaltung:
45 RPM Modelle bis G120 |
|
Tone arm cut-off: 45 RPM models to
G120 |
|
Abschaltpunkt (Umkehrung)
Der Abschaltpunkt wird durch
die Betätigung des Endabschalters bestimmt. Der genaue Punkt, an
dem sich die Kontakte schließen, wird durch Verschieben der
Schalterhalterung eingestellt und nicht durch Verbiegen der
Kontaktblätter, die so eingestellt sind, dass ein offener
Kontaktabstand von 1/32 Zoll erhalten bleibt.
Die nebenstehende Abbildung
zeigt, wie diese Einstellung vorgenommen wird. |
 |
|
|
|
|
Tonarm Endabschaltung: Modelle G200 - Continental 2 |
|
Tone arm cut-off: G200 - Continental 2 |
|
Für die Endabschaltung ist ein Mikroschalter zuständig.
Dieser kann, obwohl ein Klicken hörbar ist, elektrisch defekt sein.
Schaltet er nicht, wird am Ende der Single, wenn der Tonarm die
Auslaufrille erreicht hat, kein elektrischer Kontakt zum Zurückschwenken
des Tonarmes gegeben.
Der Schalter sollte ausgebaut und sein Durchgang gemessen werden.
|
|
A micro-switch
is responsible for the cut-off of the record. This can be
electrically faulty regardless of a hearable "click".
If this switch doesn't work the needed electrical signal does
not get created when the tone arm reaches the end. Hence the
tone arm does not move back at the end of the record.
The micro switch should be taken out for measuring its function. |
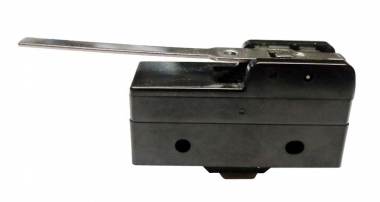
Mikroschalter G200 - Continental 2 |
|
|
|
Tonarm Endabschaltung –
Relais in der Relaisbox einer Continental 2 zieht nicht an |
|
The tone arm cut-off relay in relay box of AMI
Continental 2 does not attract |
|
Bei der Endabschaltung wird das Relais in der Relais Box nicht gezogen.
Wird es per Hand überbrückt, macht der Transfer Motor genau das, was er
muss und auch beim normalen Wahl-Prozedere zieht dieses Relais
einwandfrei.
Den Cut-Off Switch Schalter habe ich bereits erneuert und diese
Abschaltung funktioniert einwandfrei, die Stummschaltung wird aktiviert.
Antwort: Bei Geräten dieser Altersklasse kommt es relativ häufig
zu Kontaktfehlern in den Mikroschaltern. Im Stromkreis für das Reversing
Relay liegen die Stopping Switches (auf dem Plattenmagazin hinter dem
Stiftrad), die Transfer Switches und vor allem Camshaft Switch #3.
Vermutlich arbeitet einer dieser Mikroschalter nicht richtig. Eine
Anleitung zum Prüfen von Mikroschaltern gibt es hier [www.jukebox-world.de]. |
|
The cut-off relay in the relay
box does not attract at the end of the record. If it gets bridged
manually, the transfer motor does exactly what it has to do, and this
relay also operates perfectly during the normal selection procedure.
I have already replaced the cut-off switch and this cut-off works
perfectly, the mute function is activated.
Answer: Contact faults
in microswitches are relatively common in jukeboxes of this age. The
circuit for the reversing relay contains the stopping switches (on the
record magazine behind the pin wheel), the transfer switches and, above
all, camshaft switch #3. One of these microswitches is probably not
working properly. Instructions for checking microswitches can be found
here [www.jukebox-world.de]
- sorry, German only. |
|
|
|
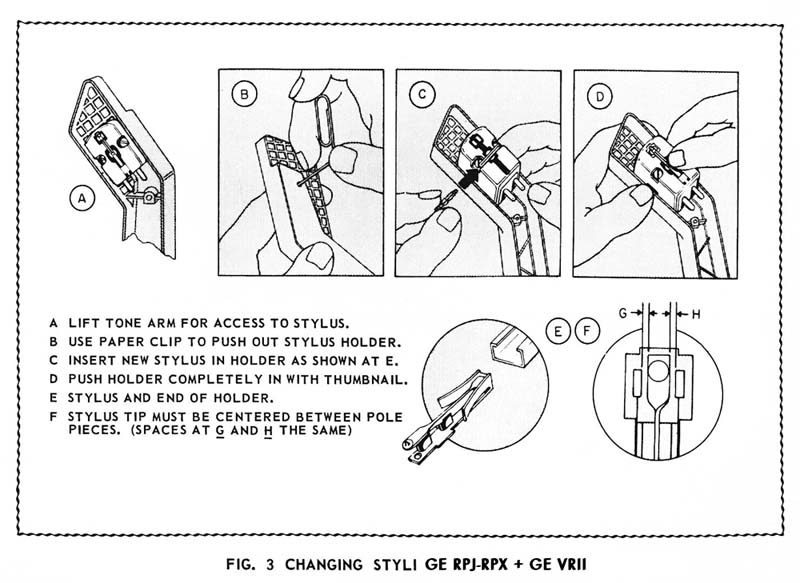
Wechseln der Tonnadeln GE RPJ-RPX und GE
VRII |
|
Changing styli / needles GE RPJ-RPX
and GE
VRII |
|
 |
|
|
|
Tonarm linksseitig,
Position des Tonsystems |
|
Tone arm at left, position of the cartridge |
|
Es sieht so aus, als ob der Tonarm auf der falschen Seite
montiert ist. Das hat einen einfachen Grund: wenn die Platte gegen den
Tonarm läuft, treten keine Skating - Kräfte auf und es erübrigen sich
Antiskating - Maßnahmen. Das hat Rowe ab ca. 1964 so gebaut.
Das Tonsystem ist zudem "falsch herum" montiert, mit der
Tonnadel nach hinten, um in Spielrichtung zu sein. |
|
It looks as if the tonearm is
mounted on the wrong side. There is a simple reason for this: If the
record rotates runs against the tonearm, no skating forces occur and
there is no need for anti-skating measures. Rowe built it this way from
around 1964 an upwards.
The cartridge is also mounted "the
wrong way round", with the stylus pointing backwards to be in play
direction. |
|
|
|
Endabschaltung einer
ROWE TI-2 funktioniert oft nicht, der Tonarm springt
ggfs. ans Ende der Rillen zurück. |
|
The cut-off of a Rowe TI-2 often does not work
properly, the tone arm might jump back to the end of the grooves. |
|
Bei einer ROWE
TI-2 funktioniert oft die Endabschaltung nicht richtig. Das
Phänomen tritt bei verschiedenen Platten auf (unterschiedl. Spieldauer).
Die Endabschaltung funktioniert bei derselben Single
manchmal, manchmal nicht.
Wenn der Tonarm das Ende der Platte erreicht, springt er zurück zum Ende
des Aufnahmebereichs der Single (also noch vor der Leerrille). Das
manuelle Betätigen des Löschschalters funktioniert - manchmal muss er 1
Sek. gedrückt gehalten werden.
Daraus schließe ich, dass die Endabschaltung an sich funktioniert, aber
etwas den Tonarm davon abhält, weiter zur Mitte der Single zu gehen, um
dann die Endabschaltung auszulösen.
Antwort:
In der Tat scheint etwas den Tonarm davon abzuhalten, weiter in die
Leerrille zu gehen. Es gibt drei Möglichkeiten:
-
steifes/schwergängiges Tonarmkabel
-
steifes/schwergängiges "Auto-Cancel"-Kabel oder
-
Reibung am Schaft des
Tonarmes (ggfs. keine Schmierung?)
Vorgehen: Einen Tropfen
leichtes Öl (Ballistol o. vergleichbares) auf den Schaft geben und das
Auto-Cancel-Kabel herausziehen. Hilft keines dieser beiden Vorgehen,
sollte das Tonarmkabel ersetzt werden.
Auto-Cancel: Funktion, wenn der Greifer keine
Single auflegt |
|
On my ROWE TI-2, the cut-off
often does not work properly. The phenomenon occurs with different
records (with different playing times), and the cut-off sometimes works
with the same record and sometimes not.
When the tonearm reaches the end of the record, it jumps back to the end
of the recording area of the record (i.e. before the empty groove). The
manual operation of the cancel switch works - sometimes it has to be
held down for 1 second.
This leads me to the conclusion that the cut-off switch itself is
working, but something is preventing the tonearm from moving further to
the centre of the recod to activate the cut-off switch.
Answer:
Indeed, something seems to be preventing the tonearm from going further
into the run-out groove. There are three possibilities:
-
Stiff/sluggish tonearm
cable
-
Stiff/sluggish "auto-cancel"
cable or
-
Friction on the tonearm
shaft (possibly no lubrication?)
Procedure: Apply a drop of
light oil (Ballistol or similar) to the shaft and pull out the
auto-cancel cable. If neither of these procedures helps, the tonearm
cable should be replaced.
Auto-Cancel: Function if the
gripper does not apply a single |
|
Die Angaben haben keinen
Anspruch auf Vollständigkeit oder Richtigkeit.
Bei den (importierten) Boxen können im Laufe der Jahre durchaus
Veränderungen vorgenommen worden sein. Copyright.
<<< zurück
zur Archiv-Übersicht
|
|
Ein Service von

Copyright by Stamann
Musikboxen |