|
1. Wahlablauf, allgemeine Beschreibung –
Modelle mit einem Flachriemen im Plattentellerantrieb
(1968 - 1976) |
|
1. Selection, general description –
models with one flat TT drive belt
(1968 - 1976) |
|
Beschreibung von
charly49:
Wenn Kredit vorhanden ist, muß die Kreditanzeige leuchten und die
Tastenverriegelungsspule angezogen sein, damit die Tasten einrasten
können. Wenn man je eine Buchstaben- und Zifferntaste drückt, rasten sie
ein und der Wahlmotor (unter der Abdeckung mit dem Fahrknopf, links vom
Plattenmagazin) beginnt zu laufen. Der Motor läuft solange, bis die Schaltnocke mit den vier Kontakten eine viertel Umdrehung gemacht hat.
Während der Motor läuft, muß als erstes die Subtraktionsspule in der
Krediteinheit kurz anziehen. Dadurch wird ein Kredit abgezogen, und die
Wahl wird in den Magnetkernspeicher eingeschrieben. Dann wird die
Tastenverriegelungsspule abgeschaltet, so daß die Tasten entriegelt
werden. Wenn noch Kredit vorhanden ist, zieht sie einen Augenblick
später wieder an. Außerdem wird der Hebel mit dem einzelnen Kontaktsatz
(der auch durch den Fahrknopf betätigt werden kann) mechanisch nach
unten gezogen, dadurch wird der Laufwerksmotor eingeschaltet. Dieser
bleibt so lange eingeschaltet, bis das Laufwerk zwei Mal den rechten
Anschlag erreicht.
Wenn die
Tastenverriegelungsspule angezogen hat, zieht auch das
Wiederanlauf-Sperrelais (im Inneren der Steuerzentrale) an. Sobald nun
die Wahltasten gedrückt werden, zieht zusätzlich das Start Relais
(ebenfalls in der Steuerzentrale) an. Das Start Relais wird von der
Tastatur gesteuert. Dafür gibt es auf jeder Taste einen Umschaltkontakt.
Solange die Taste nicht gedrückt ist, wird der Stromkreis jeweils zur
nächsten Taste weiter verbunden. Es sind also alle Tasten in Serie
geschaltet. Wenn eine Taste gedrückt wird, wird die Serienschaltung an
dieser Stelle unterbrochen und der Strom zu einer Sammelleitung
umgeschaltet. Wenn man die Nummer A1 wählt, ist daher nur ein Kontakt
auf dem Buchstaben-Tastensatz und ein Kontakt auf dem Ziffern-Tastensatz im Stromkreis. Je höher die gewählte Nummer ist, desto mehr
Kontakte liegen im Stromkreis. Bei V8 sind es 20 Buchstaben - Kontakte
und 8 Ziffern - Kontakte.
Eine ähnliche Schaltung gibt es nochmals, nur dass dabei nicht auf eine
Sammelleitung geschaltet wird, sondern auf die Einschreibleitungen des
Magnetkernspeichers. Diese Stromkreise werden nur vorbereitet. Erst wenn
die Subtraktionsspule in der Krediteinheit anzieht, wird ein genau
definierter Stromimpuls durch die vorbereiteten Stromkreise geschickt
und dadurch die Wahl eingeschrieben.
Detaillierter beschrieben
findet man dies in den Schaltsequenzen der NSM Unterlagen.
|
|
Courtesy
charly49:
If credit is established, the credit indicator must be illuminated and
the
latchbar coil activates and the pushbuttons can be engaged.
When one letter key and one number key gets pressed, they will engage
and the selector motor
(under the cover with the scan button at left of the record magazine)
starts to run. The motor will run until the cam with the four contacts
has made a quarter turn.
While the motor is running, the subtract coil in the credit unit needs
to attract at first. This subtracts one credit, and the selection gets
written-in into the magnetic core memory. Then the latchbar solenoid
deactivates and the pushbuttons get released.
If there is still credit established, the solenoid will attract again a
short time later. In addition, the lever with the single set of
contacts is (which can also be operated by the scan button) is pulled down
mechanically, thus switching on the carriage motor. This remains
switched on until the carriage reaches the right side stop two times.
When the latch bar solenoid attracts, the interlock
relay (located inside the control center) attracts too. As soon as the
pushbuttons get pushed, the start relay (also inside the control unit)
also gets energized. The start relay is controlled by the keyboard. For
this purpose, there is a changeover contact on each pushbutton.
As long as the pushbutton is not pressed, the circuit is connected to
the next pushbutton. So all pushbuttons are connected in series.
If a pushbutton is pressed, the series connection is interrupted at this
point and the current is switched to a common line. Therefore, when
selecting the number A1, there is only one contact on the letter
pushbutton set and one contact on the number pushbutton set in the
circuit. The higher the selected number is, the more contacts are in the
circuit. For V8 there are 20 letter contacts and 8 number contacts.
There is a similar circuit again, only that it
does not get
switched to a common line but to the write-in lines of the magnetic core
memory unit. These circuits only get prepared. Only when the subtract coil in
the credit unit is attracted, a precisely defined
current pulse gets sent through the prepared circuits, and hence the selection
gets
written in.
More detailed description can be found in the
sequences of operation of the NSM manuals. |
|
|
|
2. Wahlablauf, Kreditwerk ohne und mit
Thyristor –
Modelle mit einem Flachriemen im Plattentellerantrieb
(1968 - 1976) |
|
2. Selection sequence, credit unit w/o and with
thyristor - models with one flat drive belt in TT drive (1968 - 1976) |
|
Beschreibung von
charly49:
Der Wahlvorgang ist folgendermaßen: Wenn ein Buchstaben- und eine
Zahlentaste gedrückt werden und einrasten, werden Stromkreise von der
Tastatur zu den Einschreibleitungen im Magnetkernspeicher vorbereitet.
Dann beginnt der Wahlmotor zu laufen und es wird unter anderem ein
Kontakt geschlossen, der den Subtraktionsmagneten im Kredit-Speicherwerk
aktiviert. Der Subtraktionsmagnet stellt das Kreditwerk um einen Schritt
zurück und betätigt den Wischkontakt.
Bei der alten Version (ohne Thyristor) stellt der Wischkontakt
eine Verbindung zwischen Pin 13 und 14 auf der Anschlussleiste her. Das
komplettiert die Stromkreise, die zuvor durch die Tastatur vorbereitet
wurden. Dadurch wird ein Stromimpuls durch die Einschreibleitungen des
Magnetkernspeichers geschickt und die Wahl wird eingeschrieben. Der
Stromimpuls entsteht durch die Entladung des Einschreibkondensators (C5
- 150nF) in der Versorgungseinheit.
Bei der Version mit Thyristor wird durch das Schließen des
Wischkontakts der Thyristor gezündet und dieser stellt die Verbindung
von Pin 13 zu Pin 14 her. Der Vorteil dieser Schaltung ist, dass einige
Ohm Übergangswiderstand des Wischkontakts keine Rolle spielen, weil der
Thyristor den tatsächlichen Schaltvorgang durchführt.
Wenn man nicht sicher ist, ob die Thyristorschaltung funktioniert (oder
wenn der Thyristor defekt ist), kann man den zweiten Anschluss des
Wischkontakts direkt an Pin 14 legen (ein Anschluss liegt schon an Pin
13).
Wichtig ist auch, dass der Einschreibkondensator in Ordnung ist und dass
er korrekt über den 270K-Widerstand auf etwa 300V geladen wird. In den
meisten Fällen liegt es an Kontaktfehlern in der Tastatur.
Detaillierter beschrieben
findet man dies in den Schaltsequenzen der NSM Unterlagen.
|
|
Description by charly49:
The selection process is as follows: When a
letter button and a number button are pressed and engage, circuits are
prepared from the keyboard to the write-in lines in the magnetic core
memory. Then the selection motor begins to run and, among other things,
a contact gets closed which activates the subtraction solenoid in the
credit core memory. The subtraction solenoid shifts the credit unit back
one step and actuates the wiper contact.
In the old version (without thyristor), the wiper contact makes a
connection between pins 13 and 14 on the terminal block. This completes
the circuits previously prepared by the keyboard. This sends a current
pulse through the write-in lines of the magnetic core memory and the
selection is written in. The current pulse is created by the discharge
of the write-in capacitor (C5 - 150nF) in the supply unit.
In the version with thyristor,
the thyristor is ignited by closing the wiper contact and this
establishes the connection from pin 13 to pin 14. The advantage of this
circuit is that a few ohms of contact resistance of the wiper contact do
not matter, because the thyristor does the actual circuit.
If you are not sure if the thyristor circuit works (or if the thyristor
is defective), you can connect the second terminal of the wiper contact
directly to pin 14 (one terminal is already connected to pin 13).
It is also important that the write-in capacitor is OK and that it is
correctly charged to about 300V via the 270K resistor. In most cases it
is due to contact errors in the keyboard.
More detailed description can be found in the
sequences of operation of the NSM manuals. |
|
|
|
3. Allgemeiner Funktionsablauf
– Modelle mit einem Flachriemen im Plattentellerantrieb
(1968 - 1976) |
|
3. General process of sequences -
models with one flat drive belt in TT drive (1968 - 1976) |
|
Normalerweise ist es so,
dass, wenn Kredit auf dem Gerät ist, der Tastenmagnet anzieht und so die
Tasten einrasten können.
Wenn nun eine Zahlen- und eine Buchstabentaste gedrückt sind, läuft der
Wahlmotor in der linke Kiste neben dem Magazin an und lässt die Nocke
eine Position weiterlaufen.
Durch die Nockenkontakte werden die Tasten kurz entriegelt, wodurch
diese herausspringen. Die Wahl wird eingeschrieben und ein Kredit
abgezogen. Dabei wird mechanisch die Einheit betätigt, die den
Motorkontakt (in der Kiste) schließt.
Jetzt bekommt der Motor am Laufwerk 110 V~ über das Motorrelais und
beginnt so, das Laufwerk in Bewegung zu setzen.
Hat das Laufwerk nun eine Wahl gefunden, wird der Bremsmagnet betätigt,
und das Laufwerk wird im weiteren Verlauf durch die Auslösung des
Bremsmagneten mechanisch von Laufbetrieb auf "Platte einfädeln"
umgeschaltet. Ist die Platte im Magazin, wird durch einen Kontakt im
Laufwerk der bzw. die Verstärker zugeschaltet und der Motor auf 80V~
umgeschaltet. Dieser muss jetzt nur noch den Plattenteller drehen,
nicht mehr die Mechanik.
Detaillierter findet man
dies in den Schaltsequenzen der NSM Unterlagen beschrieben.
|
|
Usually, when credit has been
established, the latch solenoid attracts, allowing the buttons to engage.
Now, when a number button and a letter button get pressed, the
selection motor in the left box next to the
magazine starts to run, causing the cam to move one position forward.
The cam contacts then briefly unlock the pushbuttons, causing them to
release. The selection is written in and a credit is withdrawn. This
mechanically actuates the unit that closes the motor contact (in the
box).
Now the motor on the carriage gets 110 V~ through the motor relay and so
begins to set the carriage to run.
If the carriage now found a selection, the brake solenoid is actuated.
In the further process by releasing the brake solenoid, the carriage is
mechanically switched from running mode to pick up the record.
Is the record located is in the record magazine, a contact in the
carriage activates amplifier(s) and the motor is switched to 80V~. This
now only has to spin the record and no longer the heavy carriage.
More detailed description can be found in the
sequences of operation of the NSM manuals. |
|
|
|
Wahlmotor läuft rückwärts -
Modelle Prestige 120C und vgl. |
|
Selection motor runs backwards - models Prestige
120C and similar |
|
Frage: Wenn ich eine Wahl tätige, fängt der
Wahlmotor zuerst an in entgegen gesetzter Richtung zu laufen und
verbiegt dabei diverse Nockenkontakte. Danach läuft er richtig,
aber die Kontakte sind verbogen und die Nockenwelle läuft durch.
Kennt jemand diesen Effekt? Liegt es am Motor selber oder ist es die
Ansteuerung?
Antwort: Die Fehlerursache liegt vermutlich im
Motor selbst. Er hat eine Rücklaufsperre, die im Laufe der Jahre
verharzen kann.
Abhilfe: ausbauen und reinigen.
In meinem Falle war ein französischer Crouzet Wechselstrommotor mit 24V
/ 50 Hz eingebaut, der im Inneren eine Sperre hat. Diese hat ihren
Dienst versagt. Der Motor selbst ist verstemmt und lässt sich nur
aufbiegen, was ich erst einmal gelassen habe. Nach mehrmaligem Spülen
durch die Gehäusefugen von Außen mit entfettendem Bremsenreiniger war
kein Erfolg zu verzeichnen. Erfolg brachte mein Nikotinreiniger (ähnlich Domestos) und heißes Wasser. Nach ausgiebigem Durchpusten mit Pressluft
und einer Lagerperiode auf dem warmen Kaminsims tut er wieder wie er
soll.
Nach Sichtung meiner Ersatzteile gibt es wohl auch andere
Motorenhersteller (Sodeco-Saia/Schweiz). Wie häufig dieser Fehler dort
auftritt, kann ich leider nicht sagen.
Auf jeden Fall sollten nach der Aktion alle Nockenkontakte penibel auf
korrekte Stellung überprüft werden.
|
|
Question: When I make a
selection, the selection motor first starts to run in the opposite
direction, bending various cam contacts. Then it runs correctly, but
then the contacts are bent and the camshaft runs through.
Does anyone know this effect?
Is it the motor itself or is it the control?
Answer: The cause of the
fault is probably located in the motor itself. It has a backstop that
can gum up over the years.
Remedy: remove and clean.
In my case, a French Crouzet AC motor with 24V / 50 Hz was installed,
which has a lock inside. This had failed ro work right. The motor itself
is caulked and can only be opened by bending, which I did not for now.
After several times flushing through the housing joints from the outside
with degreasing brake cleaner, there was no success. Success brought my
nicotine cleaner (similar Domestos) and hot water. After extensive
blowing with compressed air and a resting time on the warm oven it does
again what it shall do.
After looking at my spare parts lists, there were probably also other
motor manufacturers (Sodeco-Saia/Switzerland). How often this error
occurs with those motors, I can not say unfortunately.
In any case, after this work, all cam contacts should be meticulously
checked for correct position. |
|
|
|
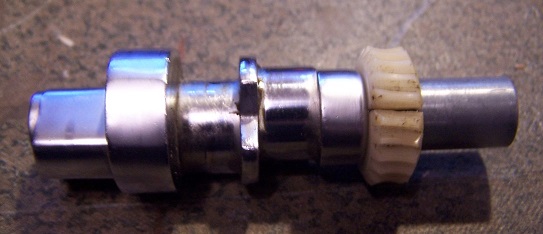
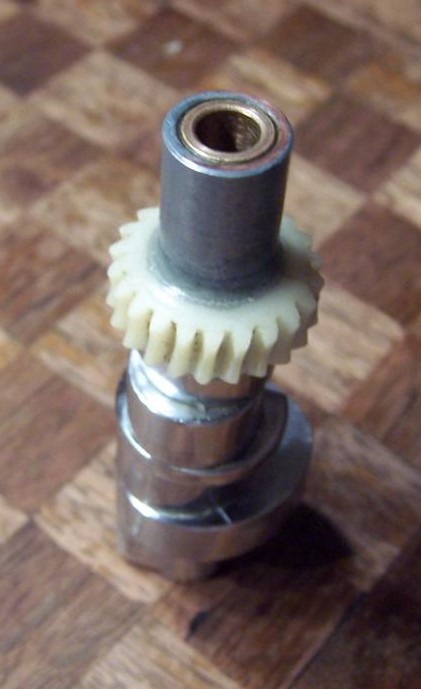
Hauptwelle mit
Steuernocke und Zahnrad |
|
Main shaft with cam and gear |
|
Photos:
Rame_x
|
NSM hat in seinen
Modellen Hauptwellen zunächst ohne (bis Serenade Technik), dann mit Steuernocke verwendet (ab Kernspeichertechnik).
Bei diesen Wellen gibt es zwei Schwachstellen:
1. Die Nocke ist aus
Kunststoff gefertigt und sie bricht. Dadurch rutscht sie auf der Welle
und bewegt sich nicht entsprechend mit. Ersatz gibt es aus Messing, so
dass ein langer Halt gewährleistet ist. Wichtig ist die Größe des
Innendurchmessers der Nocke zu ermitteln:
10 mm |
12 mm |
12,2 mm
Das folgende Foto zeigt beispielhaft eine der Hauptwellen mit neuer Steuernocke.
Verwendet wurde diese Art ab 1969 bei den Modellen mit
Ringkernspeicher-Technik.
Fotodokumentation zum Ausbau der Nockenwelle
von Detlev 54 (pdf).
|
|
NSM did use in their
models main shaft first without (up to Serenade technology),
then with a cam (models with magnet core memory unit and up). On
both main shaft there are two weak points:
1. The cam is made from
plastic and can break. Then it slips on the shaft and doesn't
move as it should. Replacements from brass are avialble which
guearantee a longer life. It is important to evaluate the inner
diameter of the cam:
10 mm |
12 mm |
12,2 mm
The following photo shows as an example
one of the main shafts with new cam. It was used on models 1969
and up using the magnetic core memory unit.
Dokumentation with photos to remove the cam shaft
by Detlev 54 (pdf, English) |
.jpg)
|
2. Ein weiteres Problem kann das Zahnrad sein. Es ist
ebenfalls aus Kunststoff gefertigt und hat im Laufe der Jahre
Weichmacher verloren, ist spröde geworden und eingerissen. Auch dann ist
die Funktion nicht mehr gegeben. Sollte das Zahnrad nur eingerissen
sein, ansonsten jedoch komplett und mit unbeschädigten Zähnen, dann kann
Kleben eine Lösung sein. Die folgenden Fotos zeigen wie ein Mitglied des
Forums das bei seiner Festival 130 (Serenade Technik) gelöst hat.
Hinweis: Diese Hauptwelle ist die Ausführung ohne Nocke. |
|
2. Another problem can
be the gear. It is made from plastic as well and did lose its
softener, got brittle or did tear within the years. hence the
function isn't given any longer.
In case the gear has a tear only but complete otherwise and with
undamaged teeth, then glueing it might be a solution.
The following photos show how a
forum member solved this in his
Festival 130 (Serenade technology).
Note: The main shaft shown is the version without cam. |
|
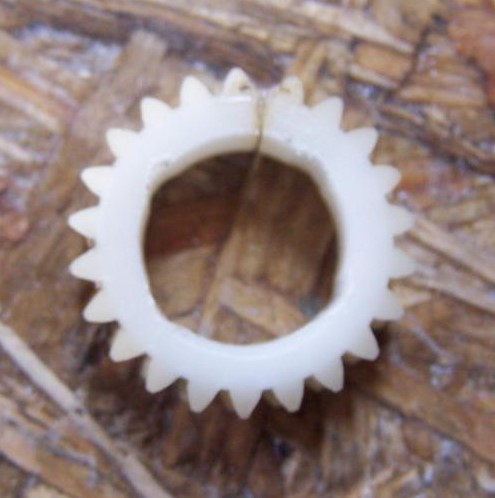
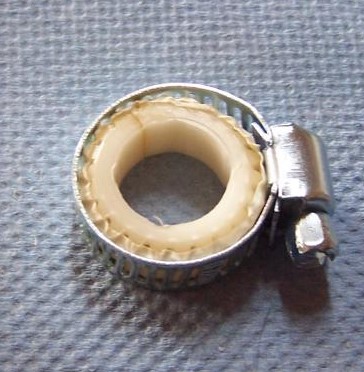
Welle mit gebrochenem Zahnrad
|
|
Shaft with broken gear |
|

|
|
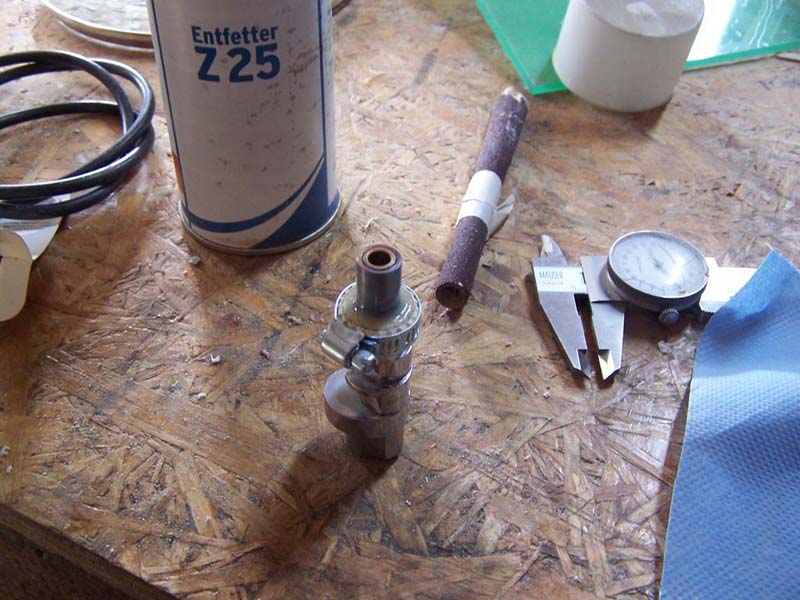
Zuerst habe ich es innen mit einem aufgerollten Schmirgelpapier
aufgeweitet, bis es beim Aufschieben nicht mehr auseinandergedrückt
wird.
Dann habe ich noch so etwas wie Nuten eingefeilt, damit dort etwas mehr
Klebstoff Platz hat. |
|
First, I widened it on
the inside with rolled-up sandpaper until it would no longer be
pressed apart when pushed on.
Then I filed some kind of extra grooves so that a little more
space is given for more glue. |
|
 |
|
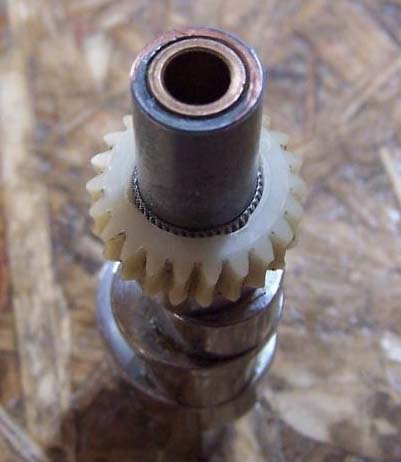
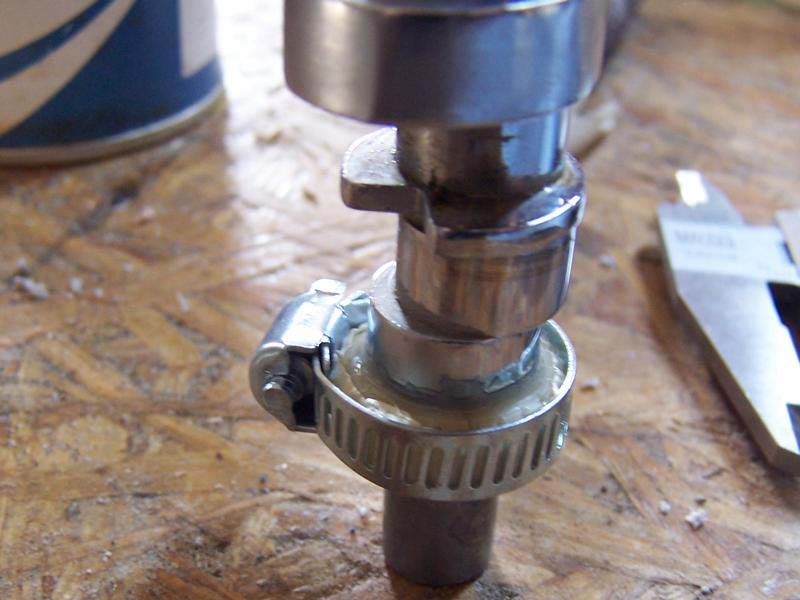
Alles entfetten und den Zahnkranz mehrmals mit Kreppband umwickeln, außen
abschneiden und alles mit einer Schlauchschelle sichern, noch nicht
anziehen.
Klebstoff anrühren (Uhu-Plus Endfest), Welle einstreichen, Zahnrad
drehend aufsetzen, dann Schlauchschelle anziehen. Nicht zuviel Klebstoff
verwenden,
nur so viel, dass sich eine schöne Wulst bildet, aber nichts in die Zähne
läuft.
Trocknen lassen.
|
|
Degrease everything and wrap the gear rim several times with
masking tape, cut off at the outside and secure all with a hose
clamp, do not tighten yet.
Mix the adhesive (type: Uhu-Plus Endfest), coat the shaft, put
on the gear wheel while rotating, then tighten the hose clamp.
Do not use too much adhesive, just enough to form a nice bead
but nothing to run down the teeth.
Let it dry.
|
|
|
|
Am nächsten Tag ist es soweit fest, dass man die Schelle abnehmen kann.
Volle Festigkeit erhält die Klebung nach 24 Stunden (ohne Wärme). |
|
The next day it did
harden enough to remove the clamp. Full strength is obtained
after 24 hours (without heat). |
|

|
|
Tip zum schnelleren Aushärten: Erwärmung (Backofen) auf 70 Grad.
Das verkürzt die Aushärtezeit auf 45 Minuten und verdoppelt die
Festigkeit der Klebenaht. |
|
Tip for faster
curing: Heating (oven) to 70 degrees.
This shortens the curing time to 45 minutes and doubles the
strength of the adhesive seam. |
|
| ! |
Hinweis:
Nicht alle Kunststoffe
sind für 70°C geeignet, sie verformen sich dann. Wenn man sich nicht
sicher ist, sollte man auf nicht mehr als 40°C erwärmen. |
! |
Note:
Not all plastics are suitable for 70°C, if not they will deform.
If you are not sure about that, you should heat to no more than
40°C. |
! |
|
|
|
|
Hit-Wahl ES II |
|
Hit-Selection ES II |
|
Modelle mit ES II Technik verfügen
über eine sog. Hit-Funktion. Das heißt, man kann sich die beliebtesten
Titel anzeigen und, wenn Kredit vorhanden, diese(n) spielen lassen.
Beim Drücken der Taste "Hit" werden nacheinander in langsamer Folge
links die Programmnummern der neun meist gespielten Titel und rechts die
Rangfolge angezeigt. Drückt man die Taste mit der Hand (Finger) während
die Programmnummer erscheint, wird dieser Titel gespielt.
Durch Löschen des
Popularitätszählers wird auch der Hit-Speicher gelöscht.
Siehe
Programmierung: Service-Programme ES II Technik –
pdf |
|
Models with ES II technology
have a so-called hit function. This means that you can display the most
popular titles and, if credit is established, have them played.
When the "Hit" button gets pressed, the programme numbers of the nine
most played titles are displayed in slow succession on the left and the
ranking on the right. If you press the button with your hand (finger)
while the programme number is displayed, this title will be played.
Clearing the popularity counter also clears the hit memory.
See
Programming:
Service Programmes ES II Technique –
pdf |
|
Die Angaben haben keinen
Anspruch auf Vollständigkeit oder Richtigkeit.
Bei den (importierten) Boxen können im Laufe der Jahre durchaus
Veränderungen vorgenommen worden sein. Copyright.
<<<
zurück zur Archiv-Übersicht
|
|
Ein Service von

Copyright by
Stamann Musikboxen |