|
Paul H. Smyth - Paul H. Smythe |
|
Smyth war der Ingenieur, der den Mechanismus für
Rock-Ola entworfen hat.
Der Smyth-Mechanismus wurde bei ALLEN Rock-Ola-Modellen verwendet, bis
die 45 rpm Mechanismen eingeführt wurden. Die frühen Rock-Olas
verwendeten ein 12- und 16er Wahlsystem, das später auf 20
Wahlen erweitert wurde, aber in allen Fällen war es ein Smyth-Mechanismus.
Der Smyth-Mechanismus sah aus wie der Wurlitzer
Simplex-Mechanismus, wies aber wesentliche technische Unterschiede auf.
Erstens hatte der Schallplattenstapel 20 und nicht 24 Fächer; die Fächer
schwenkten von links nach rechts aus - (von der Rückseite des Stapels)
genau andersherum der Simplex. Außerdem hatte der Smyth einen Pfosten,
der auf dem Stapel auf und ab fuhr, wenn eine Auswahl getroffen wurde,
und ein mechanischer "Finger" entriegelte das Fach vom Stapel, so dass
es vollständig herausschwingen konnte, bevor sich der Plattenteller hob.
Der Smyth-Mechanismus verwendete auch eine
scherenartige Vorrichtung, so dass man, wenn man ihn während des Laufs
betrachtet, sehen kann, wovon ich spreche. Wurlitzer Simplex-Mechanismen
verwendeten eine andere elektro-mechanische Technik. Der einzige
Nachteil der Smyth-Mechanik war, dass sie ständig geschmiert werden
musste. Zu diesem Zweck gibt es das Öl-Loch unter dem Plattenteller.
Der andere Nachteil war, dass die Auswahlsäule manchmal nicht ganz nach
oben fuhr, wenn #1 gewählt wurde - normalerweise von #20 unten zu #1 oben - das lag daran, dass die
Mechanik nicht richtig eingestellt war. Dies zu beheben ist ein Alptraum
und erfordert viel Zeit und Geduld.
(Information:
Edward M. Liss)
US-Patente: 2,159,832 - eingereicht 1934 <> 2,119,251
<> eingereicht 1935 <> 2,159,833 - eingereicht 1935 <> 2,159,834 -
eingereicht 1936 Anmerkung Stamann: Auf den Patenten
eingereicht für Rock-Ola findet man den Namen "Smyth". Auf anderen
Patenten steht es richtig: Paul H. Smythe. |
|
Smyth was the engineer who designed the mechanism for Rock-Ola.
The Smyth mechanism was used on ALL Rock-Ola models right up until
the 45rpm mechs were introduced. The early Rock-Olas used a 12 and
16-selection system, later expanded to 20 selections, but in all
cases, it was a Smyth mechanism.
The Smyth mechanism looked like the Wurlitzer Simplex mechanism except that it
had substantial engineering differences. First off, the record stack
had 20 selections, not 24; the trays swung out from left to right –
(from the rear of the stacker) exactly opposite the Simplex. Also,
the Smyth had a post that rode up and down the stack when a
selection was made and a mechanical “finger” would unlock the tray
from the stack, enabling it to swing out completely before the
turntable rose.
The Smyth mechanism also used a scissor-like device so that if you
look at it while it’s cycling, you will see what I am talking about.
Wurlitzer Simplex mechs used a different electro-mechanical
technology. The one drawback of the Smyth mech was it needed
constant lubrication. There is a single oil hole under the turntable
for this purpose.
The other drawback was that the selection post would sometimes not
raise all the way to the top when #1 was selected - usually going
from selection #20 at the bottom to #1 at the top - this was due to
the mech being out of adjustment. It's a nightmare to remedy and
takes lots of time and patience.
(Information:
Edward M. Liss)
US-Patents:
2,159,832 - filed 1934 <> 2,119,251
<> filed 1935 <> 2,159,833 - filed
1935 <> 2,159,834 - filed 1936
Note Stamann: On patents filed for Rock-Ola the name
"Smyth" is found. On other patents it is given right: Paul H. Smythe. |
|
Information: Gert Almind
 |
|
|
|
Ausbau des Plattenmagazins in 1446 u.vgl. |
|
Removing the record basket in 1446 |
|
Um das Plattenmagazin auszubauen, muss man fast die ganze
Mechanik zerlegen.
Das ganze Chassis muss aus der Box, der Selector muss ausgebaut werden, ein
Sicherungsring auf der Hauptwelle muss entfernt werden, der sich auf- und
abwickelnde Kabelbaum muss nach unten ausgefädelt werden, die hintere
Quertraverse muss abgenommen werden und dann kann man das komplette Magazin nach
hinten aus dem Grundrahmen ziehen.
|
|
To remove the record basket almost the
whole mechanism has to be disassembled.
The whole chassis needs to be removed as well as the
selector. A retaining ring on the main shaft needs to be
removed. The up- and downwards winding wiring harness
must be unthreaded downwards and the rear crossbar must
be removed. Then the complete magazine can be pulled
backwards out of the frame. |
|
|
|
Ausbau Magazin und Mechanismus 1454 |
|
Removal magazine and mechanism of 1454 |
|
Wie baue ich
das Laufchassis einer 1454 aus? Muss ich die ganze goldene
Laufwerksverkleidung lösen und dann das Chassis von vorne nach oben
herausheben? Oder geht das ganze Teil irgendwie nach hinten heraus?
-
Tür aushängen und wegstellen
-
goldene Bleche recht und links vom Plattenteller entfernen
-
blau-silberne Plattenspielerplastikverkleidung sicherheitshalber
abnehmen (wäre schade, wenn sie beschädigt werden würde....)
-
alle Kabel (Selectorkabel, Playrelaisverbindung zum Netzteil,
Cancelknopfverbindung, Tonarmleitung, Plattentellermotorleitung)
abstecken und hochbinden
-
Sicherungsklammern an den 4 Halteschrauben entfernen (so noch
vorhanden) und Schrauben herausdrehen
-
Mechanik leicht anheben und die 4 Federn entnehmen
-
bläulich eloxierte Querstrebe vor dem Plattenchassis am Gehäuse
losschrauben und entfernen
-
kleinen Blechwinkel rechts vorne im Gehäuse (drückt auf
Walzenschalter bei zugeklappter Tür) entfernen
Und dann am besten zu zweit das Chassis schräg nach
vorne aus der Box heben und auf vorbereitete Böcke stellen (z.B. 2
Getränkekisten mit Inhalt, denn die stehen besser) oder auf einem
Arbeitsgestell für Mechanismen. |
|
How do I remove the magazin of
a 1454? Do I have to losen the whole golden mechanism covers and then
and then lift the chassis out from the front upwards? Or does the whole
unit somehow come out at the back?
-
Unhinge the door and put it
aside
-
Remove the golden colvers
to the right and left of the turntable
-
Remove the blue and silver
plastic turntable cover to be on the safe side (it would be a shame
if it would get damaged....)
-
Unplug and tie up all
cables (selector cable, play relay connection to power supply,
cancel button connection, tonearm cable, turntable motor cable)
-
Remove the safety clips
from the 4 retaining screws (if still present) and unscrew the
screws
-
Lift the mechanism slightly
and remove the 4 springs
-
Unscrew and remove the
bluish anodized cross strut in front of the plate chassis on the
housing
-
Remove the small sheet
metal bracket on the front right of the housing (presses on the
roller switch when the door is closed)
And then, preferably with two
people, lift the chassis diagonally forwards out of the jukebox and
place it on prepared stands (e.g. 2 drinks crates with contents, as
these stand up better) or on an
working rack for mechanism. |
|
|
|
Ausbau Plattenmagazin 445 und vergleichbare |
|
Removal of magazin bakset in 445 and similar |
Dank an Swen für die Fotos und die
ausführliche Beschreibung.
|
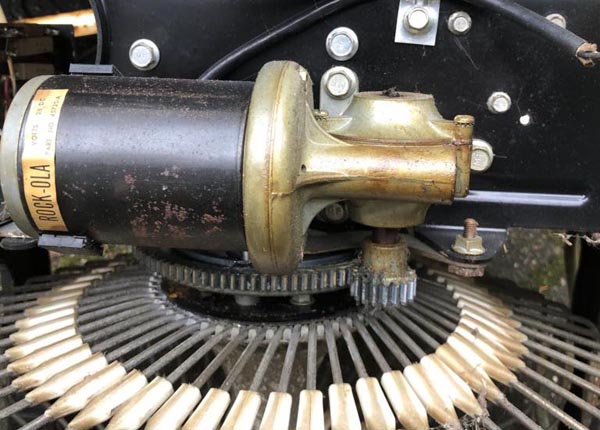
Magazinmotor ausbauen. Das geht so gerade
noch mit einem 10er Steckschlüssel. Das ist nötig, damit man den
Korb später drehen kann. |
|
Remove managzin motor.
This is just about possible with a 10 mm socket wrench. (Note:
Must be a 3/8" socket wrench.) |
|
|
|
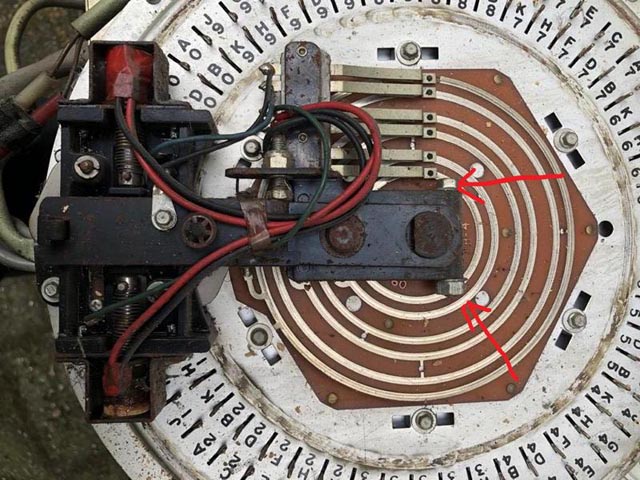
Dann wird der Auslesearm mit einem 8er und
10er Schlüssel ausgebaut. Hier ist es schon praktisch den Korb
zu drehen, damit man besser an die Schraube kommt. Denn in der
O-Position vom Korb sind genau die Halter des Selektors im Weg. |
|
The read-out arm is
then removed using an 8 and 10 mm socket wrench. Here it is
helpful to turn the basket so that it is easier to reach the
screw.
This is because the selector brackets are in the way in the
O-position of the basket. |
|
|
|
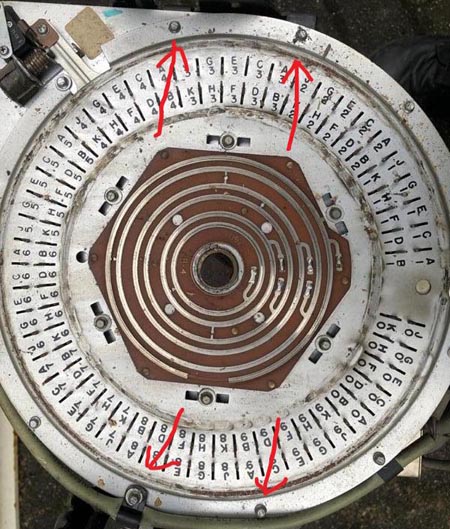
Jetzt wird der Selektor ausgebaut. Vorher sind
die vier Schrauben 3/16 Nuss und die grüne Steckverbindung zu
lösen. |
|
Now the selector gets
removed. First loosen the four 3/16 socket screws and the green
plug connection. |
|
|
|
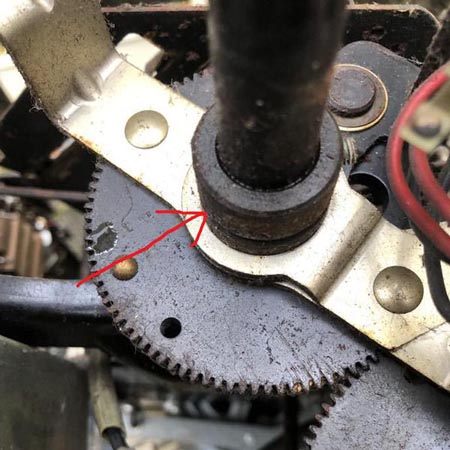
Der Stellring muss runter, dafür benötigt man
einen 3/32 Inbus. Achtung: nicht mit deutschen Größen die
Madenschrauben (2 Stück) beschädigen. Das Geld und die Arbeit,
was das später kostet um das zu reparieren, investiert man
besser jetzt in einen vernünftigen Satz zöllige Inbusschlüssel .
Jetzt kann man den Einschreibearm einfach herunter heben. Die
Stellung ist unwichtig, da der keine Sollstellung zum nächsten
Zahnrad braucht. |
|
The adjusting ring must
be taken off, for this you need a 3/32 allen key. Caution: Do
not use metric sizes to remove (and hence harm) the grub screws
(2 pieces). It is better to invest the money and work that it
will cost later to repair this in a decent set of inch allen
keys.
Now you can simply lift down the write-in arm. The position is
unimportant, as it does not need a nominal position to the next
gearwheel. |
|
|
|
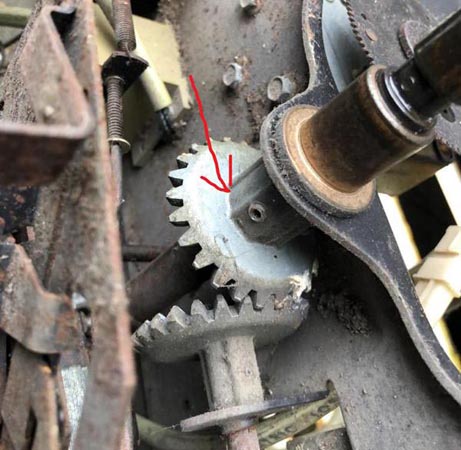
Jetzt muss noch das Zahnrad für den
Popularitätszähler gelöst werden, herunter geht das jetzt noch
nicht. Dafür fällt es später mit etwas Glück von alleine ab. Mit
Pech wird das ein Kampf. Es wird wieder der 3/32 Inbus benötigt.
Und wie zu Anfang empfohlen ist es nun praktisch das der
Korbmotor demontiert ist, damit man das Zahnrad bzw. die Welle
so drehen kann, dass man an die Inbusschrauben (2 Stück) kommt . |
|
Now the gear wheel for
the popularity counter has to be removed, it won't remove yet.
With a bit of luck, it will fall off on its own later. With bad
luck, it will be a struggle. The 3/32 Allen key is needed again.
And as recommended at the beginning, it is now very helpful that
the magazin motor got removed so that the gearwheel resp.
the shaft can be turned to reach the Allen screws (2 pieces) |
|
|
|
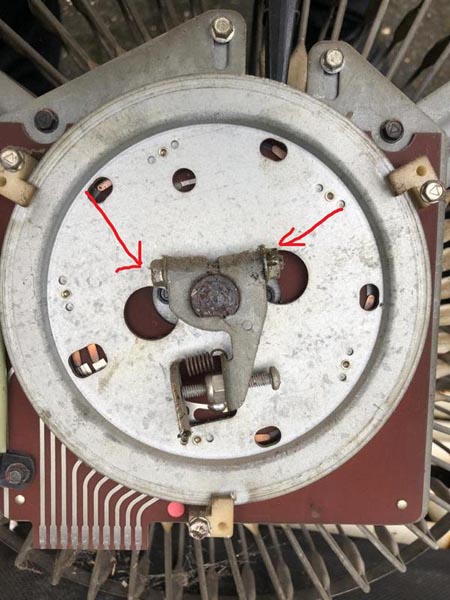
Nun wird die Maschine umgedreht und der
Mitnehmer der Selection Playing Anzeige demontiert. Die Schraube
lässt sich wieder mit 8er und 10er Schlüssel lösen. Erneut ist
es hilfreich, dass sich der Korb drehen lässt um besser an die
Schraube zu kommen. |
|
Now turn the machine
over and remove the carrier of the selection playing indicator.
The screw can be loosened again with an 8 and 10 mm wrench. Once
again, it is helpful to be able to turn the basket to better
access the screw. |
|
|
|
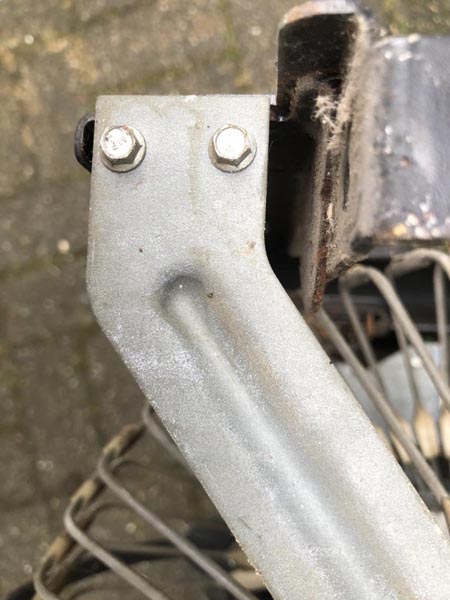
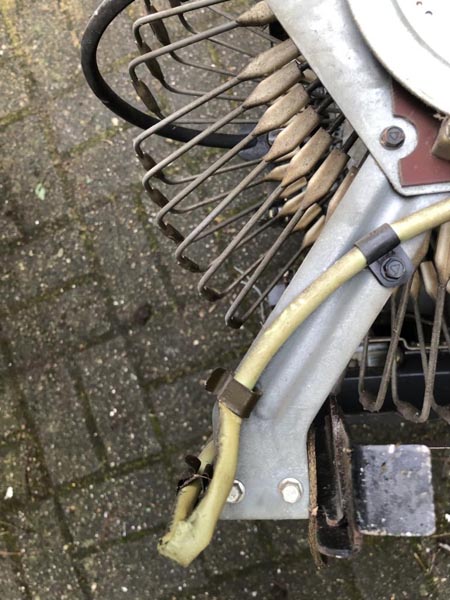
Jetzt von der ganzen Einheit welche die
Spielanzeige steuert die zwei 1/4 Zoll Schrauben links und
rechts raus drehen. Ebenso das Kabel lösen (schwarze Schrauben
1/4 Zoll ), Kabel aus den Metall Clipsen nehmen und zur Seite
legen. Jetzt kann die ganze Einheit einfach abgezogen werden.
|
|
Now unscrew the two 1/4
inch screws on the left and right of the entire unit that
controls the play indicator. Also loosen the cable (black 1/4
inch screws), remove the cable from the metal clips and put it
to one side. Now the whole unit can simply be pulled off. |
|
|
|
|
|
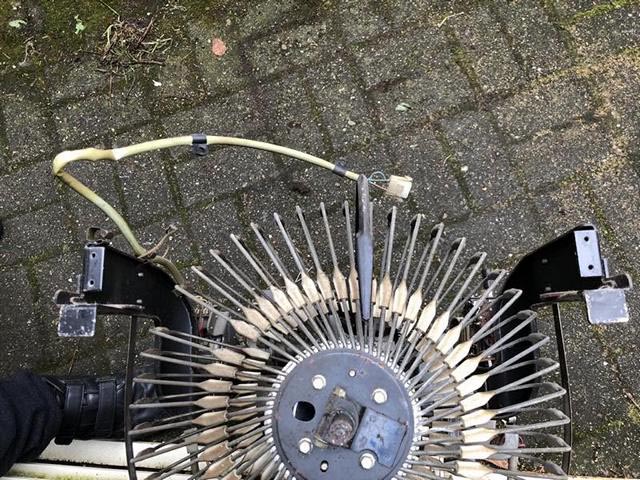
Auf dem folgenden Bild kann man sehen, dass man den
Korb jetzt schon mal in eine Position bringt, in der das freie Feld
vom Korb in Position von einem der Chassis-Träger-Arme steht.
So muss man da die Plattenfächer nicht auch noch biegen, um
den Korb samt Welle raus zu ziehen. Man sollte die nicht
verbiegen, nur etwas auseinander drücken, damit man mit dem Korb
an den Schrauben der Punkte der Mechanismusfedern vorbei kommt. Oder wie
man das auch immer Bezeichnen möchte. Man hat aber idr. nur
zwei Hände, daher ist es hilfreich sich die Aussparung im Korb
zunutze zu machen.
Das rausziehen vom Korb sollte jetzt
eigentlich gehen ... sollte "seufz". |
|
On the following
picture you can see that the basket is already in a position
where the free space of the basket is in position of one of the
chassis support arms. So you don't have to bend the plate
compartments here to pull out the basket with the shaft. You
shouldn't bend them, just push them apart a little so that you
can get past the machine spring screw points with the basket. Or
whatever you want to call it. But you usually only have two
hands, so it is helpful to use the recess in the basket.
Pulling out the basket should actually work now ... should
“sigh” . |
|
|
|
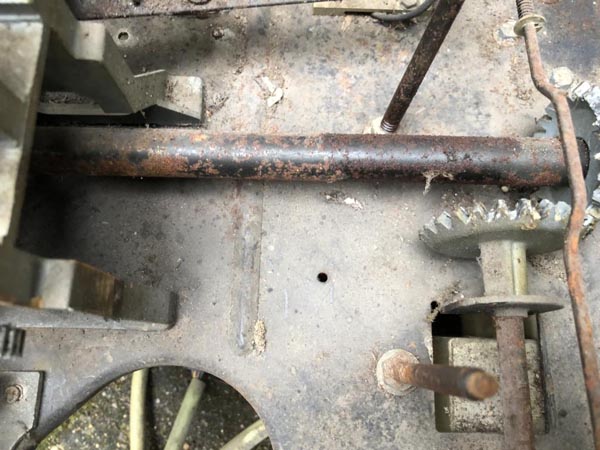
In der Regel sitzt die Achse mit Korb seit
rund 50 Jahren drin. Keiner hat da jemals Rostvorsorge gemacht
oder den Dreck herunter geputzt. Da fangen dann die Probleme an.
Zieht man jetzt wie so ein Dulliman, dann rupft man sich die
Lager raus. Ich hab mal die Achse fotografiert wie so etwas
aussehen kann, wenn die Musikbox schlecht gelagert wurde. Der
Rost bremst alles aus. Also Stahlwolle zur Hand und runter mit
dem Dreck, anschließend mit Sprühöl abreiben. Dann geht das
ganze deutlich geschmeidiger. Leider muss man dafür den
Plattentellertisch ausbauen.
In dem Zusammenhang muss sich auch das Zahnrad für den Pop
Zähler welches wir zu Anfang gelöst haben, leicht auf der Achse
drehen lassen. Gern ist das fest gegammelt. Sprühöl und eine
Rohrzange bringen hier schnell Erfolg, ansonsten ist auch Wärme
aus einem Heißluftfön oft hilfreich. |
|
As a rule, the shaft
and basket have been sitting there for around 50 years. No one
has ever done any rust prevention or cleaned off the dirt.
That's where the problems start. If you pull like a "Dulliman",
you pull out the bearings. I took a photo of the shaft to show
what this can look like if the jukebox has been badly stored.
The rust slows down everything. So I got some steel wool to hand
and rubbed the dirt off, then rubbed it with spray oil. This
makes the whole unit much smoother. Unfortunately, you have to
remove the turntable plate to do this.
In this context, the gear wheel for the pop counter, which we
loosened at the beginning, must also be able to rotate easily on
the shaft. It is often stuck. Spray oil and a pair of pipe
wrenches quickly help here, otherwise heat from a hot air gun is
often helpful. |
|
|
|
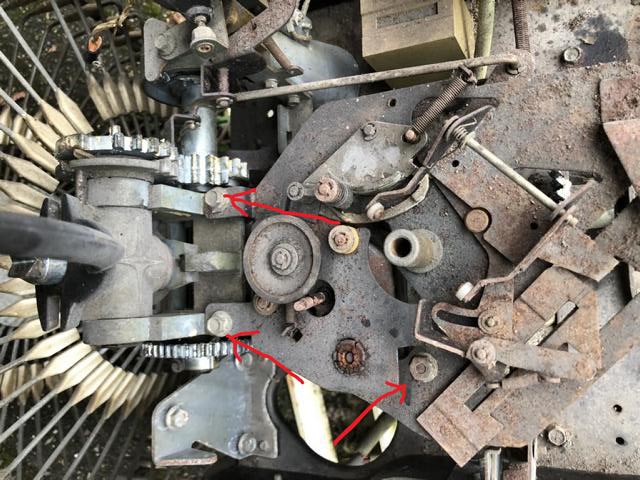
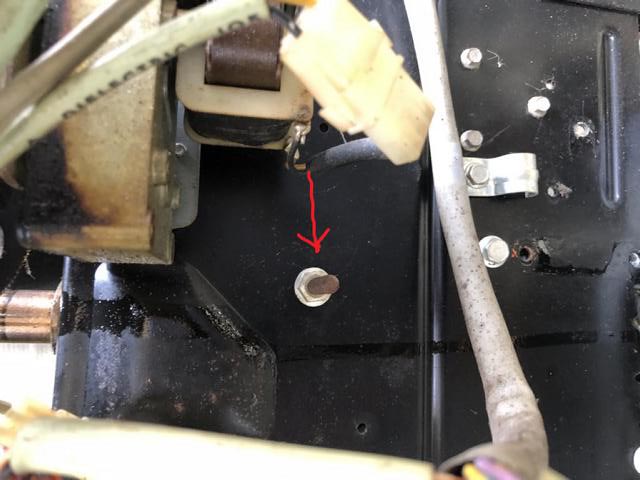
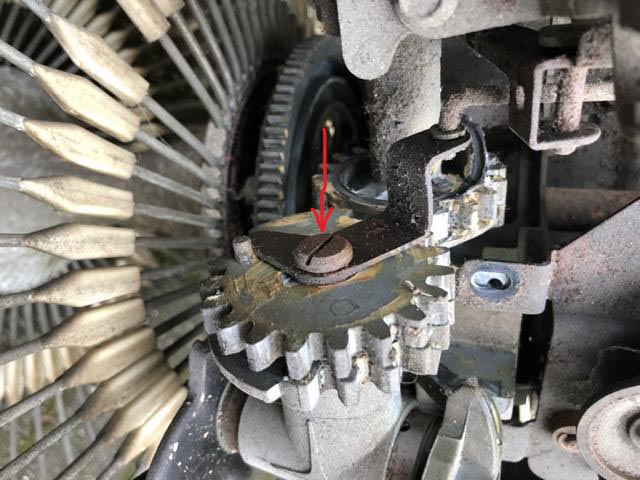
Man muss zwei Schrauben (8er) und zwei
Muttern (10er oben und 11er unten) entfernen um den ganzen Tisch
an sich heraus zu bekommen. Achtung: eine Mutter löst man am
besten au der Unterseite des Chassis.
Da hängt aber noch die Umschaltung von der Auto-Speed Mimik
dran. Die Schlitzschraube muss also auch raus.
Jetzt kann man nach Lösen des TT Steckers den ganze Tisch heraus
nehmen. |
|
You have to remove two
screws (8 mm) and two nuts (10 mm at the top and 11 mm at the
bottom) to get the whole plate out. Attention: One nut is best
to remove from the underside of the chassis.
The switch for the auto-speed unit is still attached to it. The
slotted screw must therefore also be removed.
Now you can remove the whole plate after loosening the TT
connector. |
|
|
|
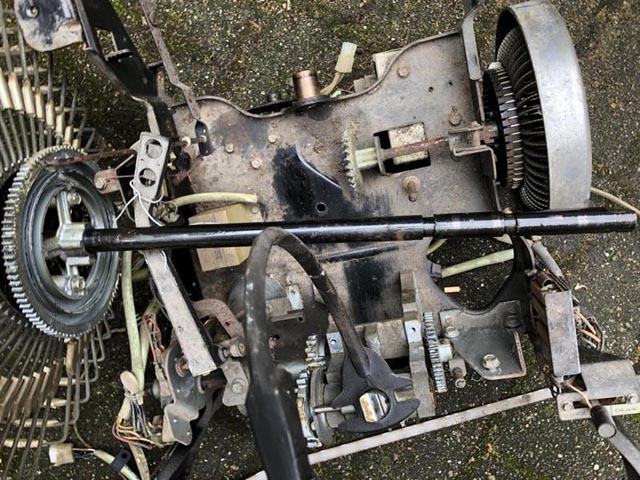
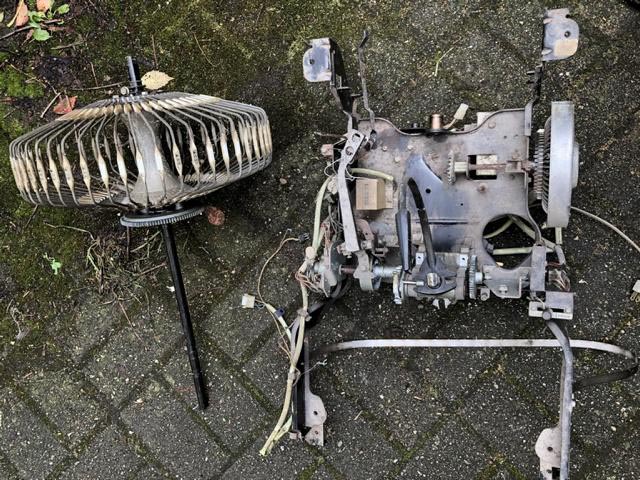
Nachdem sich nun das Zahnrad bewegen lässt
sowie Rost und Dreck von der Welle geputzt sind, geht die Welle
mit etwas Sprühöl abgerieben ganz leicht raus. *Hüstel*
Im Grunde also alles fast keine Arbeit. Daher kann man jetzt
auch noch den Rest abbauen und alles vernünftig putzen. Das
ganze Chassis sowie alle brünierten Teile am besten mit einem
Lappen mit Sprühöl abreiben, so dass überall ein leichter Öl
Film drauf ist. Dann klebt zwar etwas Staub aber Feuchtigkeit
hat auch in Zukunft kaum eine Chance. |
|
Now that the gear wheel
can be moved and the rust and dirt have been cleaned off the
shaft, the shaft can be easily removed with a little spray oil.
*lol*
So basically almost no work at all. So you can now dismantle the
rest and clean everything properly. It is best to rub the entire
chassis and all burnished parts with a cloth with spray oil so
that there is a light film of oil everywhere. Then a little dust
will stick, but moisture will hardly stand a chance in the
future.
|
|
|
|
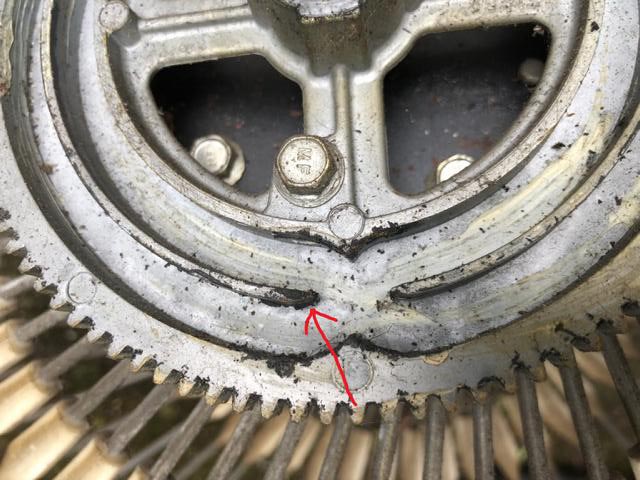
Zur Abrundung des Themas hier die Stelle wo
die Führung des Schiffchens im Zahnrad gerne ausbricht. Man
sieht an diesem Zahnrad auch das hier schon vom Werk aus nicht
viel Fett drin war. |
|
To round off the topic,
here is the point where the guide of the shuttle in the
gearwheel tends to break out. You can also see from this
gearwheel that there wasn't much grease in it from the factory. |
|
 |
|
|
|
Austausch des Platten-Fangbandes
-
Modelle Tempo, Regis, Empress, Rhapsody 160 |
|
Exchange of magazine belt
models Tempo, Regis, Empresss, Rhapsody 160 |
|
Das Band wird um die
beiden Rollen links und rechts gelegt und geht nur unten um die Platten
herum.
Zur Montage des Plattenhaltebandes müssen alle Rollen (4x Plastikrollen
und
2x kleine Messingrollen) abgenommen werden. Einen "Trick" gibt es da
nicht. Das ist einfach nur Arbeit. Wenn die Mechanik im Gehäuse
eingebaut ist, kommt man an die Rollen nicht besonders gut heran.
Aber die Mechanik auszubauen bedeutet auch zusätzliche Arbeit.
|
|
The magazine belt is placed
around the two rollers on the left and right and only goes around below
the records at the bottom.
All rollers (4x plastic rollers and 2x small brass rollers) must be
removed to fit the magazine belt. There is no “trick” to this. It's
simply work. If the mechanism is installed in the cabinet, it is not
particularly easy to get at the rollers.
But removing the mechanism also means extra work.
|
|
|
|
Wie werden die Singles im Magazin
ausgewechselt - 45 rpm Modelle |
|
How do the records being changed in the
magazine - 45 rpm models |
|
I.d.R. befindet sich auf der Vorderseite des Mechanismus die
Scan-Control-Box mit einem Hebel für drei Stellungen: ON - OFF - SCAN.
Das ist der sog. Serviceschalter. Im Normalbetrieb muß er auf ON stehen.
In der Mittelstellung OFF ist der Strom zum Mechanismus ausgeschaltet.
Die dritte Stellung SCAN ist hauptsächlich zum Plattenwechseln
vorgesehen. Der Schalter rastet in dieser Stellung nicht ein; d.h. man
muß den Schalter solange in diese Stellung drücken, bis das Magazin die
gewünschte Position erreicht hat. Natürlich werden dabei keine Singles
abgespielt.
Wichtig: nach dem Plattenwechsel den Schalter zurück auf ON zu
stellen. |
|
The scan control box with a
lever for three positions is usually located on the front of the
mechanism: ON - OFF - SCAN. This is the so-called service switch. In
normal operation it must be set to ON. In the middle position OFF the
power to the mechanism is switched off.
The third position, SCAN, is mainly intended for changing records. The
switch does not engage in this position, i.e. you have to push the
switch into this position until the magazine has reached the desired
position. Of course, no records will be played.
Important: After changing the record, set the switch back to ON. |
|
|
|
Reinigung des
Plattenmagazin - 1438, 1448, 1454, 1458 u.a. |
|
Cleaning of magazin - 1438, 1448, 1454, 1458 and others |
|
Musikboxen, die lange in Scheunen oder feuchten Kellern zubringen mussten,
zeigen meist Rostansätze am Plattenmagazin.
Dieser Rost tritt besonders dort auf, wo die einzelnen
Plattenmagazinlamellen "Noppen" besitzen, an denen die Platten im
Magazin anliegen.
Diese "Noppen" sind nach langer Gebrauchszeit meist ohne Lack, weil die
Platte beim Herausnehmen und Zurücklegen ins Magazin an diesen Noppen
entlang schleift (meist lässt sich der Greifmechanismus über den
Selectorschlitten nicht so genau justieren, dass keine einzige Platte bei
Herausnehmen oder Zurücklegen rechts oder links an einer der Lamellen
entlang schleift).
War also die Noppenoberfläche ohne Lack länger Feuchtigkeit ausgesetzt,
dann bildet sich dort Rost.
Situation ohne Zerlegen des Magazin:
In mäßig erhaltenen Plattenmagazinen liegen nun die Platten genau an
diesem Rost im Magazin an und beim Herausnehmen und Zurücklegen der
Platte schleift diese am Rost entlang.
Man kann sich vorstellen, was da mit den Platten passiert ...
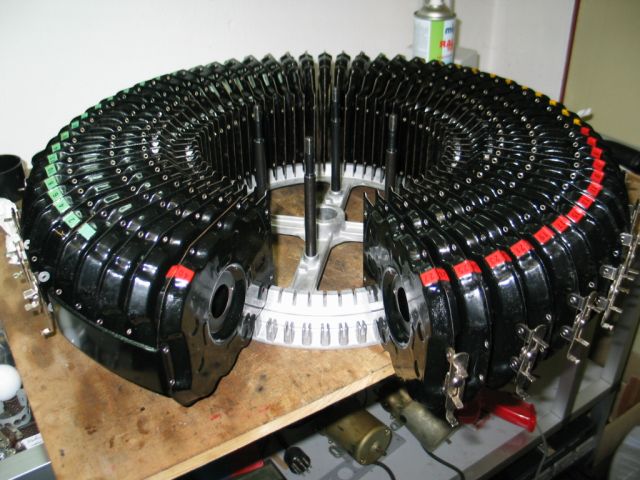
Ich würde grundsätzlich empfehlen ein das Plattenmagazin zu zerlegen,
denn nur dann ist es wirklich an allen Stellen sauber und man kann sehen
in welchem Zustand die Noppen sind.
Ich habe die einzelnen Plattenmagazinlamellen gereinigt, trocken gefönt,
Fehlstellen im Lack ausgebessert (auch die Noppen entrostet und neu
lackiert) und dann die ganze Lamelle mit Autowachs versiegelt.
Diese Arbeit ist schon eine "Strafarbeit" und recht mühsam, aber hat man
es hinter sich, dann weiß man, dass mit dem Magazin wieder alles o.k.
ist.
Beim Zerlegen des Magazins muss man sich z.B. die Position der 1. Lamelle
am vorderen und hinteren Aluring kennzeichnen.
Nach Lösen der vier Bolzen, die den vorderen und hinteren Aluring
zusammenhalten, klemmen die Lamellen immer noch fest in den beiden
Aluringen. Hier gilt es ganz vorsichtig diese Aluringe auseinander zu
klopfen.
Ich habe vor zwei Jahrzehnten mal vor lauter Ungeduld zu fest geklopft
und dann brach mir eine Aluspeiche aus dem Ring. Also hier wirklich mit
Geduld und Ruhe zu Werke gehen, denn manchmal sitzen die Lamellen
wirklich bombenfest in den Nasen der Aluringe.
Auch der Zusammenbau ist ein Geduldsspiel, denn es müssen ja alle
Lamellen in ihren zugehörigen Nasen im Aluring sitzen, bevor man die
beiden Aluringe wieder miteinander verschrauben kann. |
|
Jukeboxes that have
spent a long time in barns or damp cellars usually show signs of
rust on the record magazine.
This rust occurs particularly where the individual record
magazine segments have “knobs” against which the records in the
magazine rest.
After a long period of use, these “knobs” are usually without
lacquer because the record rubs along these knobs when it is
removed and returned to the magazine (usually the gripper
mechanism cannot be adjusted so precisely via the selector
carriage that the record does not rub along a magazin segment on
the right or left when it is removed or returned).
If the knob surface has been exposed to moisture for a long time
without varnish, then rust will occur.
Situation without dismantling the magazine:
In moderately preserved record magazines, the records are now
resting against this rust in the magazine and when the record is
removed and returned, it rubs along the rust.
You can imagine what happens to the records ...
I would always recommend to dismantle the record magazine,
because only then is it really clean in all places and you can
see what condition the knobs are in.
I cleaned the individual record plate magazine segments,
blow-dried them, repaired imperfections in the paint (also
derusted and repainted the knobs) and then sealed the entire
segment with car wax.
This work is “punishing” and quite tedious, but once you've done
it, you know that everything is OK again with the magazine.
When disassembling the magazine, you have to mark the position
of the first segment on the front and rear aluminum ring, for
example.
After loosening the four bolts that hold the front and rear
aluminum rings together, the segments are still firmly clamped
in the two aluminum rings. It is important to knock these
aluminum rings apart very carefully.
Two decades ago, I was so impatient that I knocked too hard and
an aluminum spoke broke out of the ring. So you really need to
be patient and calm here, because sometimes the segments are
really firmly seated in the lugs of the aluminum rings.
Reassembly is also a game of patience, because all the segments
have to sit in their corresponding lugs in the aluminum ring
before you can screw the two aluminum rings together again. |
Bilder und Infos: Axel Rosenberger
Magazin einer 1458

|
|
Weitere Anregung:
Bei meiner 1448 habe ich dass Plattenmagazin ausgebaut und mit
Nikotinreiniger eingesprüht, anschließend mit dem Wasserschlauch
ausgespritzt, danach mit Pressluft ausgeblasen und einen passenden
Lappen öfters durchgezogen.
Ich habe durch das Plattenmagazin ein Rohr gesteckt, welches auf zwei
Böcken auflag, damit man sich der kleinen Hebelchen, welche das
Durchfallen der Platten verhindern, annehmen kann.
Diese habe ich - ohne Feder - mit feinster Stahlwolle gereinigt und
anschließend die Gelenke mit einem halben Tropfen Ballistol geölt - die
flutschen dann wie neu. Nach dieser Behandlung sieht das Teil aus
wie neu. |
|
Another suggestion:
On my 1448, I removed the record magazine and sprayed it with
nicotine cleaner, then sprayed it out with a water hose, then
blew it out with compressed air and pulled a suitable cloth
through it several times.
I put a tube through the record magazine, which rested on two
supports, so that the small levers that prevent the records from
falling through could be taken care of.
I cleaned these - without the spring - with the finest steel
wool and then oiled the joints with half a drop of Ballistol -
they then slip like new. After this treatment, the part looks
like new.
|
|
 |
|
|
|
|
Anlaufprobleme des Plattenmagazins |
|
Start-up problems of the
record magazine |
|
Hinten an der Achse des
Plattenkorbes sitzt eine Mechanik, die über einen Mikroschalter und
eine Feder, die diesen Schalter betätigt, den Strom für die Musikbox an- und
ausschaltet und die Laufrichtung des Korbes umschaltet. Wenn man vorne
eine Taste drückt, wird ein Metallstift in eine Spule gezogen und
sollte dann den Mechanismus so einrasten lassen, dass diese Zahnscheibe
die o.g. Feder drückt und den o.g. Schalter aktiviert. Grundsätzlich
funktioniert dies, allerdings muss man zu Beginn, wenn die Musikbox aus dem
Stand anläuft, meistens mehrmals drücken.
Antwort:
Es kann sein, dass an der Subtraktionsspule im Kreditwerk der Kontakt,
der für das Anziehen der o.g. Spule verantwortlich ist, nicht immer
sauber schaltet. Dieser Kontakt sollte gereinigt werden.
Zwischenfrage:
Kann das auch sein, wenn das Kreditwerk eigentlich gar nicht in Aktion
ist? Ich habe ja Freispiel eingestellt, also im Kreditwerk das kleine
Teilchen ausgehakt, dass das Zahnrad weiterschaltet. Es haut jetzt immer
ins Leere!
Antwort:
Nein, der Mechanische Ablauf des Kreditabziehens ist für die Wahl
nicht wichtig. Aber die Spule, die diesen Vorgang auslöst, sollte auf
dem "Rücken" drei oder vier Kontakte haben, und einer von
denen steuert das Anziehen der Spule, die wiederum für den Korbanlauf
zuständig ist. |
|
There is a mechanism at the
back of the record magazine axle that switches the power for the jukebox
on and off and changes the direction of magazine rotation via a
microswitch, and a spring that actuates this switch. When pressing a
button at the front, a metal pin is pulled into a coil and should then
engage the mechanism so that this toothed disk presses the
above-mentioned spring and activates the above-mentioned switch. This
basically works, but you usually have to press it several times at the
beginning when the jukebox starts up from standby.
Answer:
It is possible that the contact on the subtraction coil of the credit
mechanism, which is responsible for attracting the above-mentioned coil,
does not always switch cleanly. This contact should be cleaned.
Interposed question:
Can this also be the case if the credit mechanism is not actually in
action? I have set free play, i.e. I have unhooked the small part in the
power unit that advances the gearwheel. Now it always shifts to nothing!
Answer:
No, the mechanical sequence of the credit mechanism is not important for
the selection. But the coil that triggers this process should have three
or four contacts on the “back”, and one of them controls the tightening
of the coil, which in turn is responsible for the basket run. |
|
Die Angaben haben keinen
Anspruch auf Vollständigkeit oder Richtigkeit.
Bei den (importierten) Boxen können im Laufe der Jahre durchaus
Veränderungen vorgenommen worden sein. Copyright.
<<<
zurück zur Archiv-Übersicht
|
|
Ein Service von

Copyright by
Stamann Musikboxen |