|
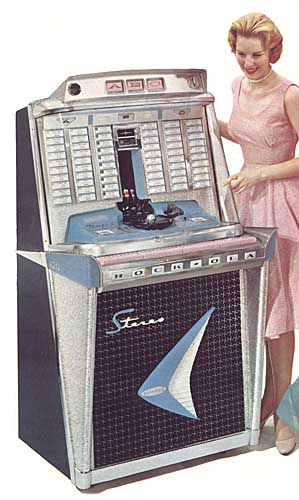
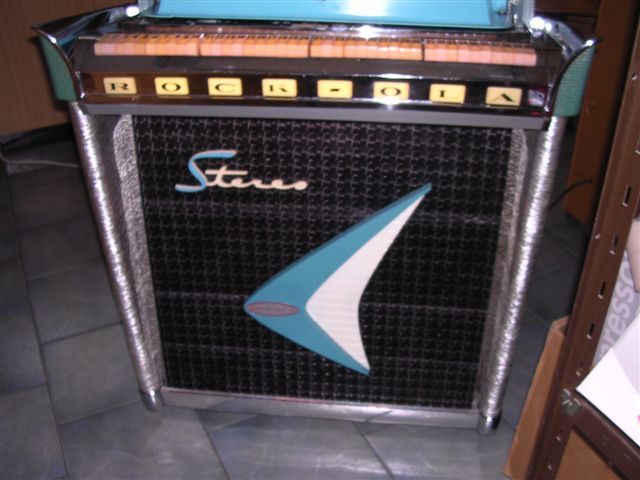
Rock-Ola 1478 (120 Sel.) |
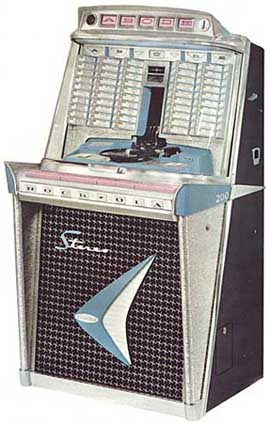
Rock-Ola 1485 (200 Sel.)
|
|
|
|
|
|
Rock-Ola 1478 (120 Sel.) |
|
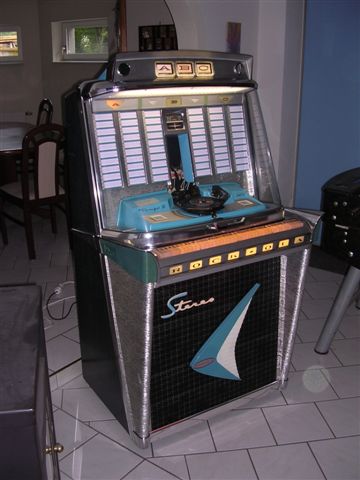 |
F
o
t
o
s
E
r
i
c
h |
 |
 |
|
|
|
Zwei Varianten bei der Tempo 2
|
Two different
versions of the Tempo 2 |
|
1. Variante: Buchstaben Kategorien
Hierbei handelt es sich um die amerikanische Version der Tempo 2.
Man findet A, B, C (für 120er) sowie D und E (für 200er) in den oberen
Programmtasten (siehe Bilder oben).
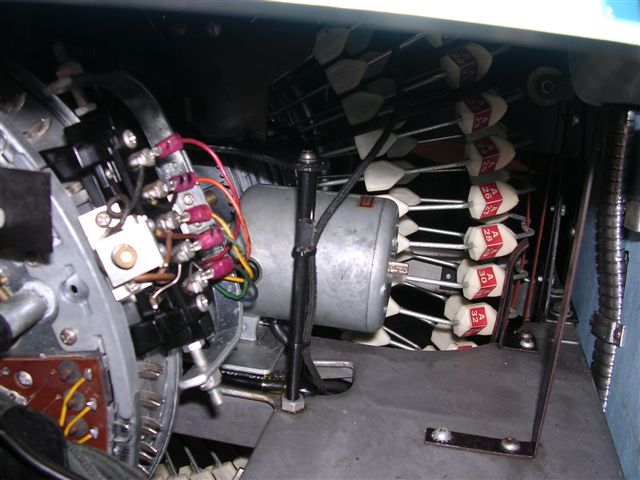
Das Karussell war auf den Reitern einfarbig jeweils mit A1, A2,...A20,
dann B1, B2... und C1... beschriftet. Der Selector ist auch mit diesen
Bezeichnungen versehen. Die Titelhalter sind genauso beschriftet,
ebenfalls einfarbig. Die Leuchtpfeile weisen auf die jeweils gewählte
Kategorie und sind zusätzlich mit A, B, C, ... beschriftet.
Bei vielen dieser ABC-Geräte war auf der Scheibe ein Abziehbild am
unteren Rand: "Press Letter Button First". Es war wohl etwas verwirrend
... Das Schild der Mechanismusabdeckung gab als Wählanleitung an, dass
je eine Buchstaben- und eine Zahlentaste zu drücken sei. Das war sowohl
bei den US als auch den deutschen Versionen, die mittels
Buchstaben-Zahlen-Kombination wählten.
2. Variante:
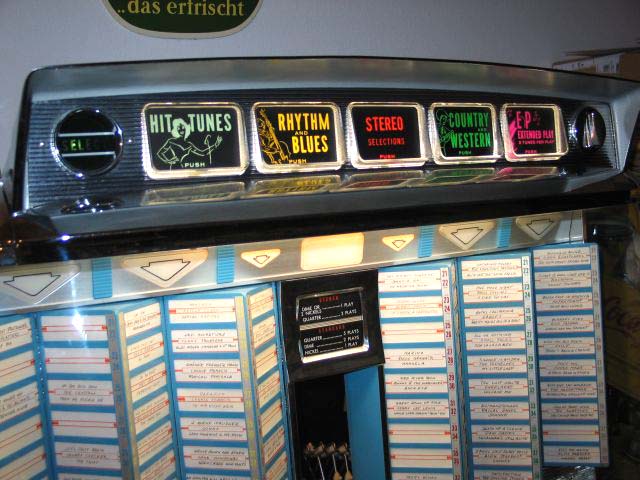
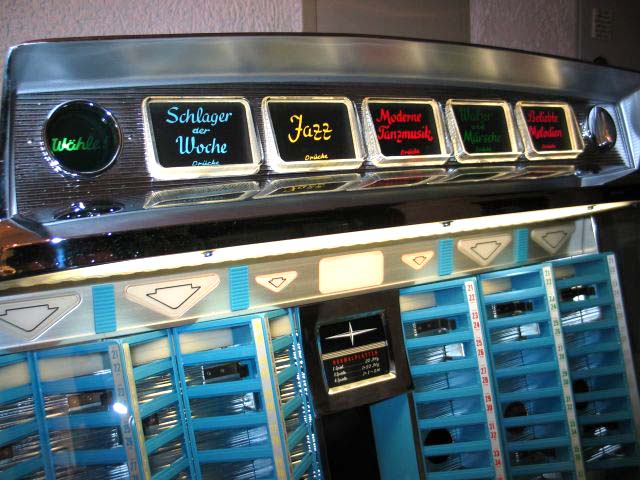
farbcodierte "Kategorien" in den Programmtasten
Hierbei handelt es sich vermutlich um eine deutsche Version der
Tempo 2, gleichwohl diese Kategorieschilder in der US Teileliste
ebenfalls zu finden sind.
Blau: "Schlager der Woche" bzw. "Hit Tunes"
Gelb: "Jazz" bzw. "Rhythm and Blues"
Rot: "Moderne Tanzmusik" bzw. "Favourites"; wahlweise
"Stereo"
für Rock-Ola 1485 noch
Grün: "Country & Western" bzw. "Walzer und Märsche"
Violett: "Varieties" bzw. "Beliebte Melodien", wahlweise
"Stereo"
Bei dieser Variante war das Karussell auf den Reitern auch jeweils
von 1 bis 40 beschriftet und mit den entsprechenden Farben
unterlegt, zusätzlich in klein die fortlaufende Nummerierung (bis
120 bzw. 200).
Der Selector ist durchnummeriert (1-120/200). Die Titelhalter sind
mit den passend farbigen Zahlen beschriftet. Die Leuchtpfeile weisen
auf die jeweils gewählte Kategorie und sind unbeschriftet.
Das Schild der Mechanismusabdeckung gab als
Wählanleitung an, dass je eine Gruppen- und eine Zahlentaste zu
drücken ist. Dies war sowohl bei den deutschen als auch bei den
US-Versionen der Farbkategorie-definerten Geräte. |
|
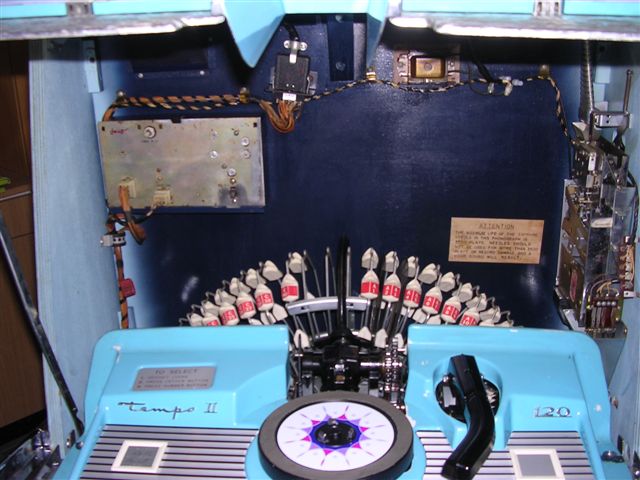
1. Version: Category by numbers and letters
This is the US-version of Rock-Ola Tempo 2.
The upper program buttons show A, B, C (120 selection) plus D and E (200
selections) - see upper pictures.
The numbering system on the record magazin was done monochrome with A1,
A2, ... A20, then B1, B2, followed by C1, C2, .. So are the
selector numbering and the title holders too.
The illuminated arrows point to the selected category and are labeled
with A, B, C (120 selections) and D and E (200 selections).
A lot of these US models showed a black decal on the lower rim of the
front glass saying "Press Letter Button First" - it was kind of
confusing ....
The instruction insert on the mechanism cover explains to press first a
letter and then a number button. This can be found on both the described
US and the German versions which had the alpha-numerical-combination for
making a selection.
2.
Version: Colour code categories in the program buttons
This seems to be the German version of Rock-Ola Tempo 2 though
the category inserts can be found in the US parts list as well.
Blue: "Hit Tunes" resp. "Schlager der Woche" (German)
Yellow: "Rhythm & Blues resp. "Jazz" (German)
Red: "Favorites" resp. "Moderne Tanzmusik" (German) or optional
"Stereo"
for Rock-Ola 1485 also
Green: "Country and Western" resp. "Walzer und Märsche" (German)
Violet: "Varieties resp. "Beliebte Melodien" (German) or optional
"Stereo"
With this version the numbering system of the record magazin showed
1 - 40 printed on the equivalent colour, added by increasing
small numbers from 1 - 120 resp. 200. The selector is numbered from
1 - 120 resp. 200.
The title strip holders had the same kind of numbering system. The
three resp. five illuminated arrows point the the chosen category
and are not labeled at all.
The instruction insert on the mechanism
cover explains to press first a programm button and then a number
button. This can be found on both the described German and the US
versions which had the colour code categories instead of letters. |
|
|
Hinweise zum Elac KST 103 in einer Tempo 2 |
|
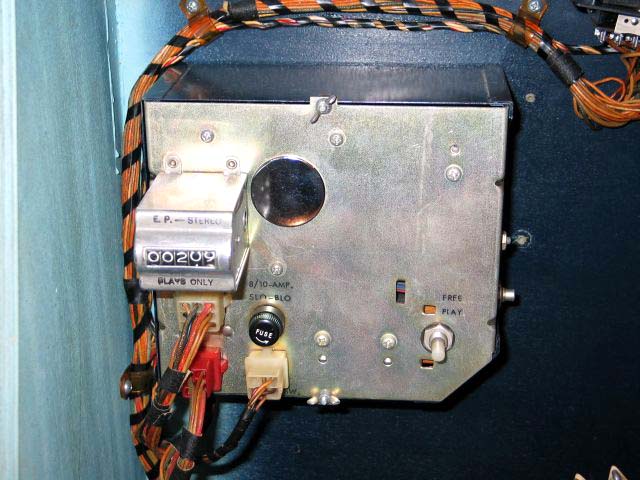
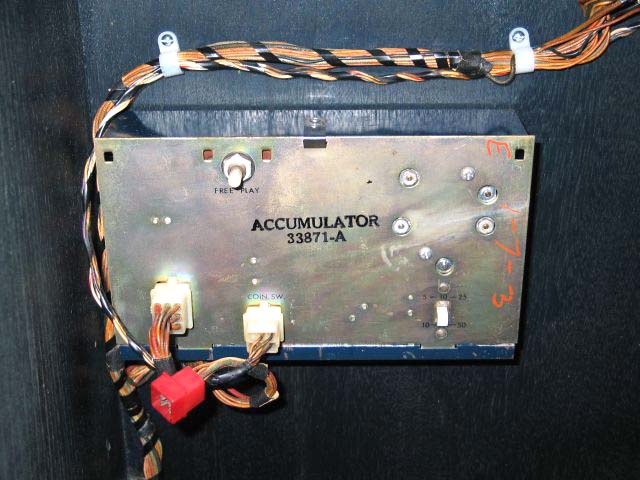
Unterschiedliche Kreditwerke |
Different Credit
Units |
|
|
|
|
|
Unterschiede Deutsche – USA
Version |
Differences German and USA version |
|
Programmschilder 1485 - US |
|
Program Cards 1485 - US |
|
 |
|
Programmschilder Deutsch
|
|
Program Cards German |
|
 |
|
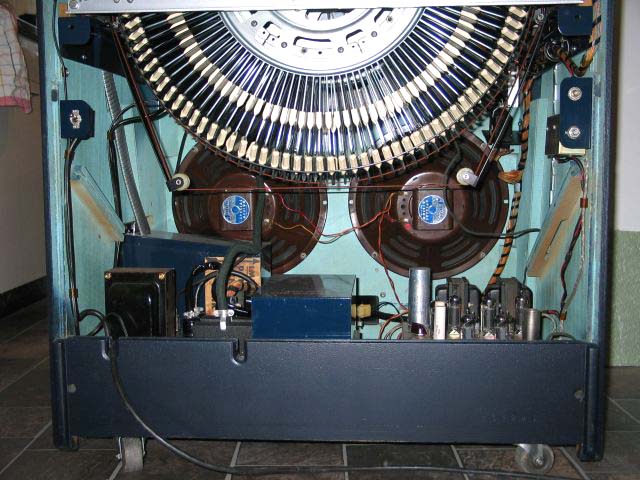
Lautsprecher-Verstärker-Netzteil - US
|
|
Speaker-Amplifier-Power Supply - US |
|
 |
|
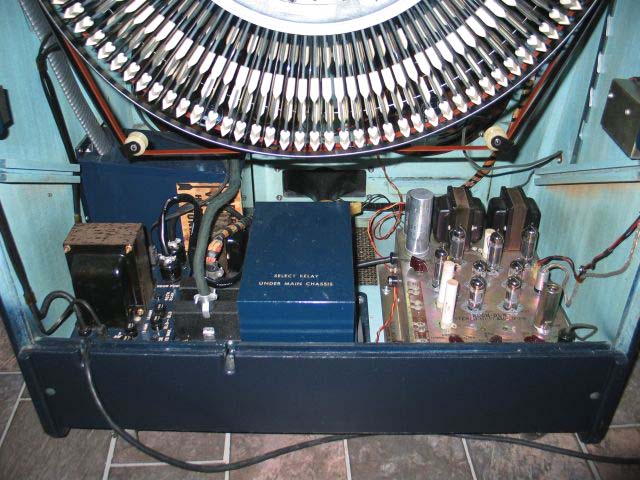
Stepper: Zubehör
|
|
Stepper: Accessory |
|
 |
|
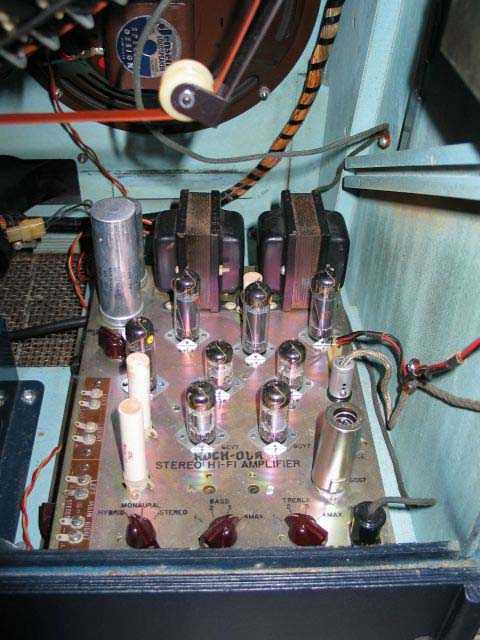
US Verstärker
|
|
US Amplifier |
|
 |
|
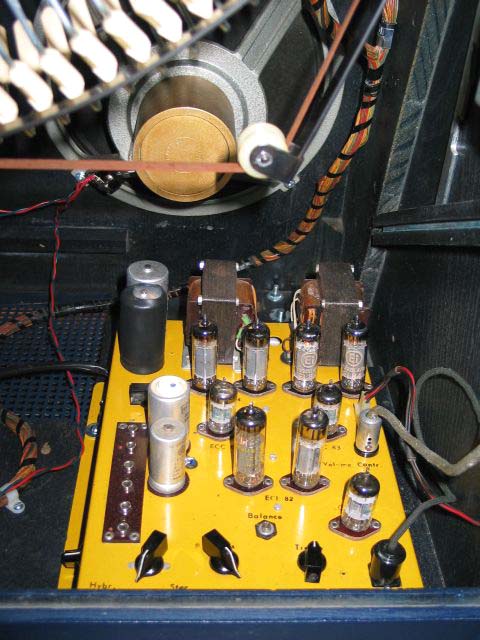
NOVA Verstärker
|
|
NOVA Amplifier |
|
 |
|
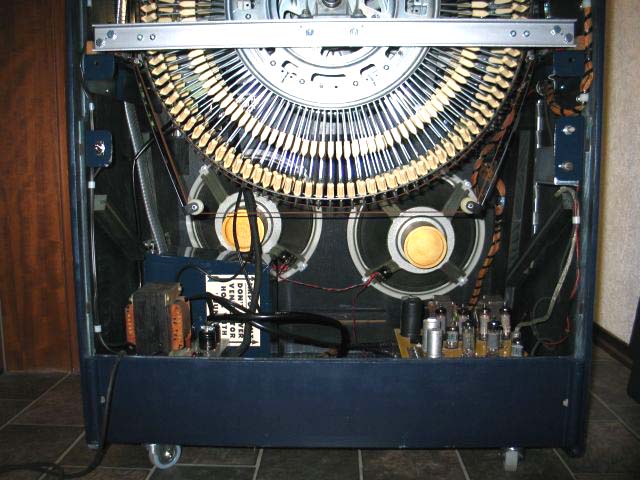
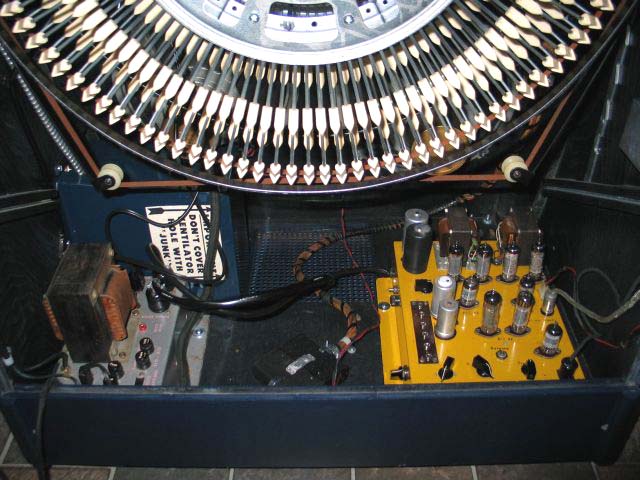
Lautsprecher-Verstärker-Netzteil - Deutsche Version ohne Hochtöner,
dafür Lautsprecher mit Hochtonkegel
|
|
Speaker-Amplifier-Power Supply
- German version has no tweeter but dual cone speaker
|
|
 |
|
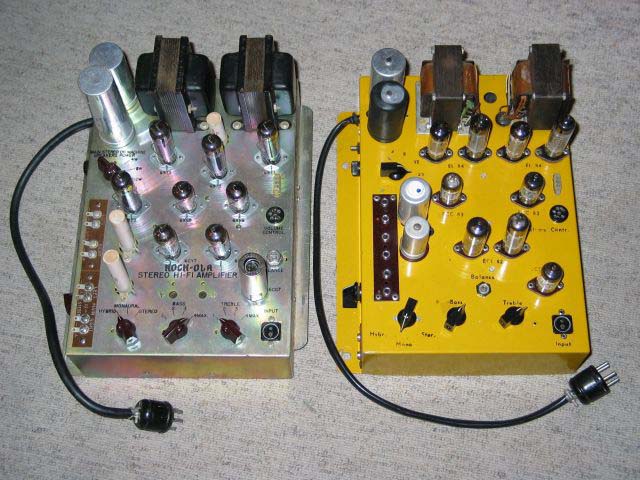
Verstärker US (links) und Deutsch (rechts)
|
|
Amplifier
US (left) and German (right) |
|
 |
|
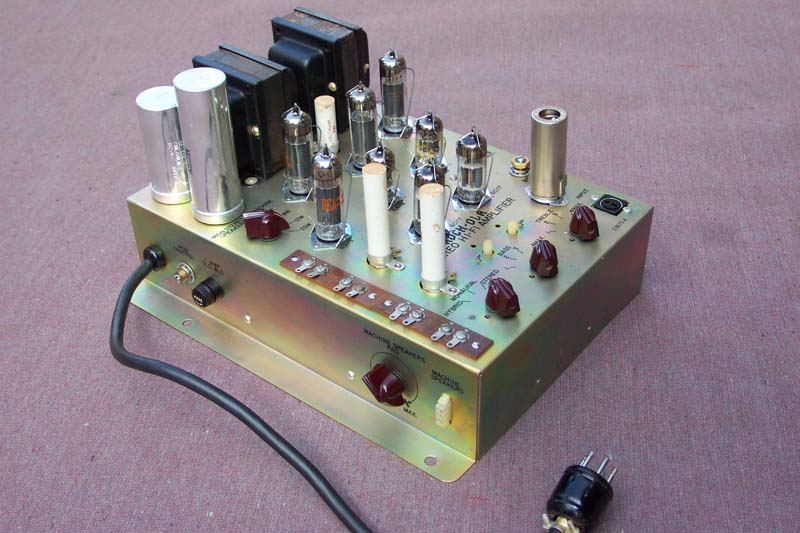
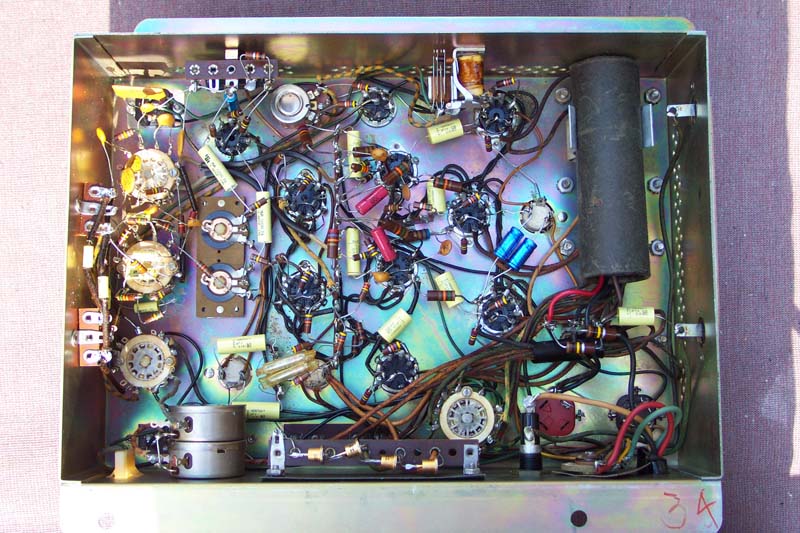
US Verstärker 33875-A
|
|
US Amplifier 33875-A |
|
Fotos: M. Sommer
 |
|
Besonderheit
des Tempo 2 US-Stereo-Verstärkers (links): Phasenverdrehter
Anschluss des Tonabnehmers
Das Vertauschen der Phasen des Tempo-II Tonabnehmers war deshalb
notwendig, weil Rock-Ola die Gerätelautsprecher ab der Tempo-II
bis Empress und Princess (1493) in Mono betrieben hat, davon
unabhängig und unbeeinflusst aber Stereowiedergabe über die
Zusatzlautsprecher möglich sein sollte (Stellung Hybrid des
Betriebsartenschalters).
Zur Erzielung der passenden Lautstärke für die
Geräte-Monolautsprecher wurde dann das Signal des einen Kanals
in halbierter Stärke mit dem ebenso halbierten Signal des
anderen Kanals addiert (einfach erklärt); man konnte also
rückwirkungsfrei zusätzlich jeden Kanal mit voller Signalstärke
zur stereophonischen Wiedergabe abgreifen.
Wegen Massebezug der Ausgänge war dieser Kunstgriff nur mit
phasengedrehtem Eingangssignal machbar. Ab Modell Regis fanden
wicklungstechnisch geänderte Ausgangsübertrager Anwendung, daher
konnte die Phasendreherei entfallen.
Weitere Infos Verstärker Tempo 2 |
|
Characteristic
of Tempo 2
US-Stereo-amplifier (left): Inverted connection of the cartridge
phases
The phase inversion with Tempo II cartridges was needed
because Rock-Ola operated the speaker inside the jukebox from
Tempo II up to Empress and Princess (1493) in mono, but wanted
to operate the extra speakers in stereo (position hybrid of the
operating switch).
To get the right volume out of the built-in mono speakers the
signal of one channel was devided in half and added to the also
devided in half signal of the other channel (explained in a
simple way); so it was possible to grip each channel
individually with whole volume for stereophonic playback.
Due to ground of the outstages this manipulation was only
possible by inverting the input signals. From Regis and up other
output transformers were used which did not require the
inversion anymore.
More info amplifier Tempo 2 |
|
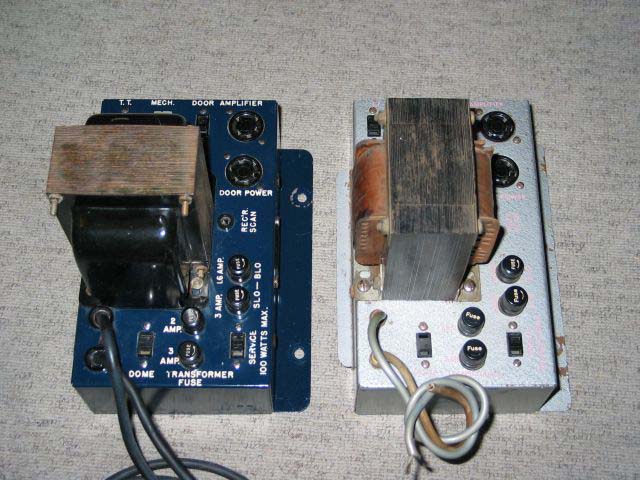
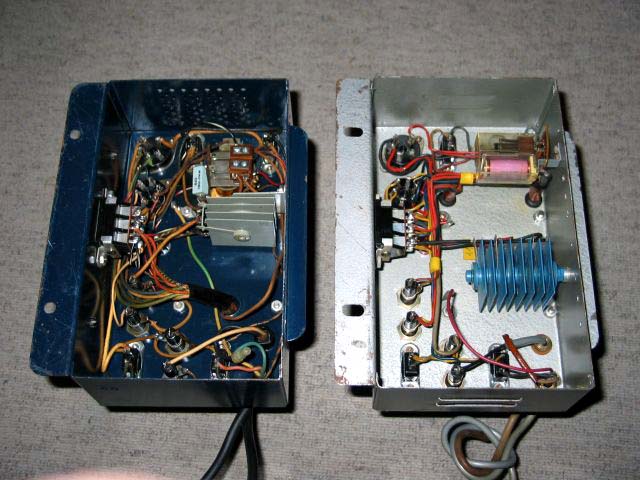
Netzteil - US
|
|
Power Supply - US
|
|
 |
|
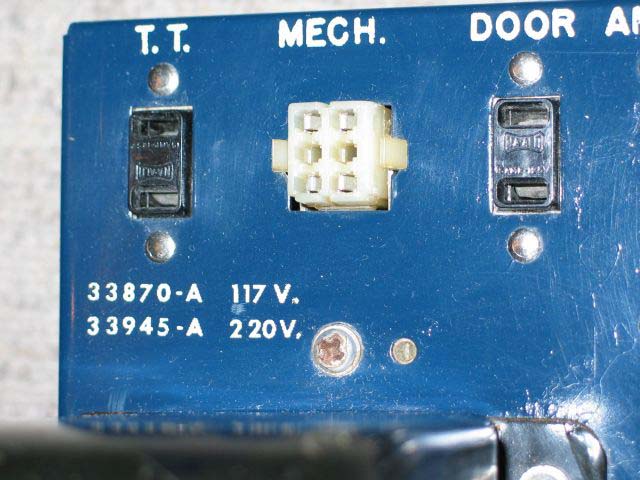
Netzteil US (links) und Deutsch (rechts)
|
|
Power Supply US (left) and German (right)
|
|
 |
|
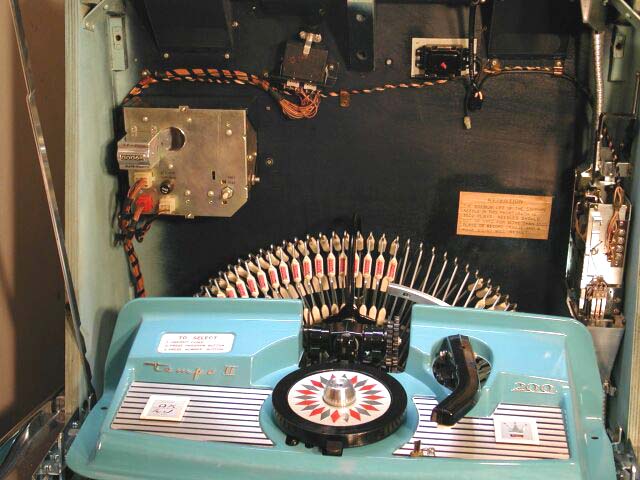
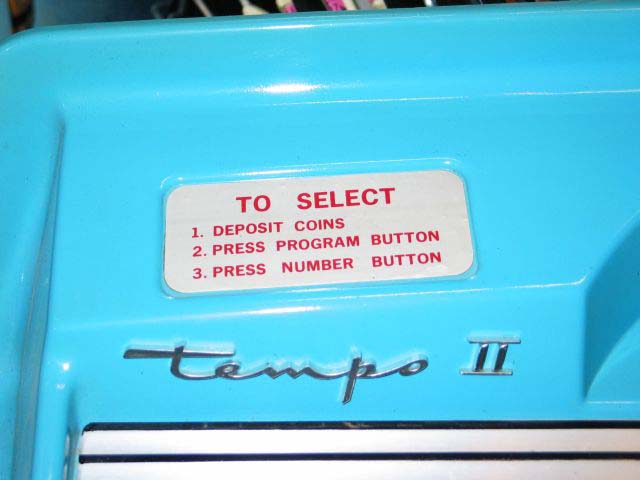
US Beschriftung Mechanismusabdeckung - für Wahl durch Kategorie- und
Buchstabentaste
|
|
US Mech Cover insert - for selection by program
categorie and number
|
|
 |
|
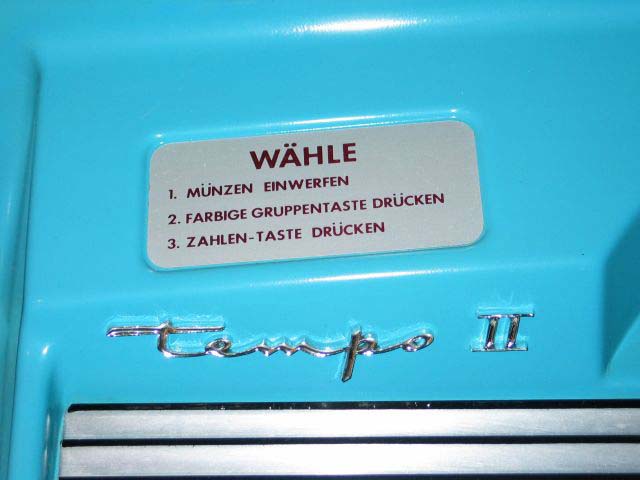
Deutsche Beschriftung Mechanismusabdeckung
für Wahl durch Kategorie- und Bustabentaste
|
|
German Mech Cover insert - for selection by
program categorie and number
|
|
 |
|
|
|
|
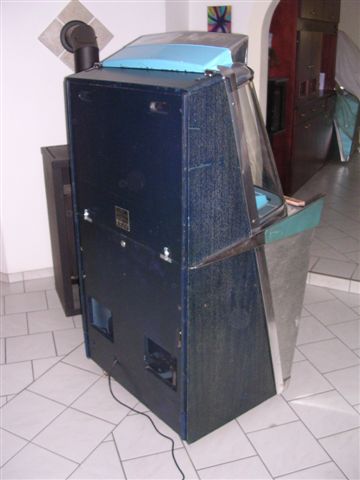
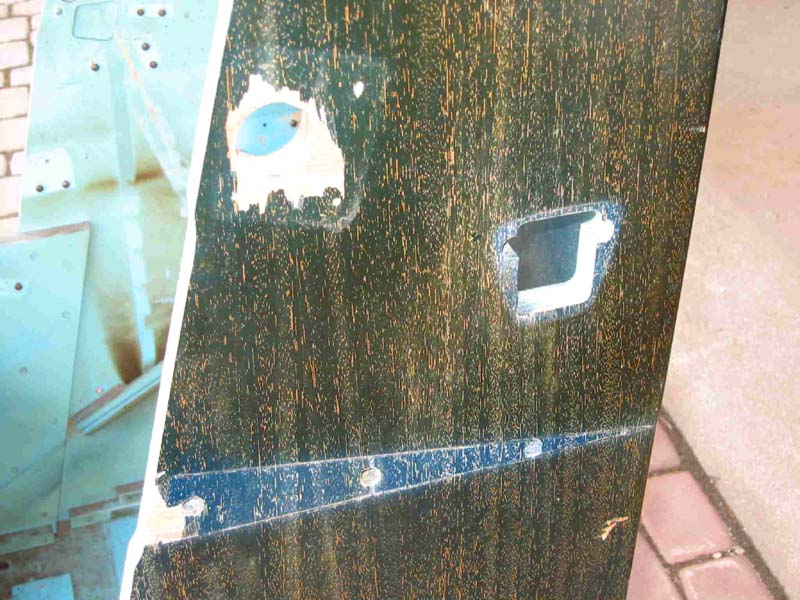
Ist das Gehäuse der Tempo II schwarz oder
blau? |
Is the cabinet of Tempo II black or
blue? |
|
Auf dem Bild erkennt man deutlich, dass es
ursprünglich blau war, aber im Laufe der Jahre durch Nikotin, UV-Licht
usw. verfärbt ist schwarz wirkt. Die Poren sind durch eine helle Farbe hervorgehoben.
Dafür kann man RAL 1015 recht gut verwenden, ein schneeweißer Farbton
würde zu neu aussehen. |
|
The photo below shows clearly
that it was blue originally, but discoloured by nicotine and UV within
the years and seems to be black. The pores are highlighted with a light
colour. Therefore RAL 1015 ca be used, a snow white colour would appear
too new. |
|
Bild: Christian Schrammel
 |
|
Aufarbeitung dieser
Holzmaserung
Weitere Farben,
die dem original nahe kommen:
-
Blechteile innen:
VW/Audi mauritiusblau LY 5A *
-
Greifmechanismus, Tonarm, Plattenteller: glänzend schwarz
-
Maserung: in etwa RAL 1015 oder 9001
*
Hinweis:
Farbtöne verändern sich im Verlauf von 50 und mehr Jahren, und ehemals gleiche
Farben "vergilben" verschieden. Je nach Untergrund scheint es so,
dass die Plastikteile andersfarbig als die Metallteile sind. Somit
sind vorgefundene alte Farbtöne nur bedingt als Referenz geeignet.
Farbangaben ohne Gewähr; sie sind Richtwerte,
Empfehlungen bzw. Erfahrungswerte versch. User des Forums und kommen dem
Originalfarbton nahe. In der Regel empfiehlt es sich, anhand eines
gut erhaltenen Originalmusters den Farbton gezielt bei einem
Lackierer oder Farbenfachgeschäft mischen zu lassen. So kann der
Farbton an die übrigen Farben der Jukebox angepasst werden, ohne
dass es "zu neu" aussieht.
Gut erhaltene Farbtöne finden sich i.d.R. unter Leisten,
Abdeckungen, Profile usw., also dort, wo Licht und Nikotin nicht
hinkommen.
|
|
Refurbishing the
wood grain
Other
colours which are close to the original ones:
-
Inside metal parts:
VW/Audi mauritiusblau LY 5A *
-
Gripper
assembly, tone arm, turntable: Glossy black
-
Wood grain: About RAL 1015 or 9001
*
Note:
Colours change
within 50 and more years, and colours that used to be the same "yellowing"
resp. aging differently. Depending on the surface, it appears
that the plastic parts have a different colour than the metal
parts. Old colors found are therefore only spartially suitable
as a reference.
Colour specifications without guarantee; they are reference
values, recommendations resp. experience values of various forum
users and come close to the original colour. As a rule, it is
advisable to have the color shade mixed by a painter or paint
store using a well-preserved original sample. In this way, the
colour can be matched to the other colours of the jukebox
without it looking "too new".
Well-preserved colours can usually be found under strips, covers,
profiles, etc., i.e. where light and nicotine cannot reach. |
|
|
|
|
Ausbeulen der
Pilaster bei Tempo 1 und Tempo 2: |
Planishing pilasters of Tempo 1 and Tempo 2 |
|
Bei meiner Tempo sind
die metallenen Seitenteile von vorne und seitlich etwas eingedrückt.
Hat jemand Erfahrung mit der Beseitigung dieser Dellen (ausbeulen),
ohne dass weder die Seitenteile noch die Farbe
der Eloxierschicht (weiteren) Schaden nehmen?
Antwort: Wenn Du die Säulen links und rechts neben dem
Lautsprechergitter meinst, hilft nur auseinanderbauen und die Beulen
von innen mit einer Platte und einem Hammer ausdrücken. Für die
vorderen Rundungen habe ich ein Rundholz (Besenstiel) genommen und
dadurch die Rundungen wieder hinbekommen.
|
|
The metal side
pilasters of my Tempo are slightly dented at the front and sides.
Does anyone have experience of removing these dents (planishing)
without causing (further) damage neither to the pilasters nor to the
colour of the anodized layer?
Answer: If
you mean the pilasters to the left and right of the loudspeaker
grille, the only helpful way is to take them apart and press out the
dents from the inside with a plate and a hammer. For the front
curves, I used a round piece of wood (broomstick) and managed to get
the curves right again.
|
|
|
|
|
Ausbau der Lautsprecher |
Removal of speakers |
|
Um an die Lautsprecher zu kommen,
nimmt man die Rückwand ab und am besten die ganze Mechanik heraus.
So kommt man besser an die Lautsprecher um sie loszuschrauben und heraus
zu nehmen.
Oftmals kleben die Lautsprecher noch nach dem Abschrauben an der Pappdichtung fest.
Um diese nicht zu beschädigen, kann man mit einem Cuttermesser mit
neuer langer Klinge direkt am Schallwandholz, also zwischen
Schallwand und Pappdichtung herum fahren und so die klebende
Pappdichtung lösen, ohne die Pappmembran des Lautsprechers zu
beschädigen.
Die Schraube hinter der
Kassenbox geht durch. Diese nach vorne herausnehmen, sonst bekommt
man die Lautsprecher nicht am Gehäuse
vorbei. Oft drehen sich die eingeschlagenen
Schrauben mit, die können aber mittels eines Schraubendrehers
festgehalten werden.
An der Verkabelung hängt auch die Weiche mit dran, die sollte in dem
Zusammenhang auch gleich mit überholt werden. |
|
To access the
speakers, remove the rear panel and - ideally - take out the entire
mechanism. This makes it easier to reach the speaker to unscrew and
remove them.
The speakers are often still stuck to the cardboard seal after being
unscrewed. To avoid damaging it, you can run a cutter knife with a
new (long) blade directly around the baffle wood, i.e. between the
baffle and the cardboard seal, to loosen the stuck cardboard seal
without damaging the cardboard membrane of the speaker.
The screw behind
the cash box goes through. Remove it towards the front, otherwise
you will not be able to get the speakers past the housing. The
screwed-in screws often turn too, but can be held in place with a
the help of screwdriver.
The crossover is also connected to the cabling and should be
overhauled at the same time. |
|
|
|
|
Anschluss der Lautsprecher |
Connection of speakers |
|
|
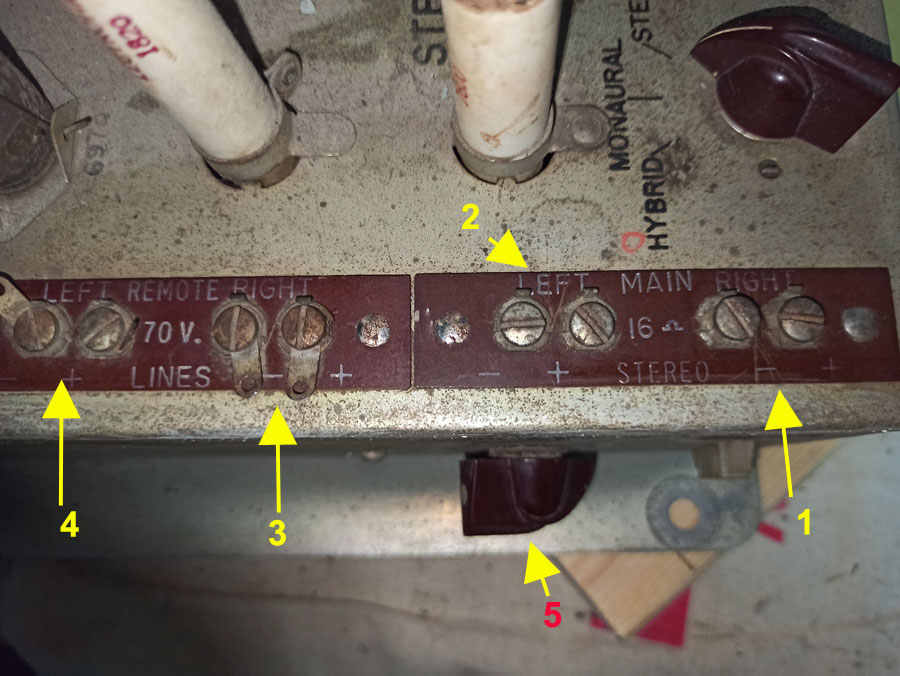
Die internen Lautsprecher sind nur
für Monobetrieb und werden normalerweise am "Machine Speaker"
Anschluss angesteckt (Stecker rechts neben dem "Machine Speaker Pad").
Das Pad wird voll aufgedreht, der Power Schalter steht auf 25W und
der Funktionsschalter auf "Monaural". So bekommen die internen
Lautsprecher die volle Leistung. Voraussetzung damit das ganze
richtig funktioniert ist die Verwendung eines Tonabnehmers bei dem
an einem Kanal die Phase gedreht ist. Der
Verstärker muss auf beiden Kanälen einwandfrei funktionieren und gut
abgeglichen sein.
Die Anschlüsse 1 und 2 sind für Stereo Betrieb mit
Zusatzlautsprechern. Im Service Manual ist beschrieben wie die
Schalter eingestellt werden müssen, das hängt von der Anzahl der
externen Lautsprecher ab. Mit dem Pad kann das Lautstärkeverhältnis
zwischen Musikbox und externen Lautsprechern eingestellt werden.
Die "70V" Anschlüsse 3 und 4 sind für Lautsprecher mit eingebautem
Trafo, diese Technik wird für die Beschallung größerer Räume mit
mehreren Lautsprechern verwendet oder wenn die Leitung zu den
externen Lautsprechern besonders lang sein muss. |
|
The internal
speakers are for mono operation only and are normally connected to
the “Machine Speaker” connection (plug right hand of the “Machine
Speaker Pad”). The pad is turned up fully, the power switch is set
to 25W and the function switch is set to “Monaural”. This gives the
internal speakers full power. The precondition for this to work
properly is the use of a phase inverted cartridge (phase switched on
one channel). The amplifier must work perfectly on both channels and
be well balanced.
Connections 1 and 2 are for stereo operation with additional
loudspeakers. The service manual describes how the switches must be
set, depending on the number of external speakers. The pad can be
used to set the volume ratio between the speaker and the external
speakers.
The “70V” connections 3 and 4 are for loudspeakers with built-in
transformer, this technology is used for sound reinforcement in
larger rooms with several loudspeakers or if the cable to the
external loudspeakers has to be particularly long. |
|
|
|
|
Technische Daten - Specifications |
|
|
1478 |
1485 |
|
Wahlen / Selections |
120 |
200 |
|
Lampen / Lamps |
Cabinet: 2x TL 20W/24"/T12 |
Select: GE #44
Program buttons: GE # 81 (5x) |
Cabinet: 2x TL 20W/24"/T12 |
Select: GE #44
Program buttons: GE # 81
(7x) |
|
Gehäuse / Cabinet |
Moonlight blue
Gripper Assembly, tone arm, turntable: Glossy black
Metal parts inside of cabinet: VW/Audi mauritiusblau LY 5A
* |
Moonlight blue
Gripper Assembly, tone arm, turntable: Glossy black
Metal parts inside of cabinet: VW/Audi mauritiusblau LY 5A
* |
|
Verstärker / Amplifier |
33875-A: 4x 6973, 2x 6AN8, 2x 6CY7, 6CG7;
Potentiometer: 2x 25
KOhm
NOVA Amplifier |
33875-A: 4x 6973, 2x 6AN8, 2x 6CY7, 6CG7;
Potentiometer: 2x 25
KOhm
NOVA Amplifier |
|
Netzteil / Power supply |
33870-A: 117V
33945-A: 220V |
33870-A: 117V
33945-A: 220V |
|
Kreditgerät / Credit unit |
Standard: 33871-A |
Standard: 33871-A |
|
Kontollbox / Control box |
33844-A |
33844-A |
|
Lautsprecher / Speaker |
Jensen 12" 16 Ohm - #34087
Hochtöner:
34084-A |
Jensen 12" 16 Ohm - #34087
Hochtöner:
34084-A |
|
Tonabnehmer / Cartridge |
USA: Columbia SC-2S
Germany: Elac KST
105, often Elac KST103 |
USA: Columbia SC-2S
Germany: Elac KST
105, often Elac KST103 |
|
Sicherungen / Fuses |
Power Supply: 3A, 2A, 1.6A slo blo, 3A slo blo
Amplifier: 1A |
Power Supply: 3A, 2A, 1.6A slo blo, 3A slo blo
Amplifier: 1A |
|
Schlüssel / Key |
F-592 |
F-592 |
|
Abmessungen / Size |
76 x 153 x 70 cm / 29.875 x 59.875x
27.5";
1478: 140 kg / 308 lbs; 1485: 142 kg / 313 lbs |
76 x 153 x 70 cm / 29.875 x 59.875x
27.5";
1478: 140 kg / 308 lbs; 1485: 142 kg / 313 lbs |
|
Zubehör / Accessories |
Stereo-Twin: 1620, 1621, 1621-A
Stepper 1738 (120
sel.)
Wallbox 1555
|
Wall Box Bar Bracket 1541
Remote Vol.
Control 1927
(mono), 1950 (stereo)
|
Stereo-Twin: 1620, 1621, 1621-A
Stepper 1755 (200 sel)
Wallbox 1555
|
Wall Box Bar Bracket 1541
Remote Vol.
Control 1927
(mono), 1950 (stereo)
Dual Credit Unit |
|
Besonderheiten / Features |
25th Anniversary
model |
25th Anniversary
model |
|
Produktionszahl / Production: |
1478 & 1485: approx. 10,000 |
1478 & 1485: approx. 10,000 |